Google Sheets is a powerful spreadsheet app that you use through your web browser. It stores your spreadsheets in the cloud with Google Drive. Anyone with a Google account can use Sheets and Drive for free. Both are also part of Google Workspace (formerly G Suite), Google’s subscription office suite for business and enterprise customers. There are Google Sheets mobile apps for Android and iOS, too.
This guide will teach you how to start a new spreadsheet in the Sheets web app or upload one you already have stored on your PC, including a Microsoft Excel spreadsheet. It also goes over the basic interface and unique features of Sheets, such as how to share your spreadsheets and collaborate on them with others.
Create or open a spreadsheet
To start a new spreadsheet or load one you’ve already saved in Google Drive, you’ll need to log in to your Google or Workspace account. Then:
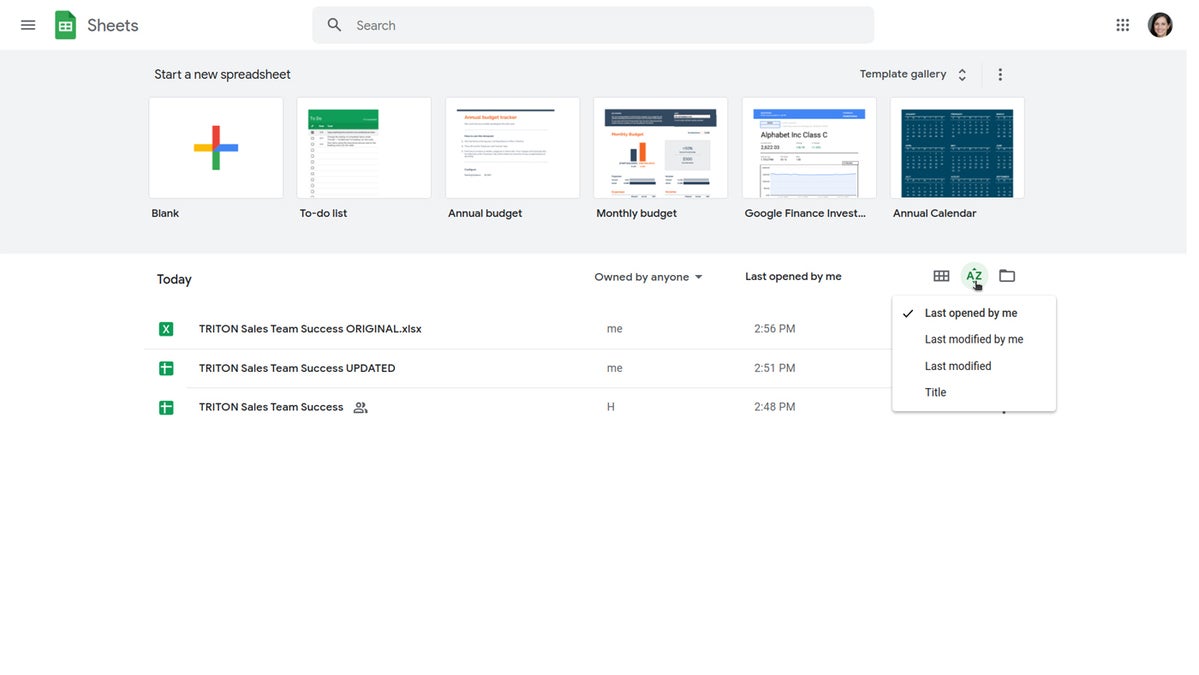
From Google Sheets: At the top of the Sheets home page, you’ll see a “Start a new spreadsheet” header, with a row of thumbnails underneath. To start a new, blank spreadsheet, click the Blank thumbnail or select a template from the thumbnails to the right. To see more templates, click Template gallery toward the upper-right corner; click any thumbnail to start a new spreadsheet in that template.
 IDG
IDG
The Google Sheets home page. (Click image to enlarge it.)
Below the thumbnails you’ll see a list of spreadsheets stored in your own Google Drive or shared with you. To open a spreadsheet, click it.
This list appears in reverse chronological order starting with the spreadsheet you most recently opened. Clicking the “AZ” icon at the upper right of this list changes the sort order to Last modified by me, Last modified, or in alphabetical order by spreadsheet title. You can also browse to a specific folder by clicking the folder icon next to the “AZ” icon.
Finally, you can use the search box at the top to find spreadsheets in Google Drive. Enter words or numbers that may be in the spreadsheet you're looking for.
From Google Drive: Spreadsheets stored in your Google Drive are listed in the main window of the Drive home page. To see a listing of spreadsheets that others are sharing with you, click Shared with me from the left column. From either list, double-click a spreadsheet to open it in Google Sheets. You can also use the search box at the top of the page.
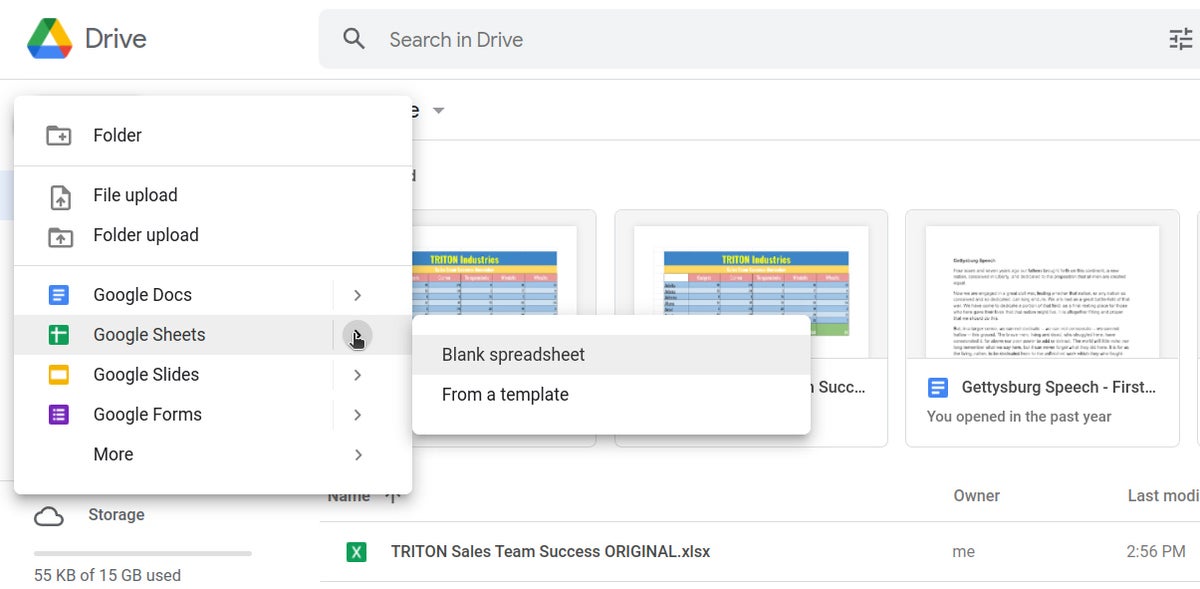
To start a new blank spreadsheet, click the New button at the upper-left of the screen and then click Google Sheets.
If you want to use a template to start a new spreadsheet: Click the New button, then select Google Sheets > From a template. The template gallery for Google Sheets will open; click a thumbnail to start a new spreadsheet in that template.
 IDG
IDG
Creating a new spreadsheet from Google Drive. (Click image to enlarge it.)
Upload a Microsoft Excel spreadsheet for editing in Google Sheets
If you want to edit a spreadsheet that’s not already stored in your Google Drive, you must first upload it to Drive. You can do this from either Sheets or Drive.
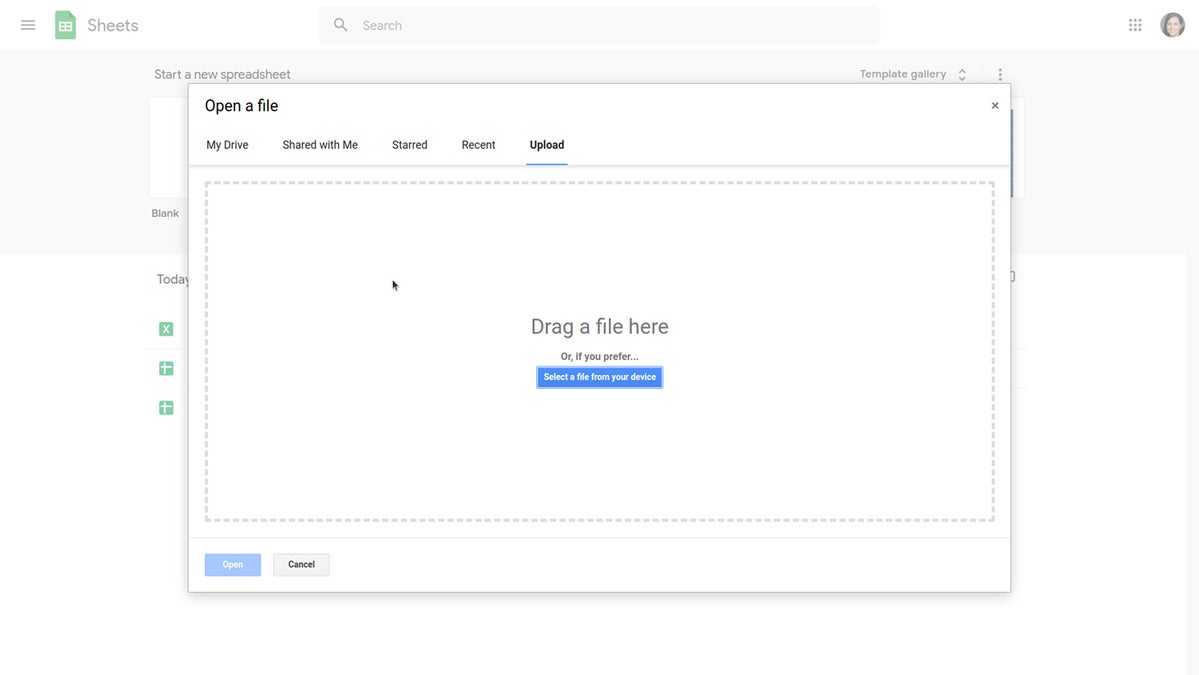
From Google Sheets: Click the folder (“Open file picker”) icon that's at the upper-right of the spreadsheets list. On the panel that opens, click the Upload tab. Drag-and-drop your Excel file (.xls or .xlsx) onto this panel, or browse your PC’s drive to select it and click Open.
 IDG
IDG
To upload an Excel spreadsheet, drag the file onto this panel or browse to it on your hard drive. (Click image to enlarge it.)
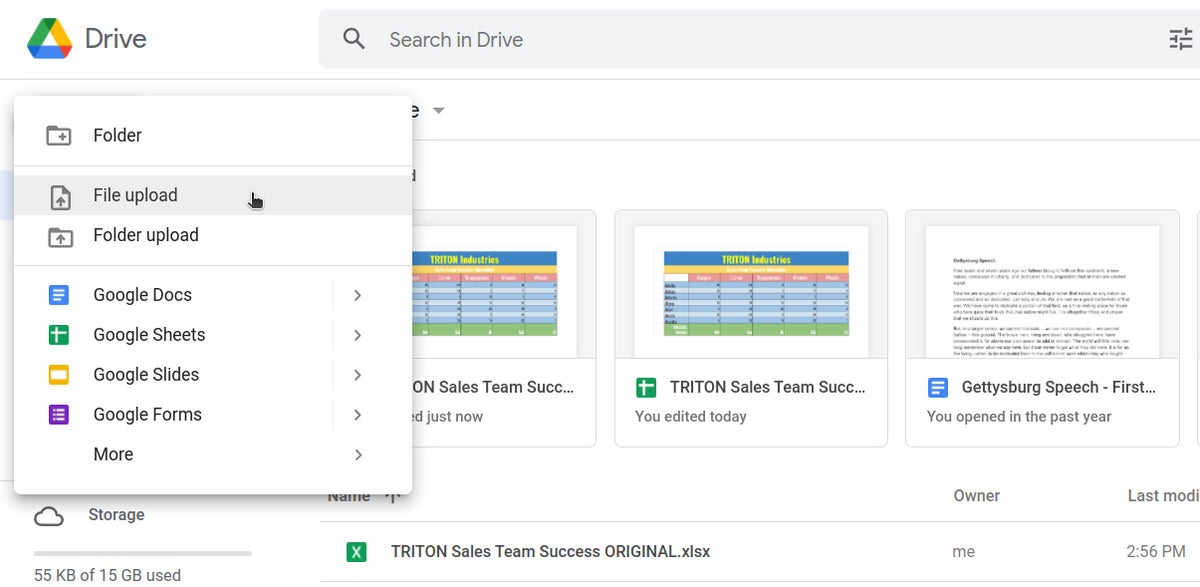
From Google Drive: Click the New button, then File upload, and select the Excel file from your PC’s drive and click Open.
 IDG
IDG
Uploading a spreadsheet in Google Drive. (Click image to enlarge it.)
Traditionally, when you uploaded Excel files to Google Drive, they were automatically converted to Sheets format. That’s still the case when you upload Excel files via the Google Sheets home page.
However, Google also supports the ability to edit Microsoft Office files in their native format. By default, any .xlsx files that you upload via Google Drive will remain formatted as Excel documents. You can edit and collaborate on an Excel file right in Sheets, with all changes made by you or your collaborators saved directly to the Excel file. On the Google Sheets and Drive homepages, native Excel files will be denoted with a green “X” icon, and when you open a native Excel file in Sheets, you’ll see an “.XLSX” flag to the right of the document title.
 IDG
IDG
Microsoft Excel-formatted files show the Excel icon (top) instead of the Google Sheets icon (bottom).
If you’d rather have Google convert Excel files to Sheets format automatically when you upload them via Google Drive, click the gear icon in the upper-right corner of the Drive home screen and select Settings from the drop-down menu. In the Settings box next to “Convert uploads,” check the checkbox marked Convert uploaded files to Google Docs editor format.
To convert Excel macros to Google Sheets: If an Excel file you’re converting to Sheets format contains VBA (Visual Basic for Applications) code, which is used for macros, and you’re subscribed to a Google Workplace Enterprise Plus plan, install the Macro Converter add-on for Google Sheets. This will do as its name implies: convert your Excel file’s VBA code to the App Script format that Google Sheets uses, so that you can execute these macros in your spreadsheet when it’s loaded into Google Sheets.
Work in a spreadsheet
When you open a spreadsheet in Google Sheets, here’s what you see:
Your spreadsheet’s title appears along the top of the screen. To change it, click anywhere inside the title and start typing.
 IDG
IDG
The Google Sheets editing interface. (Click image to enlarge it.)
The menu bar is just below the spreadsheet’s title and includes the following drop-down menus:
- File has commands for taking action on the whole spreadsheet, including Print, Rename, and Share.
- Edit contains quick tools for deleting columns or rows.
- View controls how you see the spreadsheet, such as showing/hiding formulas, freezing rows or columns, and grouping together columns or rows.
- Insert lets you insert cells, columns, or rows; graphical elements such as charts and images; and other items such as functions, comments, and checkboxes.
- Format has the same tools as the toolbar that’s directly below the menu bar (described below), plus commands for conditional formatting and alternating colors.
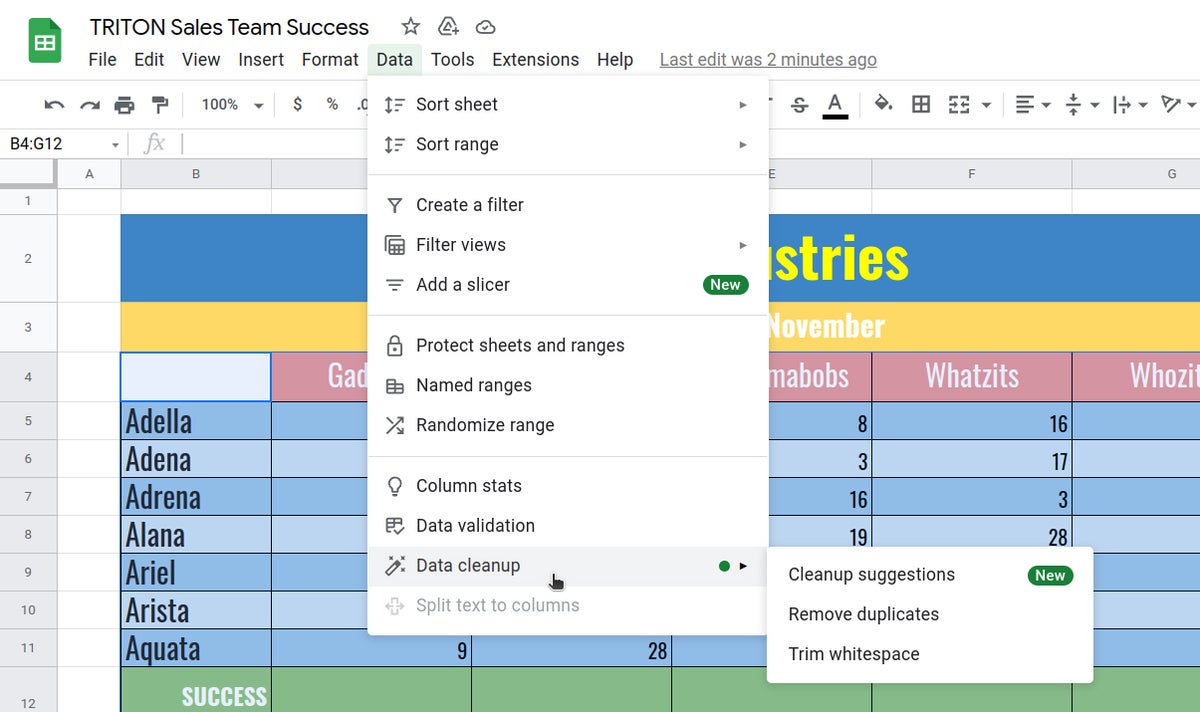
- Data has tools for sorting a range of columns in alphabetical order, creating a filter, protecting sheets and ranges, and validating and data.
- Tools leads to miscellaneous items such as creating a form and running spell-check.
- Extensions lets you work with add-ons, macros, scripts, and apps.
 IDG
IDG
The data menu includes tools for sorting, filtering, validating, and cleaning up data. (Click image to enlarge it.)
The toolbar is directly above your spreadsheet and has buttons for formatting the numbers and text in a cell. These include changing its number format (e.g., currency, date, percent) and font (type, size, style, color). Other buttons on this toolbar let you change the background color of a cell, merge cells, and adjust the horizontal or vertical alignment of numbers or text in a cell.
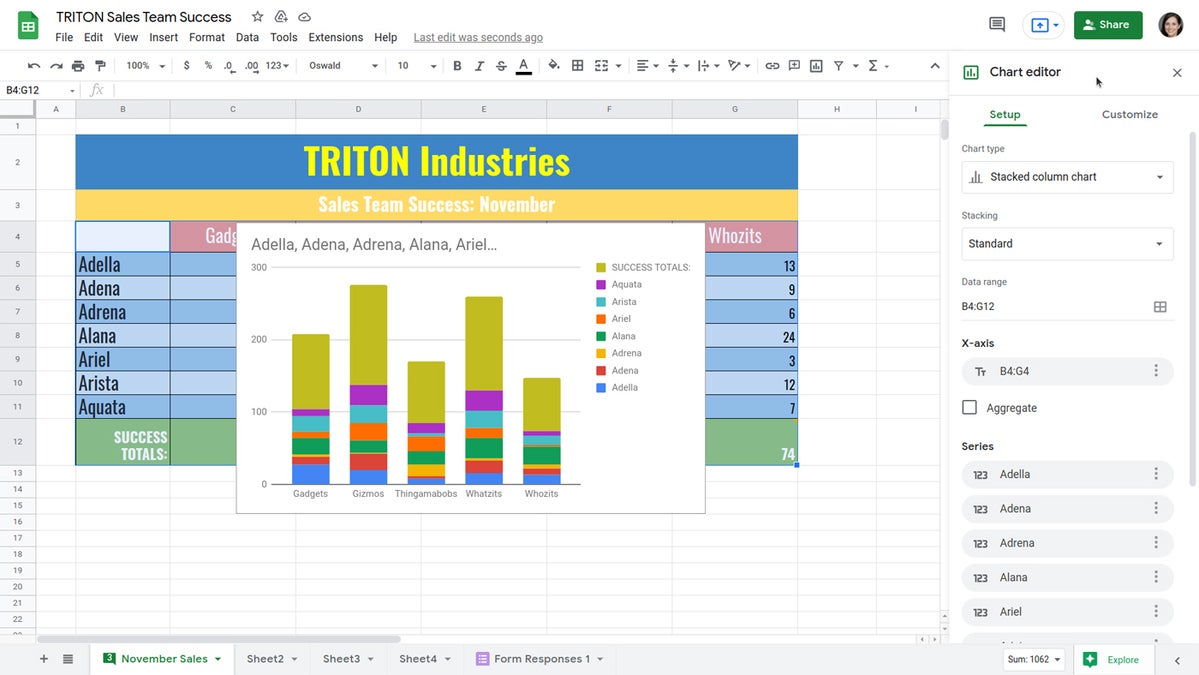
To insert a chart, click the Insert chart button toward the right end of the toolbar. This opens a sidebar from which you can select a preset chart or click the Customize tab to create your own chart.
 IDG
IDG
Inserting a chart in Google Sheets. (Click image to enlarge it.)
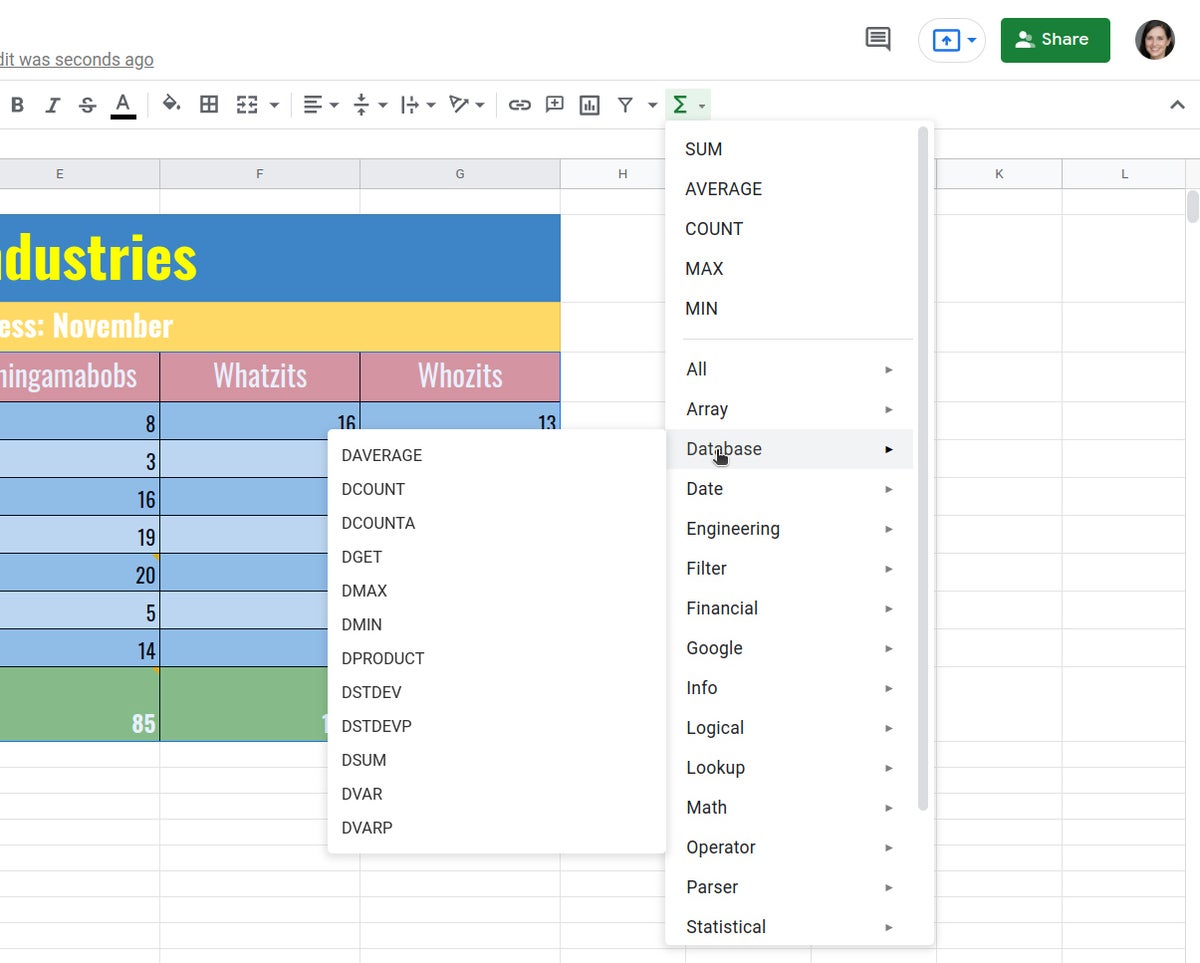
To insert a formula, click the Functions button at the very end of the toolbar. This opens a drop-down menu of formulas (a.k.a. functions) that Google Sheets supports. Click through the categories to find the formula you want. Once you find it, click the formula to insert it inside the cell where you’ve set the cursor. For a complete list of formulas/functions that work in Google Sheets, see the official Google Sheets functions list.
 IDG
IDG
Inserting a formula in Google Sheets. (Click image to enlarge it.)
Manage multiple sheets in a spreadsheet
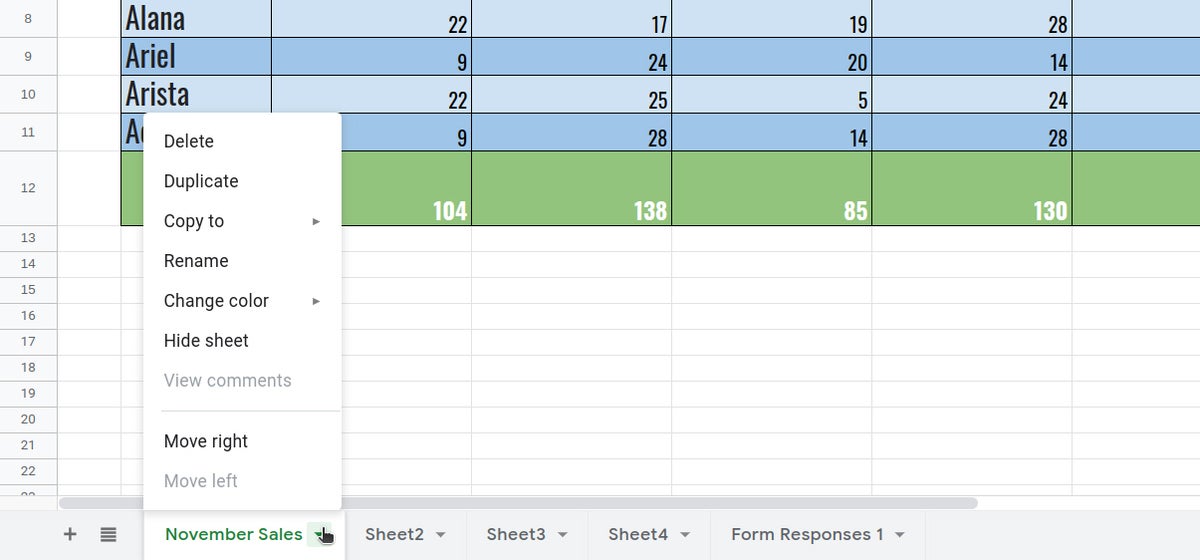
Each page of your spreadsheet is represented as a tab along the bottom of the screen. Clicking one of these tabs shows you its corresponding sheet on the screen.
To add a new, blank sheet to your spreadsheet: Click the “+” at the lower-left corner.
To delete or rename a sheet: Click the down arrow on the sheet’s tab. From the menu that opens, select Delete or Rename.
To change the page order of your sheets: Click-and-hold a sheet’s tab, drag it left or right to another spot in the row of tabs, and release it.
 IDG
IDG
Use the tab menu to delete, duplicate, copy, rename, or move a sheet. (Click image to enlarge it.)
Select a color theme for your spreadsheet
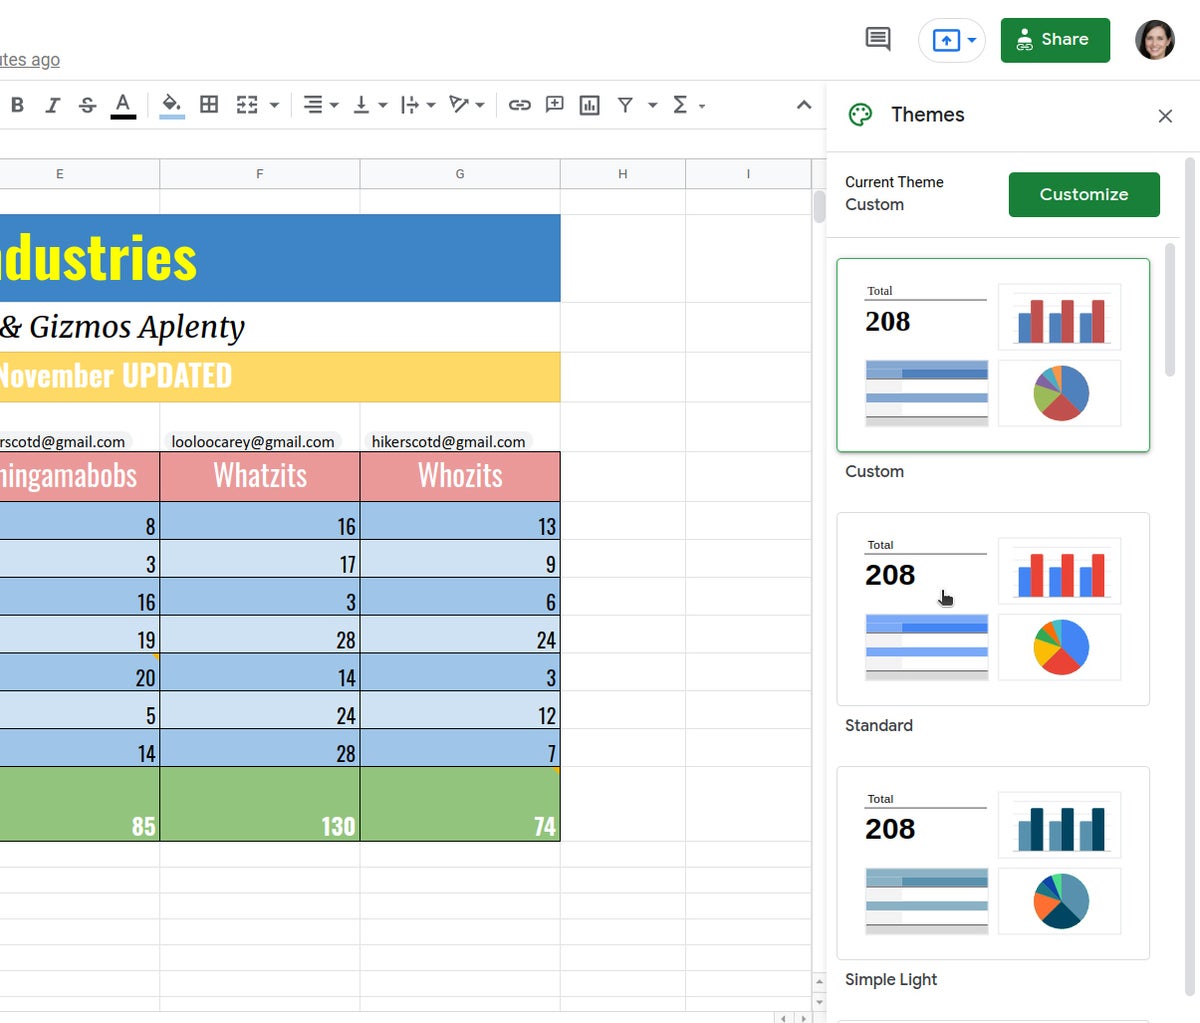
On the menu bar along the top of the screen, click Format and select Theme. A sidebar will open along the right, showing you several large thumbnails of themes. Scroll through the list and click the thumbnail for the one that you want to use for your spreadsheet. You can apply a theme to a new blank spreadsheet or to one that already has a design.
 IDG
IDG
Applying a theme to a spreadsheet. (Click image to enlarge it.)
Get assistance as you enter data
As you’re entering formulas into cells, Google Sheets may make corrections to your formula (if it thinks you’ve made a mistake), or fill in cells with suggested adjustments to your formula. For example, if you’re entering the same formula cell-by-cell down a column, yet changing the formula to correspond with the row number, Sheets may automatically insert your formula into the cells further down the column and apply what it predicts would be your succeeding adjustments to this formula.
This intelligent assistance is on by default, but if you find that it gets in your way, you can turn it off: On the menu bar along the top of the screen, click Tools > Autocomplete and deselect Enable formula suggestions and Enable formula corrections.
 IDG
IDG
If Sheets’ formula suggestions aren’t working for you, you can disable them. (Click image to enlarge it.)
Share a spreadsheet
When you’re viewing your spreadsheet in Google Sheets, click the green Share button at the upper-right.
Or, from your Google Drive homepage, click to highlight the spreadsheet that you want to share. Then, toward the upper right of the page, click the Share icon (a headshot silhouette with “+”).
Through either method, the “Share with people and groups” panel will open.
 IDG
IDG
Setting permissions for a file being shared privately. (Click image to enlarge it.)
Share a spreadsheet privately
In the entry box, enter the email addresses (or names of your Google Contacts) of the people with whom you want to share. You can also type a brief message to them. By default, the people you invite to your spreadsheet can edit it and reshare it with others.
To change access permissions for invitees: Click Editor to the right of the entry box and choose another option from the drop-down menu. Commentor means they can view your spreadsheet and add comments but can’t change it. Viewer means they can view your spreadsheet but can’t edit it or add comments. This setting applies to everyone you’re currently inviting to the document.
To prevent your spreadsheet from being reshared, downloaded, or printed: Click the gear icon at the upper-right of this panel. On the smaller panel that opens, uncheck the boxes by “Editors can change permissions and share” and “Viewers and commenters can see the option to download, print, and copy.”
When you’re done setting permissions, click Send, and everyone you’ve added will receive an email with a link they can click to access the document.
To limit or change a person’s access to your spreadsheet: Click the Share button to bring up the “Share with people and groups” panel again. It shows a list of all the people you’ve invited, along with their permission status. Click the down arrow to the right of a person’s name, change their permission level or remove their access entirely, and click Save.
 IDG
IDG
You can change permissions for people you’ve shared a spreadsheet with on an individual basis. (Click image to enlarge it.)
If you have a Google Workspace subscription, another option here is to select Give temporary access and, next to “Access expires,” select a date within one year of the current date. If you set an expiration date for a person that you’ve assigned as “Editor,” their access will be downgraded to “Commenter” on the expiration date.
Note: A spreadsheet you’ve shared (or that others have shared with you) will have an icon of two silhouetted heads next to it in the spreadsheet list on your Google Sheets and Google Drive home pages.
 IDG
IDG
Shared spreadsheets show a “shared” icon in file listings.
Share a spreadsheet publicly
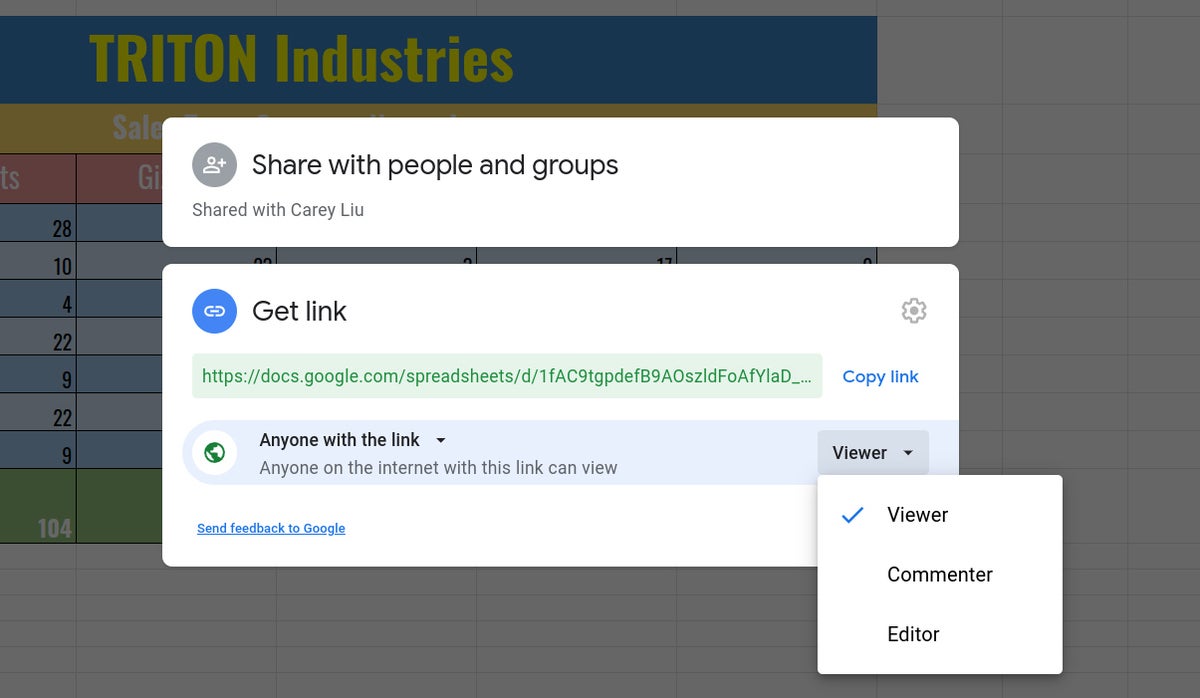
At the bottom of the “Share with people and groups” panel is a “Get link” area where you can copy the link to the document. By default, this link is restricted to those you invite to the document. To change it to a public link, click Change to anyone with the link. A link to your document will be generated.
Click Copy link and the link will be copied to your PC’s clipboard. You can then share this link by pasting it into a chat message, document, email, forum post, or most other means of online written communication. Anyone who clicks this link will be able to view your spreadsheet online. (Be aware that anyone can copy and reshare the link.)
 IDG
IDG
Generating a public link to a spreadsheet. (Click image to enlarge it.)
To allow anyone in the public to comment on or edit your spreadsheet: At the bottom right of the “Get link” area, click Viewer and select Commenter or Editor from the drop-down menu. Then click the blue Done button. Now the web link to your spreadsheet will let anyone who clicks it add a comment to your spreadsheet or edit it.
To turn off public sharing for your spreadsheet: Bring up the “Share with people and groups” panel again. On the lower-left corner, click Change. Then on the expanded “Get link” panel, click Anyone with the link, select Restricted, and click the Done button.
Note: You can apply both public and private sharing methods to your spreadsheet. For example, you could allow the public to only view your spreadsheet, but allow specific people that you’ve invited to comment on or edit it.


