For tracking to-do activities, from project milestones to simple office errands, a task list manager like Google Tasks is helpful. Tasks lets you set to-do activities (tasks) and be reminded about them through notifications on your PC or phone at days and times you specify.
What sets Tasks apart from other to-do apps is that it’s integrated with the apps in Google Workspace, including Gmail, Google Calendar, Google Docs, and more. That makes it easy to access and work with throughout your day. And Gmail, Google Chat, and Google Calendar all offer special features that tie into Tasks.
Using Google Tasks is simple. But it’s quite powerful when you understand its full capabilities. Let’s get started.
Accessing Google Tasks
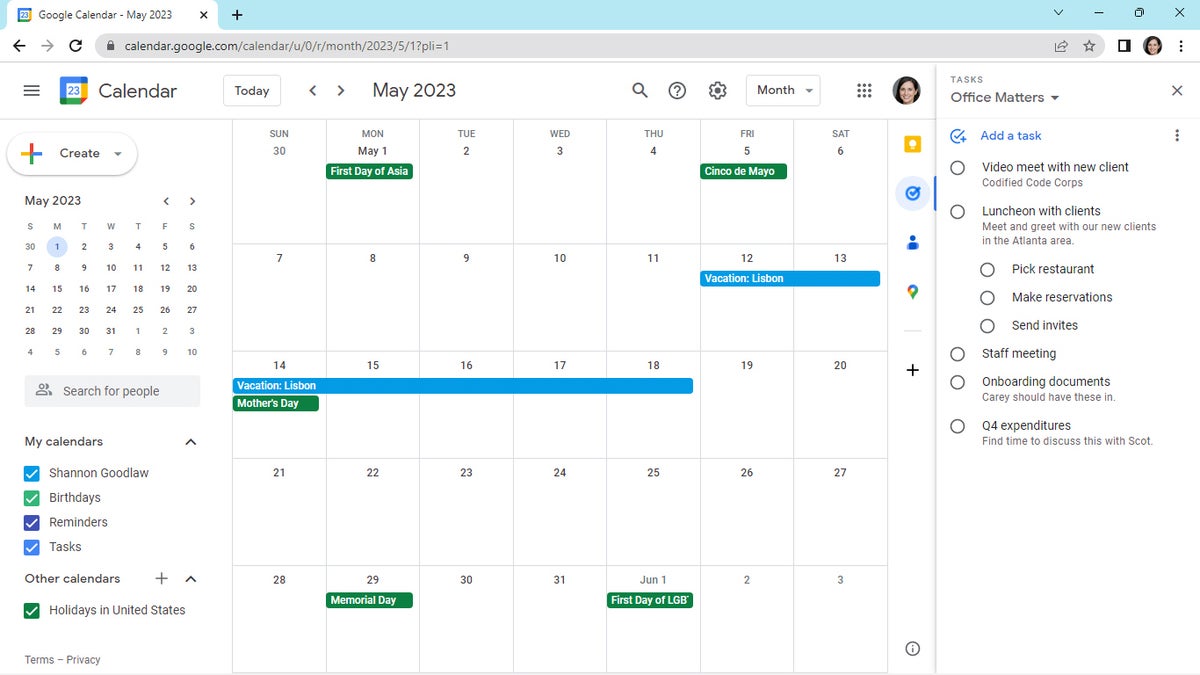
When you’re using a Google Workspace app through your web browser, the icon for the Tasks app is on the thin vertical toolbar along the right side of the screen. Click the blue circle with a checkmark. This will open the Tasks sidebar to the right (and shift the toolbar toward the left).
 IDG
IDG
Click the Tasks icon at the far right of Calendar or any Workspace app, and the Tasks sidebar will appear. (Click image to enlarge it.)
You can access Tasks this way from the following Google Workspace apps: Calendar, Chat, Gmail, Docs, Drive, Sheets, and Slides.
Note: If you do not see the toolbar with the Tasks app icon, click the < at the lower-right corner. The toolbar will slide in from the right.
Mobile: Google Tasks is also available as an app for Android, iPad, and iPhone.
Adding tasks and building a task list
 IDG
IDG
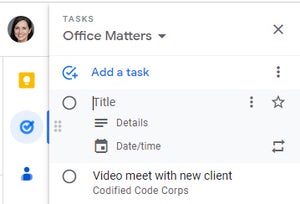
Click Add a task, then type in a task title and (optionally) details about the task.
To create a new task: On the Tasks sidebar, click Add a task. Next, in the “Title” line, enter a name for the task. If you want, you can enter more information about this task in the “Details” line below.
Click somewhere else on the screen (such as the top of the Tasks sidebar) to set your new task as the first one on what is now your default task list.
To build a task list: Repeat the steps above to add more tasks.
To rearrange the tasks in the list: Move the pointer over a task you want to move, click-and-hold it, drag the task down or up the list, and then release your mouse or touchpad button to set the task in its new place on the list.
You can also quickly move a task to the top of the list by moving the pointer over the task, clicking the three-dot icon to its right, and selecting Move to top from the menu that opens.
Adding subtasks
A subtask is indented toward the right on your task list, tucked underneath a main task. The subtask is one part of the overall task and meant to be completed before its main task.
 IDG
IDG
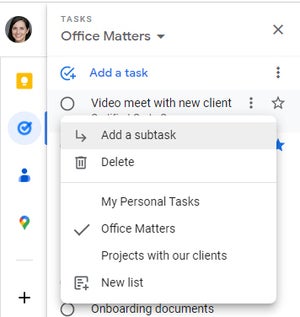
You can create a subtask that’s part of a main task.
To create a new subtask: Move the pointer over the task that you want the subtask to appear under. Click the three-dot icon to its right. From the menu that opens, select Add a subtask.
As when you create a regular task, you’ll be prompted to enter a name and other details for the subtask. In fact, you can do anything to a subtask that you can to a regular task, such as marking it complete or setting a notification for it, as described later in this guide.
To turn an existing task into a subtask: You can turn a task that’s already on your list into a subtask for the task above it. Move the pointer over the task. Click the three-dot icon to its right. From the menu that opens, select Indent.
If you want to change an existing task into a subtask for a task that’s not immediately above it, first drag-and-drop the task below the main task you want it to appear under.
To turn a subtask into a normal task: Move the pointer over the subtask, click its three-dot icon, and select Unindent from the menu.
Setting a notification for a task
You can select a day and time to receive a notification that will remind you about a task that you need to address. The notification will be sent as an email (through Gmail) and a card that appears while you’re using a Google Workspace app.
 IDG
IDG
You can set a date and time to receive a reminder about a task.
To set a task notification: Click the task on your task list that you want to set a notification for. Then click the Date/time icon that appears below the task’s name and description. A calendar panel will open over the Tasks sidebar. Click the date when you want to receive the task reminder. (Click the > to the right of the current month name to slide to coming months.)
Clicking the “Set time” box will open a panel showing a list of times in half-hour increments. Select the time you want to receive the notification. Alternatively, you can type in a time on the “Set time” box, and it can be specific down to the minute. Be sure to add an “a” or “p” at the end of the time, for “AM” or “PM.”
Click OK on the lower right to set the notification schedule for this task.
The instructions above are for when you want just a single notification about a task. You can also set up a repeating reminder. You can customize how often you get a notification, and the scheduling of these notifications can be extremely specific.
 IDG
IDG
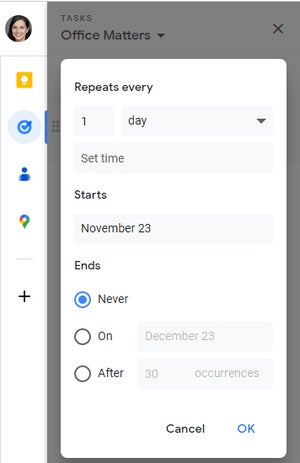
You can fine-tune the frequency of repeating task reminders.
To set and fine-tune a repeating notification: Click the task on your task list that you want to set a repeating notification for. Then click the Repeat icon (two arrows arranged as a square) to the right. This will open a panel over the Tasks sidebar.
Under “Repeats every,” you can click the first box to adjust whether you’ll get the notification every day, every two days, every three days, etc. – or you can click day to change this to week, month, or year. In the third box, you can click to set a time for the notification or change the time that you originally set. This will open the panel showing times in half-hour increments that you can select from, or you can just type in a new time.
Under “Starts,” you can set or change the date when you want to receive the notification. Clicking on the date shown will open the calendar panel over the Tasks sidebar, allowing you to select a new date.
Under “Ends,” you can select a date when you’ll stop receiving notifications for this task, or you can have the notifications stop after a certain number of times.
Click OK on the lower right to set the repeating notification schedule for this task.
Managing your tasks
To delete a task on your task list: Move the pointer over the task and click the three-dot icon to its right. From the menu that opens, select Delete.
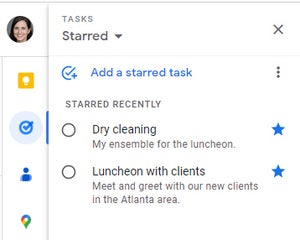
To prioritize a task on your task list: Move the pointer over the task and click the star icon to its right.
 IDG
IDG
Viewing your Starred tasks list lets you see only your most important tasks.
To view only tasks that you’ve starred: Toward the top of the Tasks sidebar, click the downward arrow to the right of your task list name. Then from the menu that opens, click Starred.
To change the sort order of your tasks: To the right of Add a task, click the three-dot icon. On the menu that opens, you’ll see three “Sort by” options. My order is selected by default. You can select Date or Starred recently to automatically change the order tasks appear in your task list.
To mark a task complete: When you’ve completed a task, click the circle to its left. This will remove it from your task list and place it in the Completed list.
To view your completed tasks: Click Completed at the bottom of the Tasks sidebar.
To return a completed task to your task list: Click the checkmark to its left.
 IDG
IDG
Click the trash can icon to remove a task from the Completed list.
To delete a completed task: Move the pointer over the completed task and click the trash can icon.
To delete all completed tasks at once: At the top of the task list, click the three-dot icon to the right of Add a task. From the menu that opens, select Delete all completed tasks.
Creating more task lists and managing them
You can create additional task lists, and even move a task from one list to another.
To create a new task list: Toward the top of the Tasks sidebar, click the downward arrow to the right of your task list name. From the menu that opens, click Create new list. A small panel will open prompting you to enter a name for your new task list.
When you click Done, your new task list will appear in the Tasks sidebar, ready for you to add tasks to it.
 IDG
IDG
You can create multiple task lists for different purposes and easily switch between them.
To switch to another task list: Toward the top of the Tasks sidebar, click the downward arrow again. From the menu that opens, select the name of another task list to switch to it in the Tasks sidebar.
To rename or delete a task list: Toward the upper right, click the three-dot icon to the right of Add a task. From the menu that opens, select Rename list or Delete list.
To reorder your task lists: Toward the top of the Tasks sidebar, click the downward arrow. From the menu that opens, move the pointer over the name of the task list that you want to move. A six-dot icon appears to its right. Click-and-hold this icon, drag the task list name down or up the list to where you want to move it, and release your mouse button or touchpad to set the task list name in its new place on the list.
To move a task from one task list to another: Move the pointer over the task in its current task list. Click the three-dot icon to its right. From the menu that opens, you’ll see a checkmark to the left of the name of the task list that this task is in. Click the name of another task list on this menu to move the task to that list.
Alternatively, you can select New list and enter a name for a new task list. This task list will be created, and your task will be moved to it.
Using Gmail and Google Chat with Google Tasks
You can turn any email in your Gmail account into a task. This can be helpful if you want to create a task to remind you to do something mentioned in an email. Similarly, you can turn a chat message from Google Chat into a task.
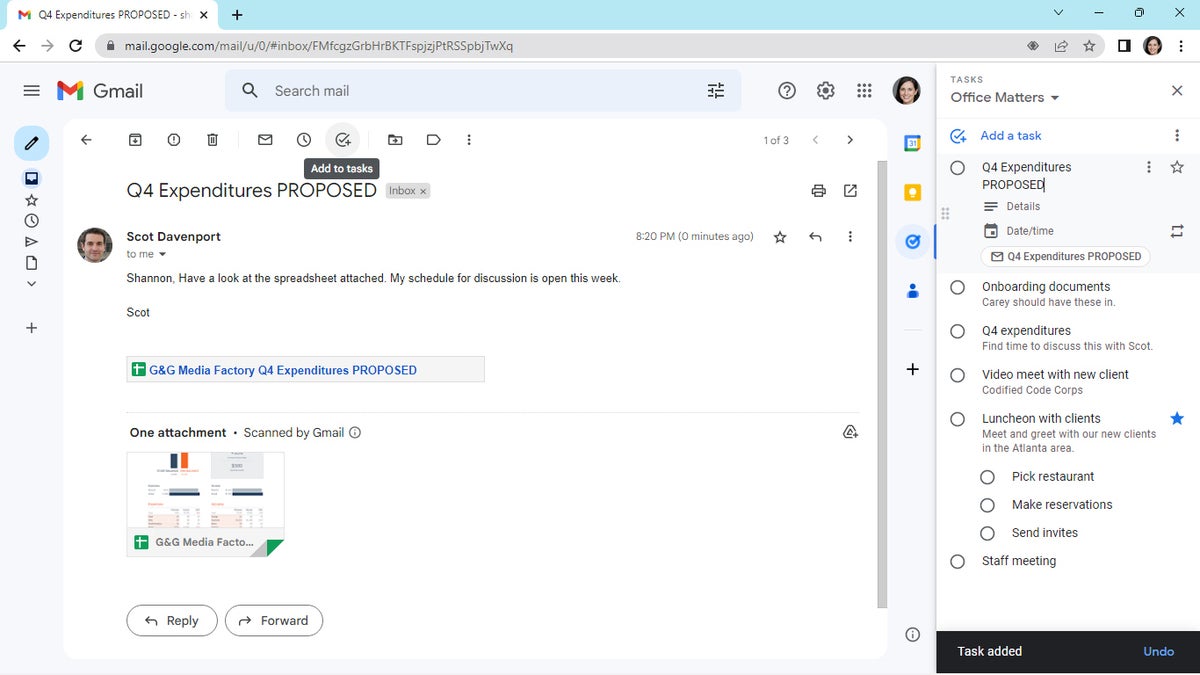
To turn an email into a task: From the Gmail home screen, open the email. At the top of your email, click the Add to tasks icon (a checkmark and + inside a circle).
The Tasks sidebar will open to the right of your Gmail home screen (if you haven’t already opened it). A new task will be added to your task list. The name of this task will be the same as the subject line of your email. You can change the name, add details for the task, set a notification for it, and otherwise manage it like any other task.
 IDG
IDG
Turning an email message into a task. (Click image to enlarge it.)
This task will contain a link to the email. When you click it, the email will open to the left of the Tasks sidebar, inside the Gmail browser tab. (If you’re using Tasks alongside another Google Workspace app, such as Google Drive, clicking this link will open a new browser tab that will show you this email inside Gmail.)
To turn a chat message into a task: From Gmail or the Google Chat home screen, open the chat. Move the pointer over the message you want to turn into a task. Click the three-dot icon that appears to the right and select Add to Tasks. A new task will be added to your task list; its name will be the chat message. You can change the name or otherwise manage it like any other task.
Using Google Calendar with Google Tasks
Google Tasks also interacts with Google Calendar, letting you manage your tasks on your calendar. And you can import reminders on your calendar to a task list in Google Tasks.
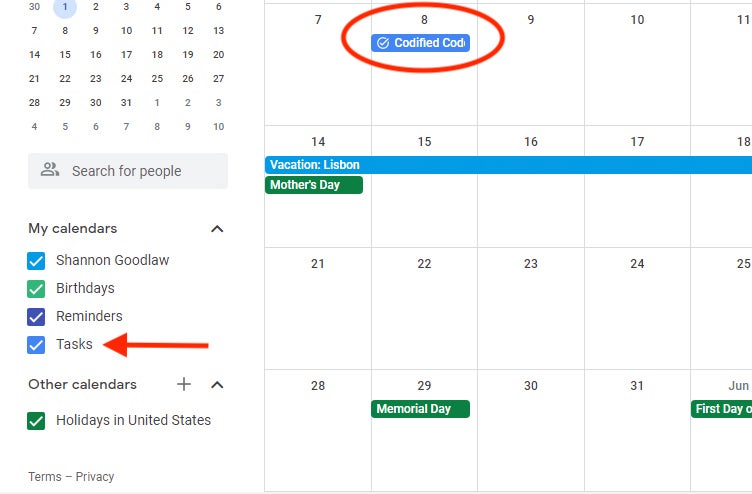
To see your tasks in Google Calendar: Open Google Calendar in a web browser. Toward the lower left, click My calendars to open the list under it (if it’s not already open). If there’s a checkmark by “Tasks,” then you’ll see your tasks from Google Tasks on your calendar. If there’s no checkmark, simply click Tasks to see your tasks on your calendar. (Note that the calendar will only show tasks that have a notification date set.)
 IDG
IDG
Check Tasks under “My calendars” to have tasks with dates appear on your calendar. (Click image to enlarge it.)
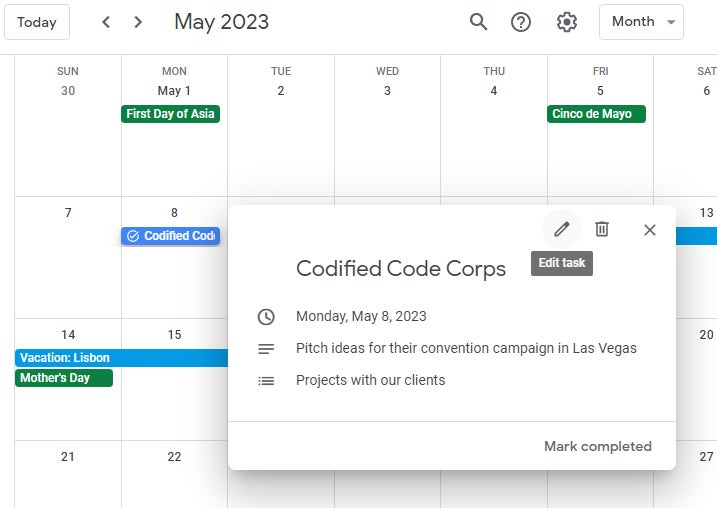
To view and manage a task on your calendar: Inside the date with the task, click its time and name. If there is more than one task listed on the date and you can’t see them all, click More to open a small panel listing all the tasks for this date. Then select a task to view it.
A small panel will open that shows the task. Here you can click the pencil icon to edit the task’s name, details, and/or notification schedule. Or you can delete the task (click the trash can icon) or mark it completed (or uncompleted) at the lower right.
 IDG
IDG
Viewing a task in Google Calendar. (Click image to enlarge it.)
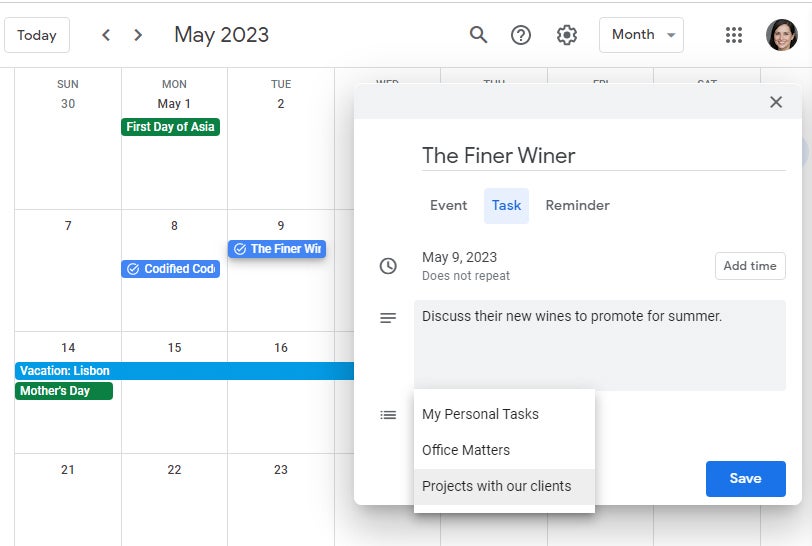
To create a task via Google Calendar: Click a date. On the panel that opens, click Task. Then enter a title, a time for the reminder notification, and a description for the task. Below the description box you’ll see your default task list; you can save the task here or click the down arrow next to it to open a list of task lists that you created in Google Tasks. Select the name of the task list that you want to put this new task under.
 IDG
IDG
Creating a task from Google Calendar. (Click image to enlarge it.)
If you’ve previously set reminders on Google Calendar, you can change those reminders into tasks so they appear in one of your task lists in Google Tasks. Note that if you do this, they will no longer exist as reminders.
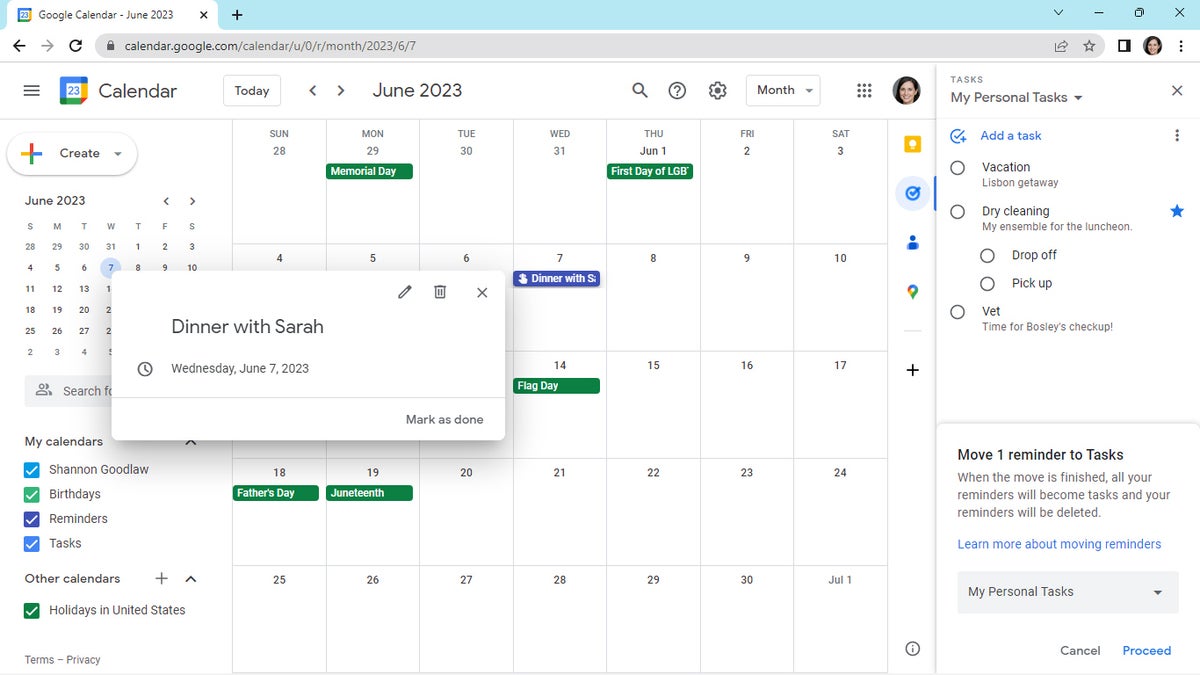
To move your Google Calendar reminders to Google Tasks: At the top of the Tasks sidebar, click the three-dot icon to the right of Add a task. From the menu that opens, select Move reminders to tasks. A “Move X reminder(s) to Tasks” box will appear toward the bottom of the Tasks sidebar. Click Select list, and from the menu that opens, select the task list where you want to move your reminders or click Create new list and create a new task list.) After you’ve made your selection, click Proceed.
 IDG
IDG
Moving Calendar reminders to a Tasks list. (Click image to enlarge it.)
Your reminders will be moved to the task list you selected, with each reminder appearing as a new task in the list. Each reminder that has been turned into a task can be renamed, rescheduled, and managed like any other task.
Read next: 5 smart secrets for a better Google Tasks experience


