Need to make a quiz, survey, registration form, order form, or other web page that gathers feedback from co-workers, customers, or others? You can design and deploy one right from your web browser with Google Forms. It’s integrated with Google Drive to store your forms in the cloud.
Anyone with a Google account can use Forms for free. It’s also part of Google Workspace, Google's subscription-based collection of online office apps for business and enterprise customers that includes Google Docs, Sheets, Slides, Gmail, and more. Forms is lesser known than these other productivity apps, but it's a useful tool to know how to use. This guide takes you through designing a form, deploying it online, and viewing the responses it gathers.
Starting a new form
First, sign into your Google or Google Workspace account if you haven’t already. You can create a new form in a variety of ways.
In Google Drive: From the home screen of your Google Drive, click the New button at the upper left and select Google Forms. The Google Forms web app will open in a new browser tab, displaying a blank form.
Alternatively, you can start with a template, modifying it to suit your needs. On the Google Drive home screen, click the New button and, to the right of “Google Forms,” select the right-pointing arrow and then click From a template. You're taken to a gallery where you can pick a ready-made template. These have been designed to gather certain data from people, such as their available time to attend a meeting, contact information, or feedback about something.
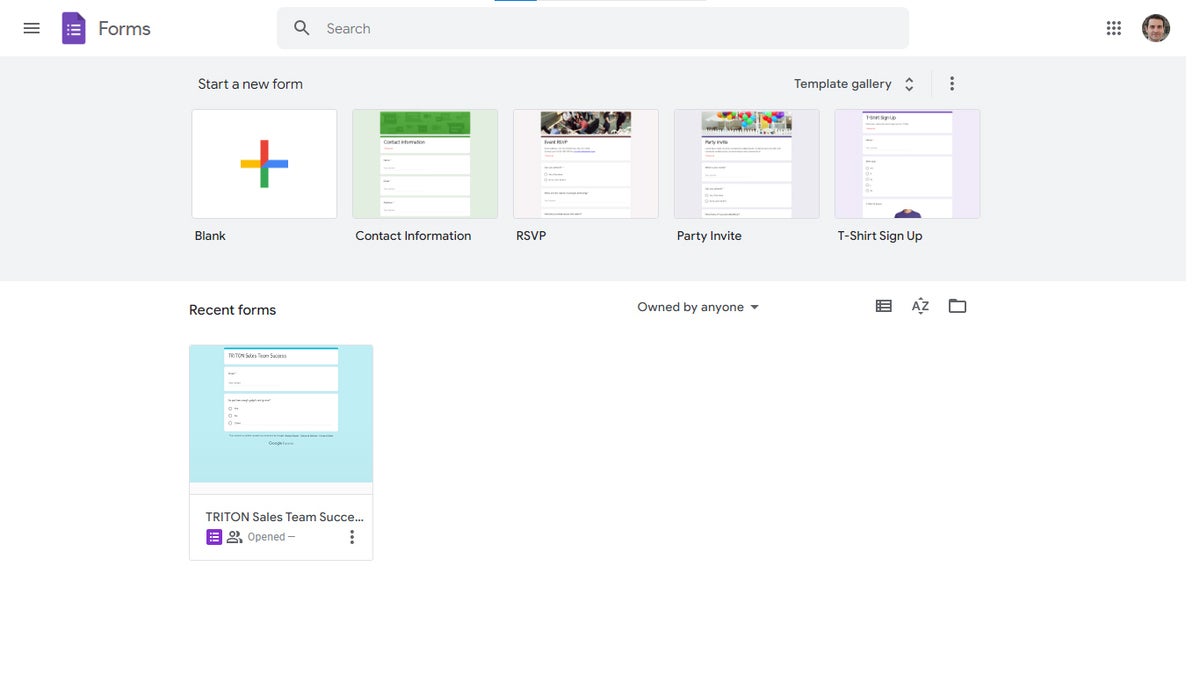
In Google Forms: At the top of the home screen, click the Blank thumbnail, choose one of the template thumbnails to the right, or click Template gallery to open the template gallery page as described above.
 Howard Wen/IDG
Creating a form from the Google Forms home page. (Click image to enlarge it.)
In Google Sheets: You can insert a form into a spreadsheet. When people fill out this form, their responses will be recorded onto a new sheet of your spreadsheet.
First, open a spreadsheet in Google Sheets. Then, in the menu bar above your spreadsheet, select Tools > Create a new form. This opens the Google Forms web app in a new browser tab.
Go to Forms.new: Going to Forms.new will immediately open a new, blank form inside a new browser tab.
Building your form
Here we’ll walk through building a form from scratch. If you’ve started a form from a template, just use the same tools described below to edit the items that are already included with a template.
 Howard Wen/IDG
A new blank form. (Click image to enlarge it.)
At the top of the page is the main title-and-description box for your form. Click the “Untitled form” line to enter a title for your form. In the line below the title, you can enter words that describe your form with a little more detail.
Below the title/description box is where one or more element boxes appear.
Working with questions
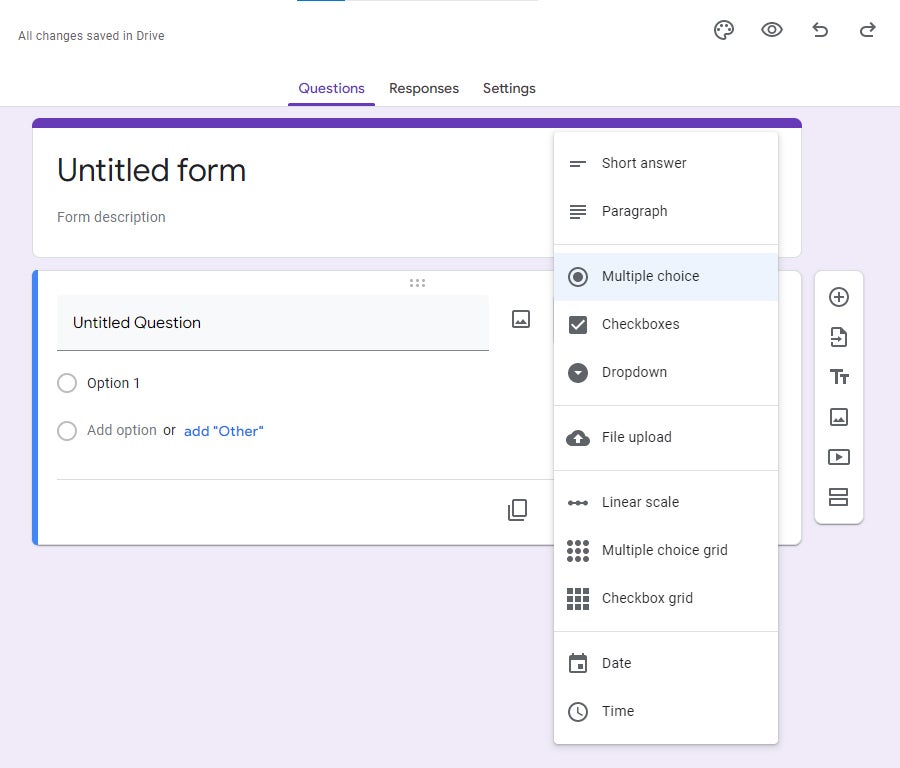
The element box that you need to familiarize yourself with the most is the question box. In a new, blank form, a question box appears below the title/description box, with the default format of multiple choice. To change this to another question format, click the question box to select it. Click Multiple choice. This will open a menu listing other question formats that you can choose from.
 Howard Wen/IDG
Google Forms offers an array of question formats to choose from. (Click image to enlarge it.)
- Short answer or Paragraph: Respondents type answers into a text field. The Paragraph field is larger than the Short answer field.
- Multiple choice, Checkboxes, or Dropdown: Respondents choose options from a list you provide. With multiple choice (radio button) and dropdown lists, respondents can select only one option. With checkboxes, they can choose multiple options.
- File upload: This allows respondents to upload a file to your Google Drive — for example, you design a form for job applicants, and you want them to upload a PDF of their resume. (Respondents must be signed in with a Google user account to upload a file.)
- Linear scale: Respondents are asked to rate something on a scale, such as from 1 to 5.
- Multiple choice grid or Checkbox grid: Respondents choose from answers that are arranged in a grid layout. With multiple choice (radio button) grids, respondents can select only one option. With checkbox grids, they can choose multiple options.
- Date or Time: The person enters a date or time, which can be in the past or the future. For example, you might ask what’s the earliest date they are available to meet. The form includes a calendar or clock tool that the person can use to enter their response.
After you’ve selected a question format, click the Untitled Question line and type the question you want your respondents to read. You can add an image to go with this question by clicking the picture icon to the right of the line. You’ll be able to upload an image file from your PC or Google Drive.
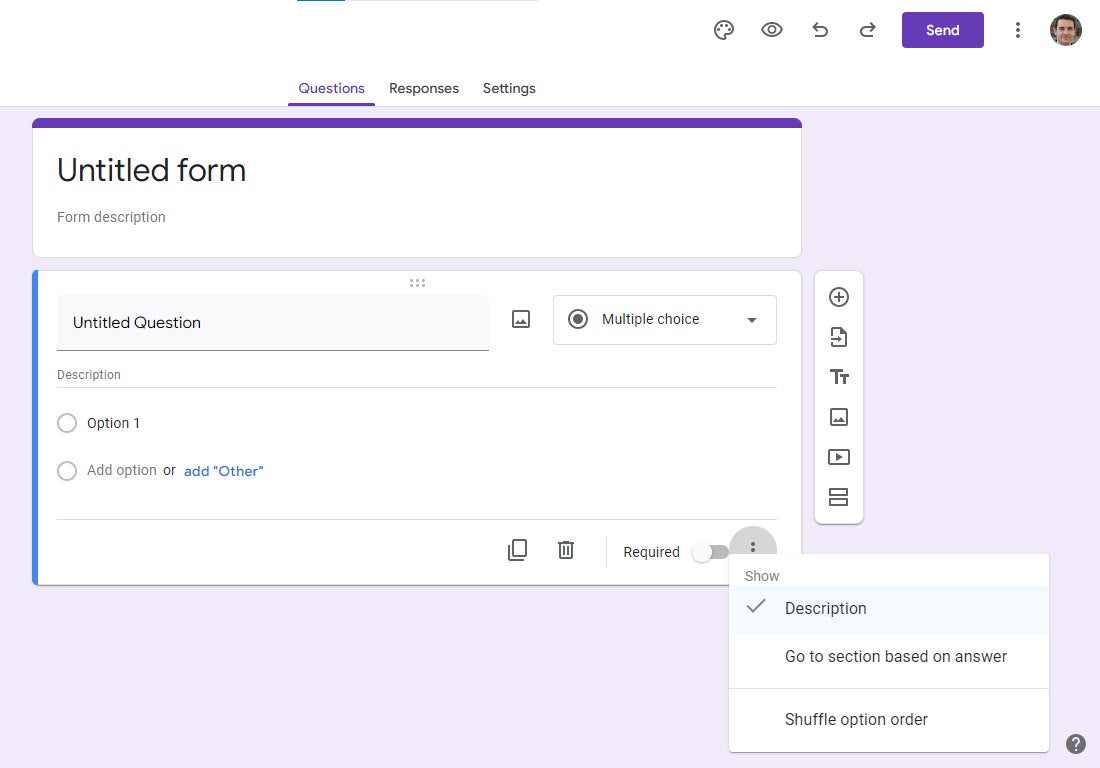
To add a description for the question: Click the three-dot icon on the lower right and select Description. This will open a “Description” line that you can fill out below the question.
 Howard Wen/IDG
You can optionally add a description to appear below a question. (Click image to enlarge it.)
To add response choices: Below the question, click the Option 1 line and type an answer that you want your respondents to consider choosing. You can include an image with this choice by clicking the picture icon to the right of this line.
Click Add option to add another answer choice, or click add “Other” to add a choice with a blank line where your respondents can type in a response.
To require respondents to answer this question: Click the Required switch on the lower right. If respondents don’t answer this question, they will not be able to submit any of their other responses to your form.
To add another question box to your form, click the + button at the top of the floating toolbar to the right of your form.
You can keep adding questions and responses this way till your questionnaire is complete.
Using the quiz format
If you want to test your respondents’ knowledge — for instance, at the end of a training session — you can format a form as a quiz. Your respondents have to choose the correct answer(s) for each question and are awarded points for doing so.
To set a form as a quiz: Toward the top of the page, click Settings. On the next page, click the Make this a quiz switch.
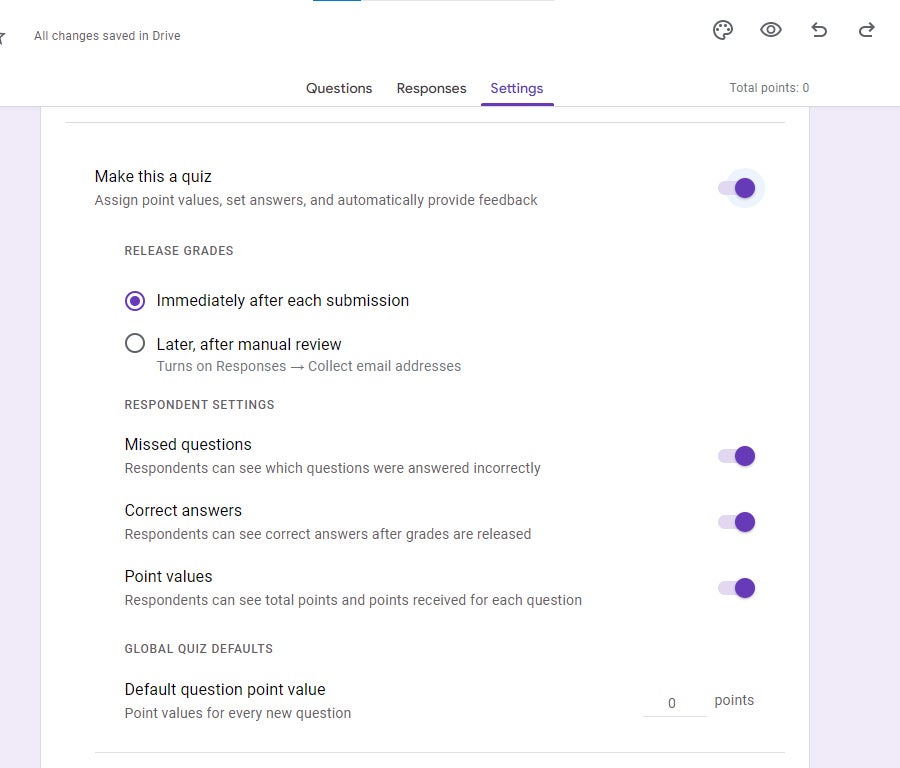 Howard Wen/IDG
Changing a form into quiz format. (Click image to enlarge it.)
Now when you click any question box, you’ll see “Answer key” in the lower-left corner of the box.
 Howard Wen/IDG
A question in quiz format. (Click image to enlarge it.)
Clicking Answer key will take you to a panel where you click the correct answer (or answers) to the question. You also enter how many points this question is worth if answered correctly. You’ll need to set the answer key for every question in a quiz.
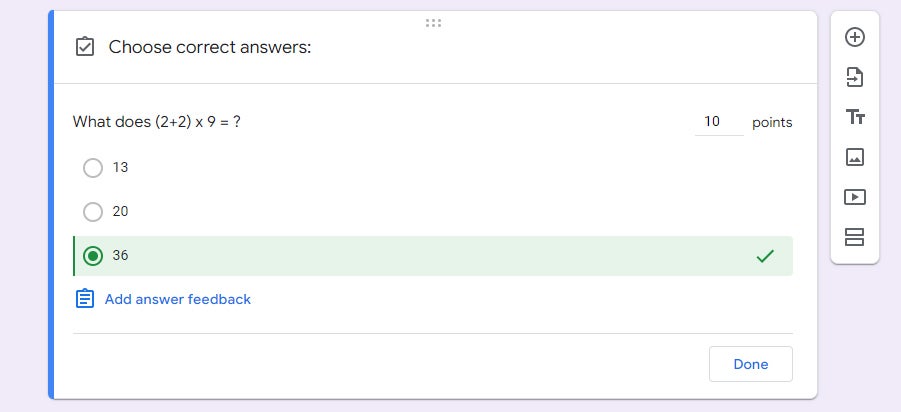 Howard Wen/IDG
Setting the answer key for a quiz question. (Click image to enlarge it.)
Adding other elements: titles/descriptions, pictures, or video
In addition to questions, there are three more types of element boxes you can add to your form. Click these buttons on the toolbar to the right of your form.
Add title and description: This box is like the one at the top of your form. It has its own title and description areas that you can fill out. A title/description box can be useful if you want to add a few categories or provide more information for your respondents to read before interacting with a question box. (Adding sections to your form, as described below, may be better for breaking apart a long, more complex form. Ultimately, this is your personal design choice.)
Add image: A panel appears that lets you select an image file from your PC or Google Drive. You can adjust the size of the embedded image by clicking to select it and dragging the corners of the frame that surrounds it.
Add video: From the panel that opens, you can search YouTube or paste in the URL for the YouTube video you want to embed. Your respondents will be able to click to play it.
Managing element boxes
Since you can design a form to have several questions, title/descriptions, images, and YouTube videos, it helps to know how to manage their boxes.
To move an element box: Move the cursor to the top of the box and click-and-hold the six-dot icon that appears. Drag the box down or up, then let go where you want it to appear. (Note: You cannot move the text/description box at the top of the form or a section.)
To copy or delete an element box: Click the box to select it. Click the Duplicate (two pieces of paper) or Delete (trash can) icon. These icons appear along the bottom of a question box, and on the upper right of the other types of element boxes. If you duplicate an element box, its copy will appear below it.
Working with sections
Your form may benefit from being divided into sections — for instance, if it has a lot of questions and images on it, it may look overwhelming for your respondents to go through.
To add a new section: Click an element box to select it. On the toolbar to the right of your form, click the Add section button at the bottom. A new section heading box will be added below. It has its own title/description box that you can fill out. Every element box that is already below this box, or that you add or move below it, will be considered part of this section.
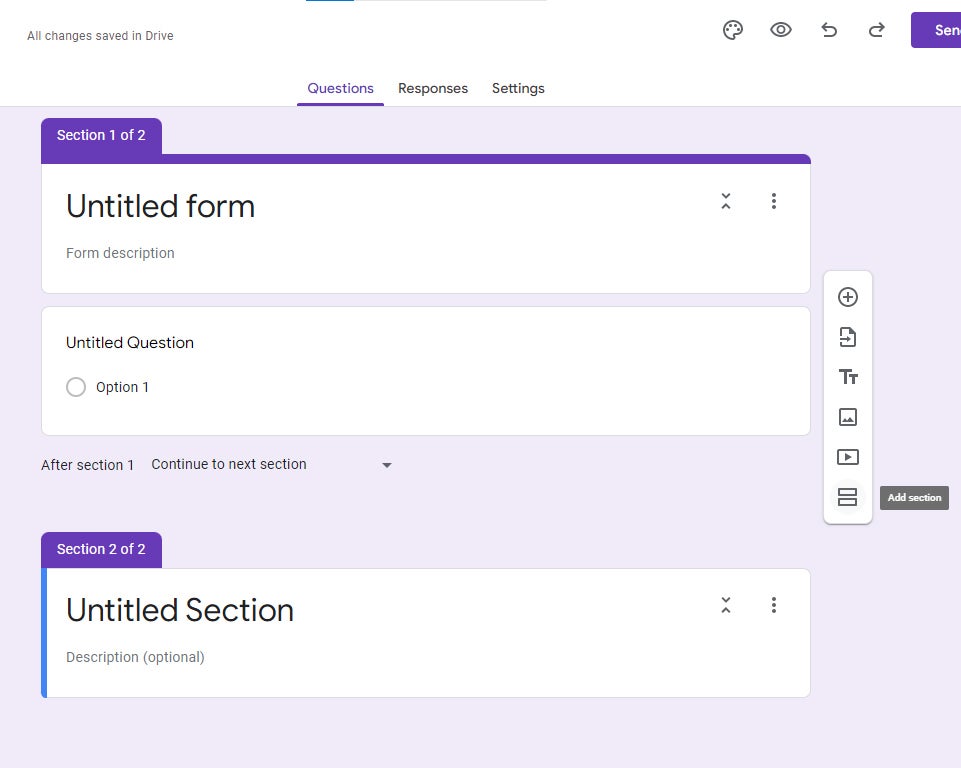 Howard Wen/IDG
Adding a new section to a form. (Click image to enlarge it.)
To manage a section: Click the three-dot icon at the upper right of the section heading box. On the menu that opens, you’ll see options to duplicate, move, or delete the section, or to merge it with the section above. Note that when you select any of these, it affects all the element boxes that are below this section heading box. So if you choose to delete a section, every element box below it will be deleted. To preserve those elements while getting rid of the section divider, choose the Merge with above option.


