Finishing touches
Once you’ve got your form built out, a few final tweaks can perfect it.
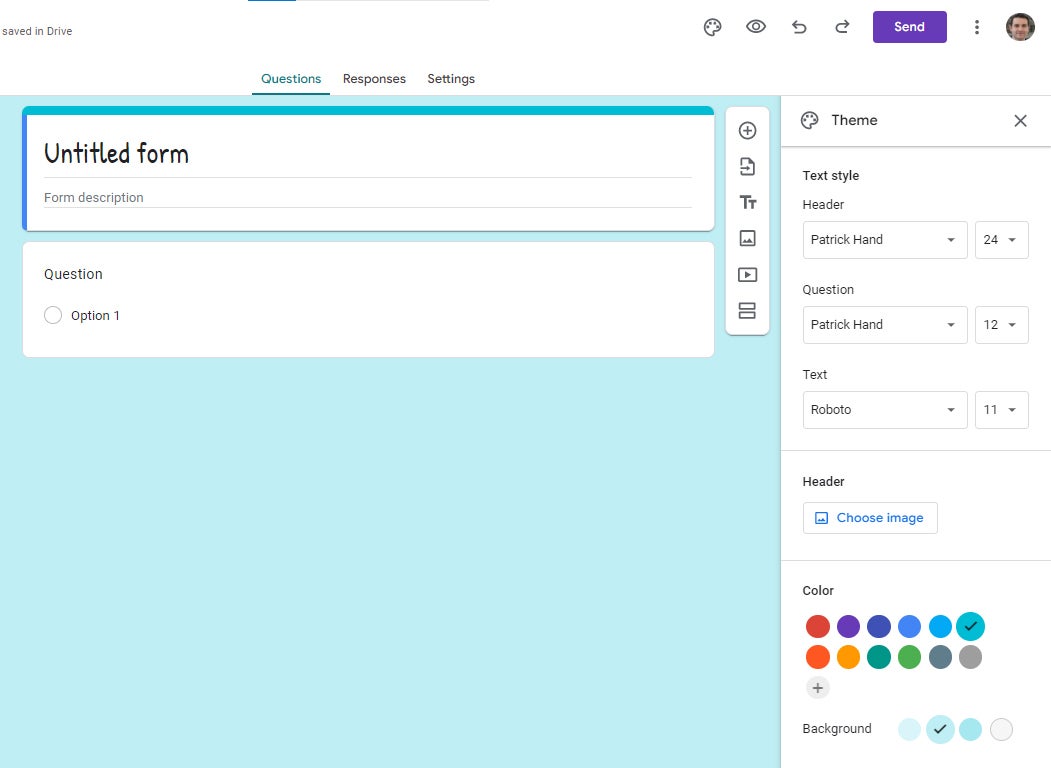
To change your form’s colors and font: Click the palette icon at the upper right of the screen. The Theme panel opens along the right side. Here you can change the color, background shading, and font used throughout your form. You can also upload a picture to set as the header image for your form.
 Howard Wen/IDG
The Theme panel lets you change a form’s colors, fonts, and more. (Click image to enlarge it.)
To see what your form will look like to respondents: Click the eye icon next to the palette icon at the top right. To return to viewing your form in editing mode, click the pencil icon at the lower right of the preview screen.
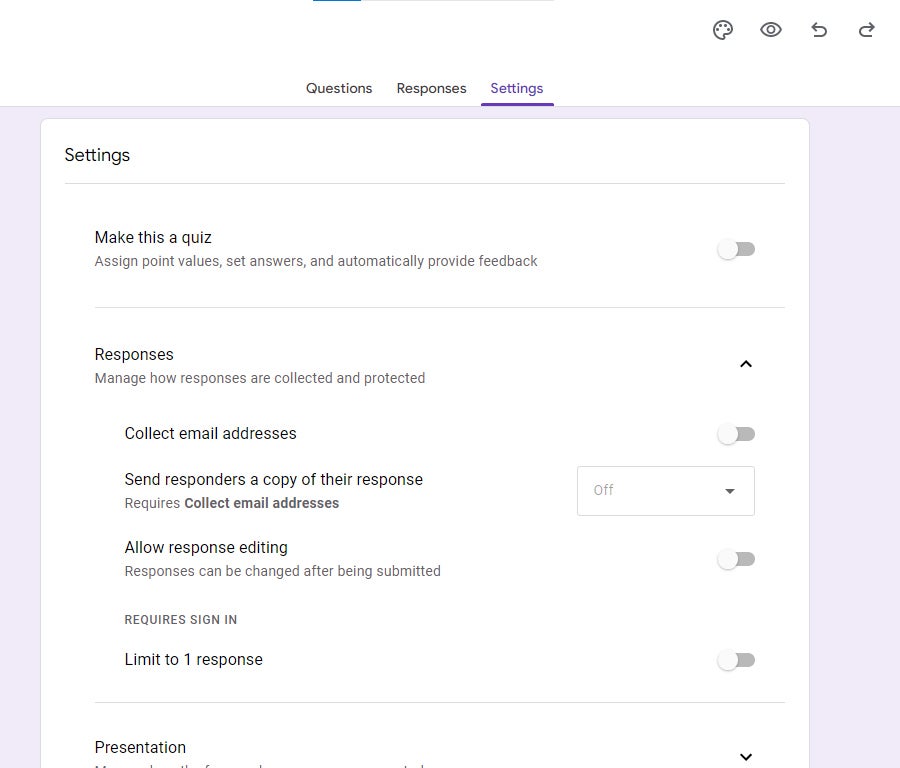
To adjust response settings: Toward the top of the page in the center, click the Settings tab. On the Settings page, click the down arrow to the right of “Responses” to open a list of options. Under this section, you can require that respondents enter their email address, have Forms email them a copy of their responses, let them edit their responses after submitting, and/or limit every respondent to one submission.
To adjust presentation settings: On this same Settings page, click the down arrow to the right of “Presentation.” Several options are here, such as showing respondents a progress bar as they fill it out the form, shuffling question order, and writing a custom confirmation message that respondents see after they’ve successfully submitted their responses.
 Howard Wen/IDG
The Settings page lets you fine-tune how responses are collected, protected, and presented. (Click image to enlarge it.)
Collaborating on your form
You can invite others to collaborate with you on creating a form. Anyone you invite can make any changes to your form just as you can.
To invite someone to collaborate: From the form that you are designing, click the three-dot icon on the upper right of the screen and choose Add collaborators.
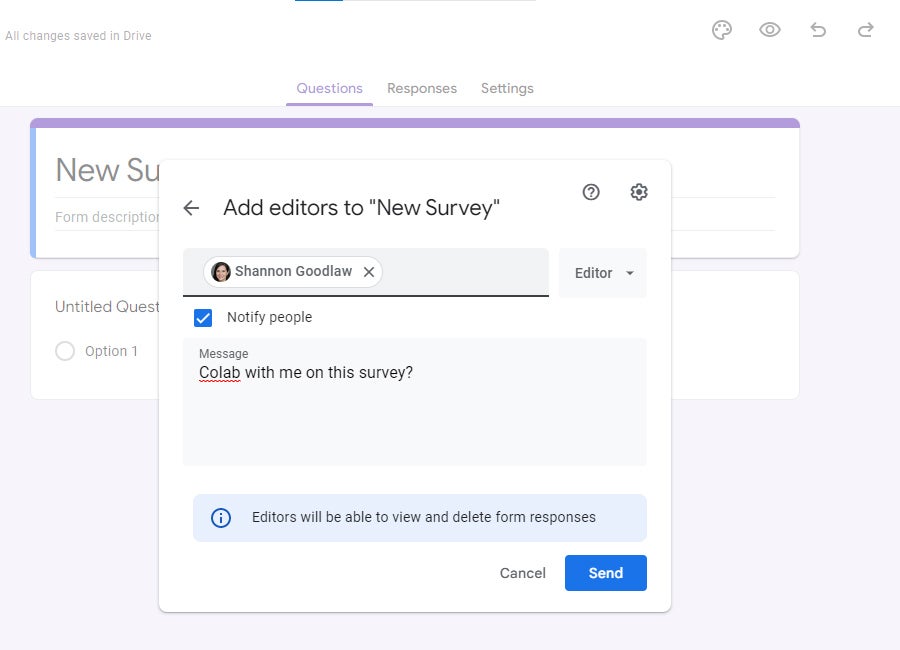
The “Add editors” panel opens. From here you can invite one or more people to collaborate with you on your form by entering their email address or their name saved in your Google Contacts and, optionally, a brief message.
 Howard Wen/IDG
Sharing a form for collaboration. (Click image to enlarge it.)
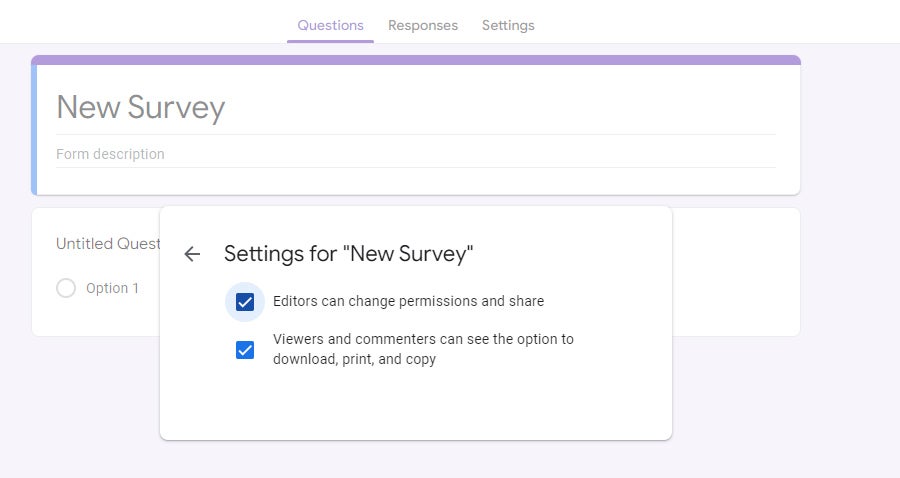
If you don’t want your collaborators to be able to invite others to work on the form, click the gear icon on the upper right, and on the next panel, uncheck Editors can change permissions and share.
 Howard Wen/IDG
Uncheck the top box if you don’t want people you’re inviting to be able to share the form with others for editing. (Click image to enlarge it.)
Back on the main “Add editors” panel, click the Send button, and your invitees will receive an email with a link that allows them to work on your form.
Sharing your form with the world
Once you’re ready to send out your form for people to fill out, click the Send button in the upper-right corner of your screen. This opens the “Send form” panel.
Through this panel, you can send the link to your form in the following ways:
- Email to people in your Google Contacts (or by entering their email addresses): Click the email icon.
- Copy the link to your PC's clipboard: Click the chain icon.
- Copy a snippet of HTML, which you can use to embed your form onto a web page: Click the “<>” icon.
- Share the link on your Facebook or Twitter account: Click the logo for either social network service.
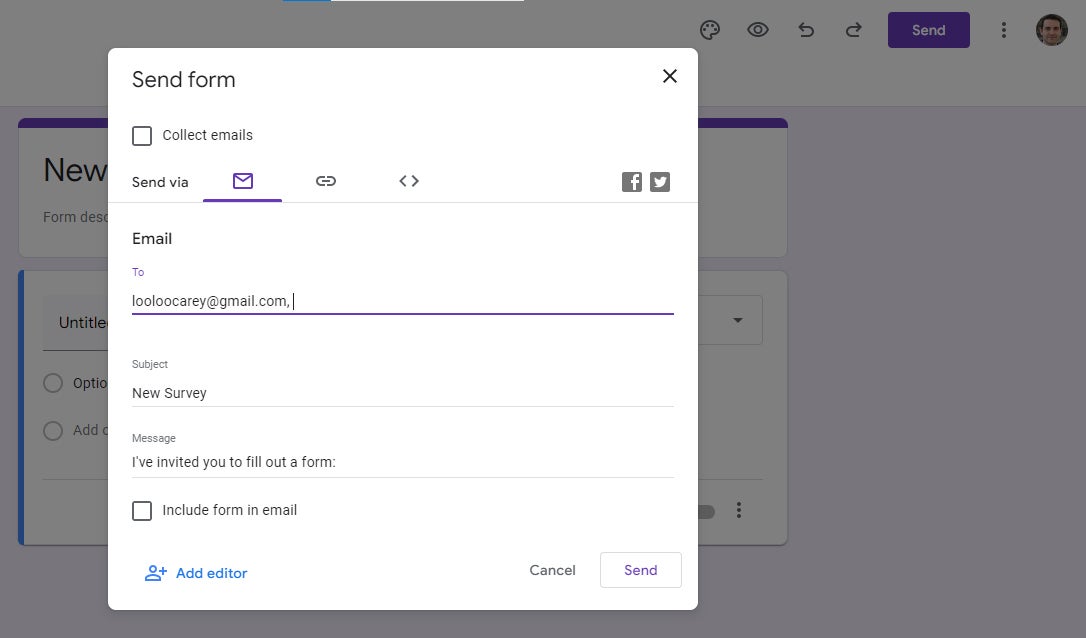 Howard Wen/IDG
You can send a form’s link out in various ways. (Click image to enlarge it.)
Toward the top left of the “Send form” panel is a checkbox marked “Collect emails.” When you check this, people who fill out your form will need to enter an email address before they can submit their answers.
To create a link with the answers filled in: You can create a web link to your form that will show it with answers to all its questions filled in. After respondents have taken a quiz, for example, you could share this link so they can see the correct responses.
Click the three-dot icon at the upper right and select Get pre-filled link from the menu that opens. On the page that opens, you’ll be able to go through your form and fill in the answers for each question. After you’ve done this, click Get link at the bottom of the form to copy the web link to your PC clipboard.
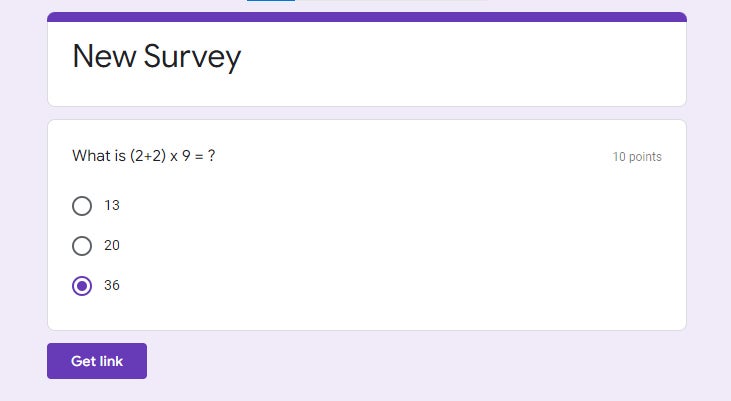 Howard Wen/IDG
Creating a link to a version of your form with answers filled in. (Click image to enlarge it.)
Viewing responses to your form
There are two ways to see the responses to your form: in Google Forms and in Google Sheets.
In Forms: From the Google Drive or the Google Forms home screen, double-click the form to open it. At the top of your form, the current number of submitted responses that your form has received is listed to the right of the Responses tab.
Click the Responses tab to view a dashboard of the results. The email addresses of respondents are listed first (if you chose to gather this information), followed by their answers. Depending on the question formats you put onto your form, their answers are shown as text they entered or as charts. A chart illustrates a summary of responses for a question.
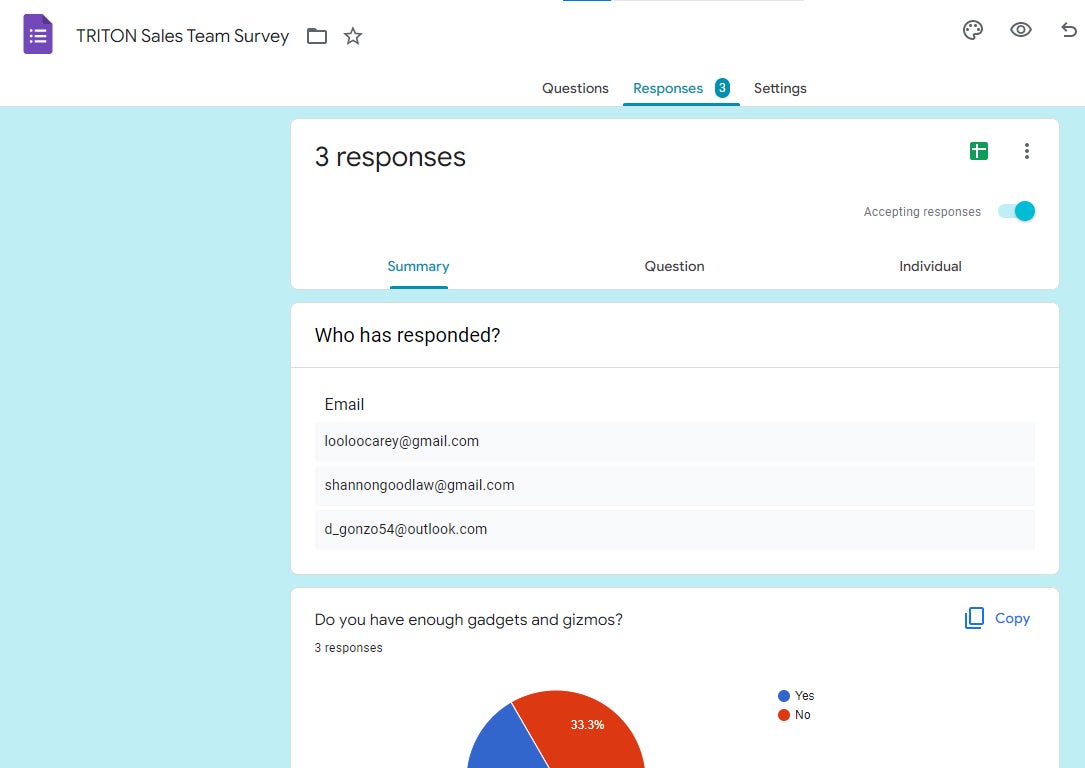 Howard Wen/IDG
A dashboard summarizing the responses to a form. (Click image to enlarge it.)
Clicking the Individual tab switches to a panel that shows you the answers given by the last person who filled out your form. To see the answers from other people, click the > symbol next to the number of respondents.
In Google Sheets: If you inserted a form into a Google Sheets spreadsheet, the summary of responses for your form appears as a new sheet in that spreadsheet. From the Responses tab in Forms, click the Google Sheets icon at the upper right.
The connected Google Sheets spreadsheet opens in your web browser, showing the summary of responses. (Alternatively, you can open the connected spreadsheet directly from Google Sheets or Drive.) The charts that appear in the Responses tab in Forms do not transfer over to a Google Sheets spreadsheet.
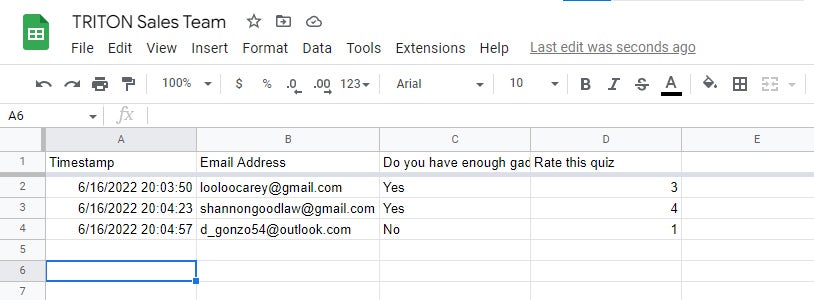 Howard Wen/IDG
A form’s results in a Google Sheets spreadsheet. (Click image to enlarge it.)
To add a form’s results to a Google Sheets spreadsheet: If you created your form in Google Forms or from Google Drive, you can turn its summary of responses into a Google Sheets spreadsheet or add it as a new sheet to an existing Sheets spreadsheet in your Google Drive.
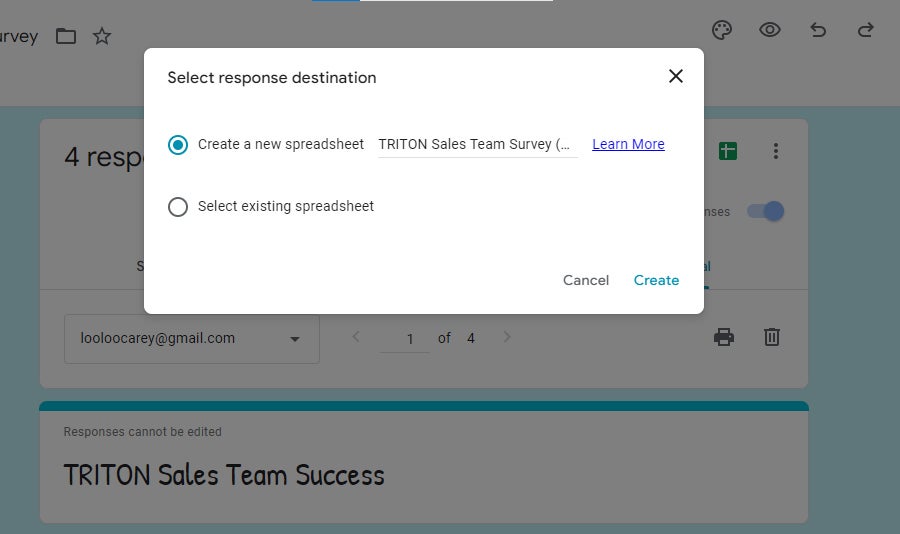
On the Responses tab in Forms, click the three-dot icon at the upper right. Select Select response destination. On the panel that opens, you can create a new spreadsheet and name it, or select Select existing spreadsheet. This latter option takes you to another panel that lists the Google Sheets spreadsheets in Google Drive that you have access to. Select the one you want to add the summary of responses to as a new sheet.
 Howard Wen/IDG
Choosing a new or existing spreadsheet to send results to. (Click image to enlarge it.)
To detach a form’s summary of responses from a Google Sheets spreadsheet: Click the three-dot icon at the upper-right of the form’s responses tab, and from the menu that opens, click Unlink form.
Embedding response charts into Google Docs and Slides
You can embed the charts showing your form’s responses into a Google Docs document or Google Slides presentation. This is a neat way to show the results of a survey in a document that you're collaborating with your co-workers on. For a presentation, you could share with your audience a link to a poll that you created in Google Forms, then later in the presentation show the response chart on a slide that tallies the results.
To embed a response chart: Open the form in Google Forms. Toward the top of the page, click the Responses tab.
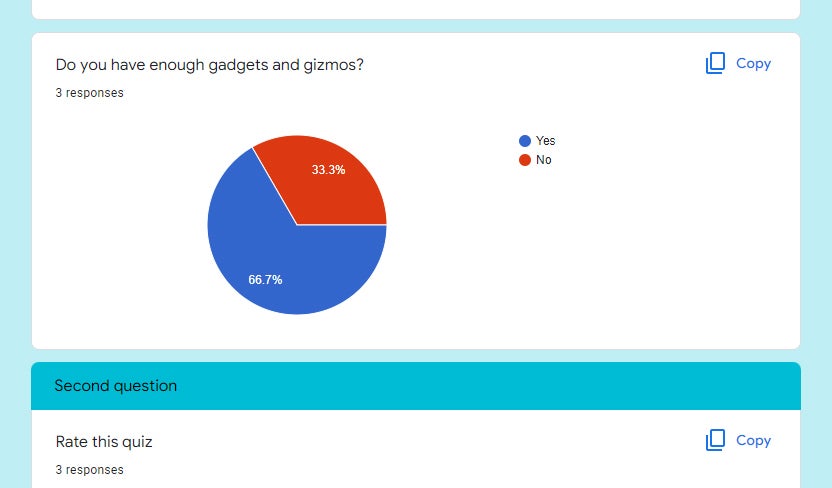
Scroll down to find the response chart that you want to embed. Click Copy at the upper right corner of the response chart box. A link to this chart will be copied to your PC clipboard.
 Howard Wen/IDG
Find the response chart you want to embed and click its Copy button. (Click image to enlarge it.)
Next, if you haven't already, open a new browser tab and load your document in Google Docs, or open a presentation in Google Slides. Place your cursor in the document or presentation where you want to embed the chart. Press Ctrl-V, and on the panel that opens, click the Paste button.
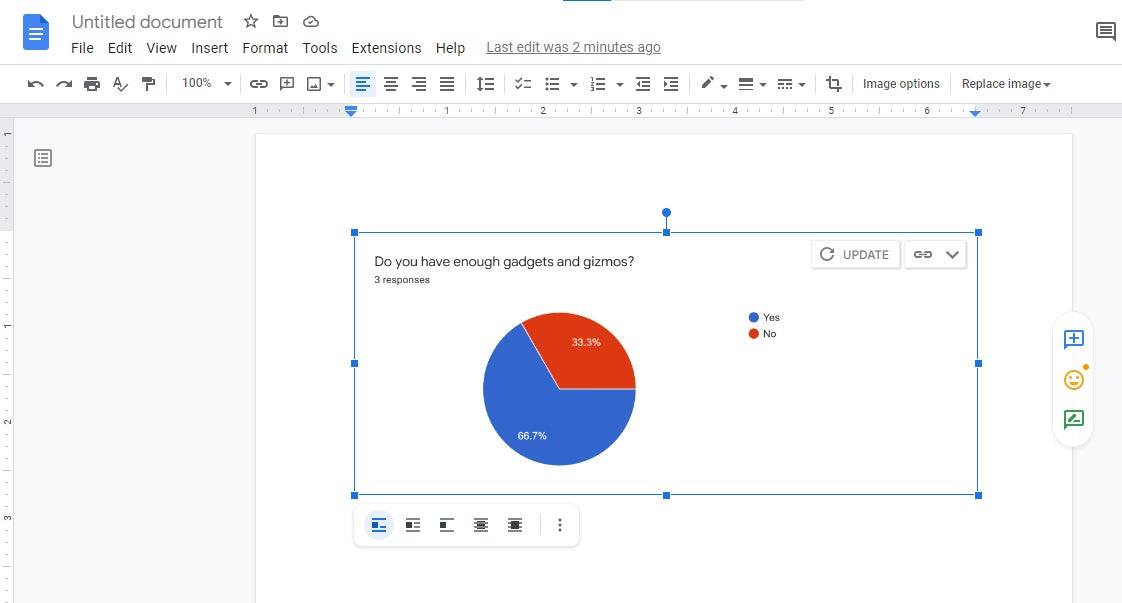
The response chart will appear in the document or slide as an image. As with any other image in your document or slide, you can resize it or move it to another area: Click on the response chart. To resize it, click-and-drag on any of the six dots that surround it. To move the image, move the cursor over the image until the cursor turns into a crosshair. Then click-and-drag the image to where you want it on the document or slide.
 Howard Wen/IDG
You can move or resize your embedded chart in the document or slide. (Click image to enlarge it.)
If more answers are submitted for this response chart's question after you've embedded it, an UPDATE button will appear on the upper right of its box. Clicking this button will update the tally and chart graphic.
Using Google Forms on a phone or tablet
There isn't a Google Forms app for Android or iOS. Instead, you can create, edit, and maintain a form through your smartphone or tablet web browser. If you use the Android or iOS app version of Google Drive, your form is listed alongside your other documents that are saved in it. When you tap a form to open it, it loads in your mobile device's browser.
 Howard Wen/IDG
You can make quick edits and view responses on the go with your smartphone. (Click image to enlarge it.)
It is possible to create a form on a smartphone. But how well you can do this depends on the capabilities of your phone and if you are adept at using its touchscreen. It’s easier to do the heavy-duty form-building on a PC, and then use the mobile version of Forms to make quick tweaks to your form or to view survey results.
Respondents can also fill out your form from their smartphone or tablet. The layout of the form automatically adjusts to look best on their mobile device's screen, and they can tap answers to the questions through their device’s touchscreen.
This article was originally published in October 2019 and updated in January 2023.


