Confused about how updates work in Windows 10 and Windows 11? Join the club. Over the years, Microsoft has made numerous changes to how Windows Update works, including how often major Windows updates are released and which users can delay updates. As a result, there have been lots of misperceptions about how Windows Update currently works and how to best use it.
With this article, we hope to make things clearer for you. We’ve delved deep into Windows Update and come up with answers to users’ most pressing questions: whether you have to accept all updates, whether you can uninstall existing updates, and how to reduce the bandwidth some updates use. We’ve also included some extras, like how to stop all updates if you want.
We’ve updated this article for the current versions of Windows — Windows 10 22H2 and Windows 11 22H2. The features that are described here and the screenshots you see may differ from what you see if you have an older version of Windows 10 or 11. Windows Update works the same way in Windows 11 as in Windows 10, although there are some minor differences in appearance, menu selections, and so on, which we’ll detail below.
 IDG
IDG
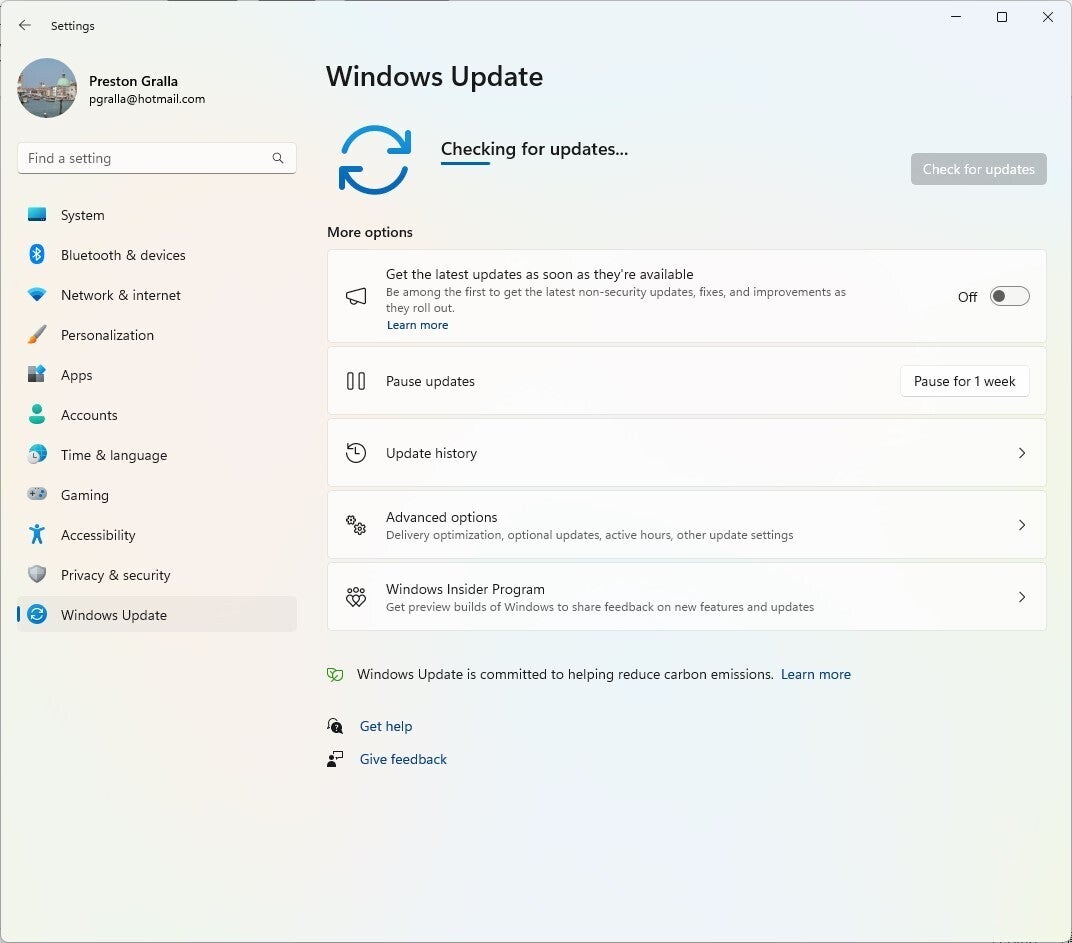
Checking for new updates in Windows 11. (Click any image in this story to enlarge it.)
All updates are not created equal
In Microsoft-speak, there are updates and then there are updates, like Windows 11 22H2. Microsoft refers to those major releases, which have their own version numbers, as feature updates. Microsoft used to differentiate by referring to “upgrades” and “updates,” but over time, the word “upgrade” seems to have disappeared from its lexicon.
Microsoft also releases frequent smaller updates called quality updates that, like the updates of old, fix security issues, squash bugs, and make relatively insignificant changes to Windows, typically under the hood. They’re delivered on Patch Tuesday, the second Tuesday of every month, and at other times as well. (There are a few other types of minor updates too, as we’ll detail later in the story, but for now we’ll lump those in with the quality updates.)
On the other hand, feature updates, like yesteryear’s upgrades, “install the latest new features, experiences and capabilities” of Windows, according to Microsoft. The first feature update for Windows 10 was released in November 2015 and the second in August 2016. For several years after that, Microsoft issued two feature updates a year, approximately six months apart — one each spring and one each fall.
With the November 2019 Update (version 1909), however, things changed a bit. That release did not include many new features and was more like what Microsoft used to call a “service pack,” with a variety of small changes and fixes. For the next few years, Microsoft continued this pattern — releasing a larger update in the spring and a smaller one in the fall — while still calling them all “feature updates.”
Since then, things have changed again. Windows 11 receives just one feature update a year, always in the fall. As for Windows 10, Microsoft has announced there will be no more feature updates beyond version 22H2. However, there will continue to be regular smaller quality updates for Windows 10 until the OS reaches end of support in October 2025.
If you use Windows 10 or 11 in a large business or educational organization, your IT department likely controls when feature and quality updates are rolled out to you using enterprise-level tools such as Windows Update for Business, Windows Server Update Services, or System Center Configuration Manager. If you use Windows 11 Home or Pro in an environment that’s not managed by IT, you can delay feature updates yourself. And if you use the Home or Pro edition of either Windows 10 or Windows 11, you can delay quality updates.
Delay or skip feature updates in Windows 11
Here’s how delaying feature updates in Windows 11 works: When a new feature update is released, rather than automatically installing it on your machine, Windows notifies you that it’s available with a message and a “Download and install” link in the Windows Update pane in the Settings app.
To get to the pane, select Start > Settings > Windows Update. If you see the “Download and install” link and don’t want to install the update, ignore the message; your PC stays as it is. At whatever point you want to install an update, click the link and follow the instructions.
There is one caveat, though. When your current version of Windows reaches what Microsoft calls “end of service” — the point at which Microsoft no longer supports it — Windows Update will install a more recent feature update whether you agree or not. For Windows 11 Home and Pro users, that’s 24 months after your current Windows version’s release.
Still, it’s theoretically possible to skip over some feature updates entirely. Since they’re released every year, you could install one version, decline to install the next one that’s released, and then install the one after that.
Note: If you’re having trouble with Windows Update — say, it won’t download a specific update or an update fails to install — we can help. See “How to troubleshoot and reset Windows Update.”
Pause quality updates in Windows 10 and 11
Windows 10 and 11 Home and Pro users can pause the minor updates that Microsoft issues in between the big annual feature updates for up to 35 days. As mentioned above, these quality updates address security issues, fix bugs, and so on, and they typically appear in Windows Update labeled as “Security Update” or “Cumulative Update.” While they’re meant to shore up Windows’ security or make it run more smoothly, they may cause more problems than they solve, and it’s a good idea to wait a while before installing them to see if problems are reported.
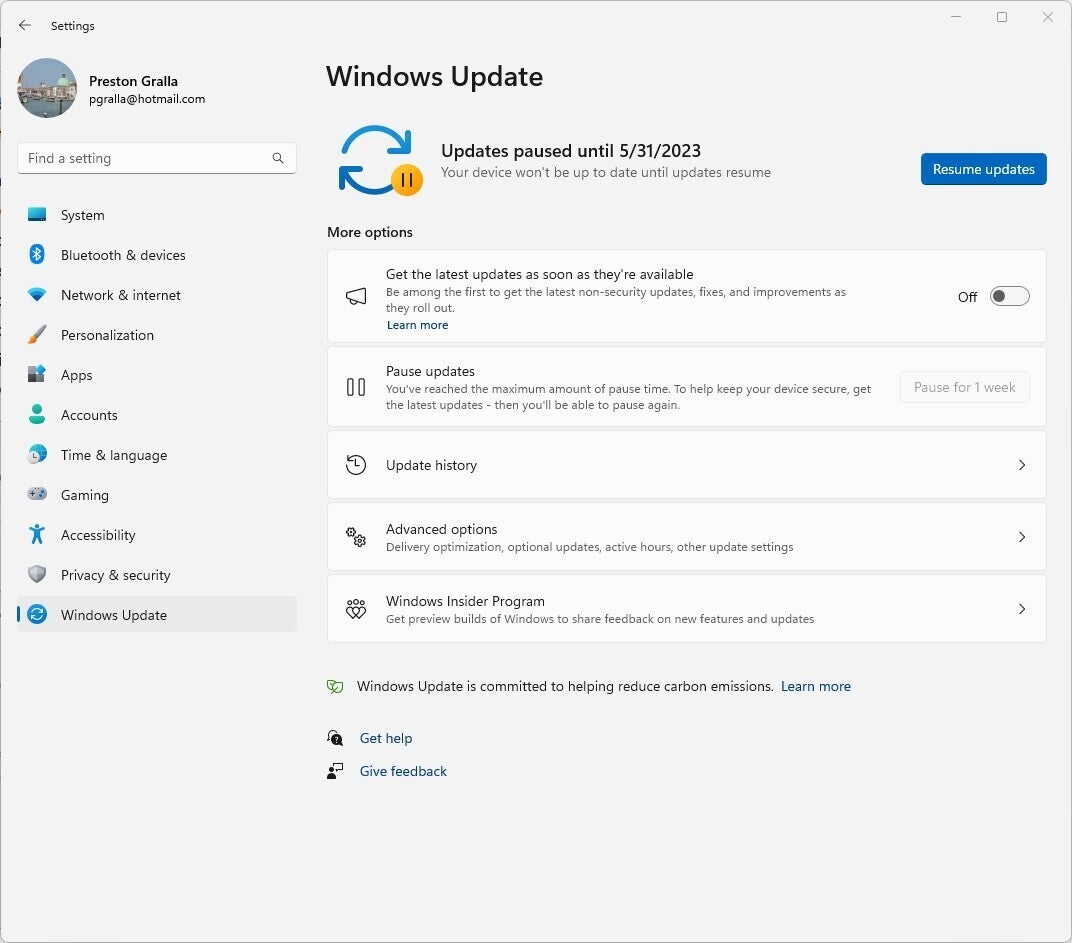
Unlike feature updates, these updates install automatically by default, so you’ll need to put them on pause to prevent that from happening. To pause updates on a week-by-week basis for up to 35 days, in Windows 10 head to Settings > Update & Security > Windows Update and click Pause updates for 7 days. In Windows 11, go to Settings > Windows Update and next to “Pause updates,” click Pause for 1 week. After seven days you can do this several more times, a total of five times to delay the updates for 35 days.
 IDG
IDG
You can delay quality updates a week at a time for up to 35 days.
Windows Pro users can alternatively use group policy settings or the enterprise-level Windows Update for Business (WUB) tool to control the timing of update delivery.
Control the hours during which Windows updates
We live in a working world in which the idea of a nine-to-five job has fallen by the wayside. Working hours for you may start at 6 a.m., or they may start in the afternoon and last past midnight. And so for many people, the hours at which Windows installs updates has been problematic, because it interrupts their work. You can control when update installations take place, though, so they don’t interrupt your work.
Control the update hours in Windows 10
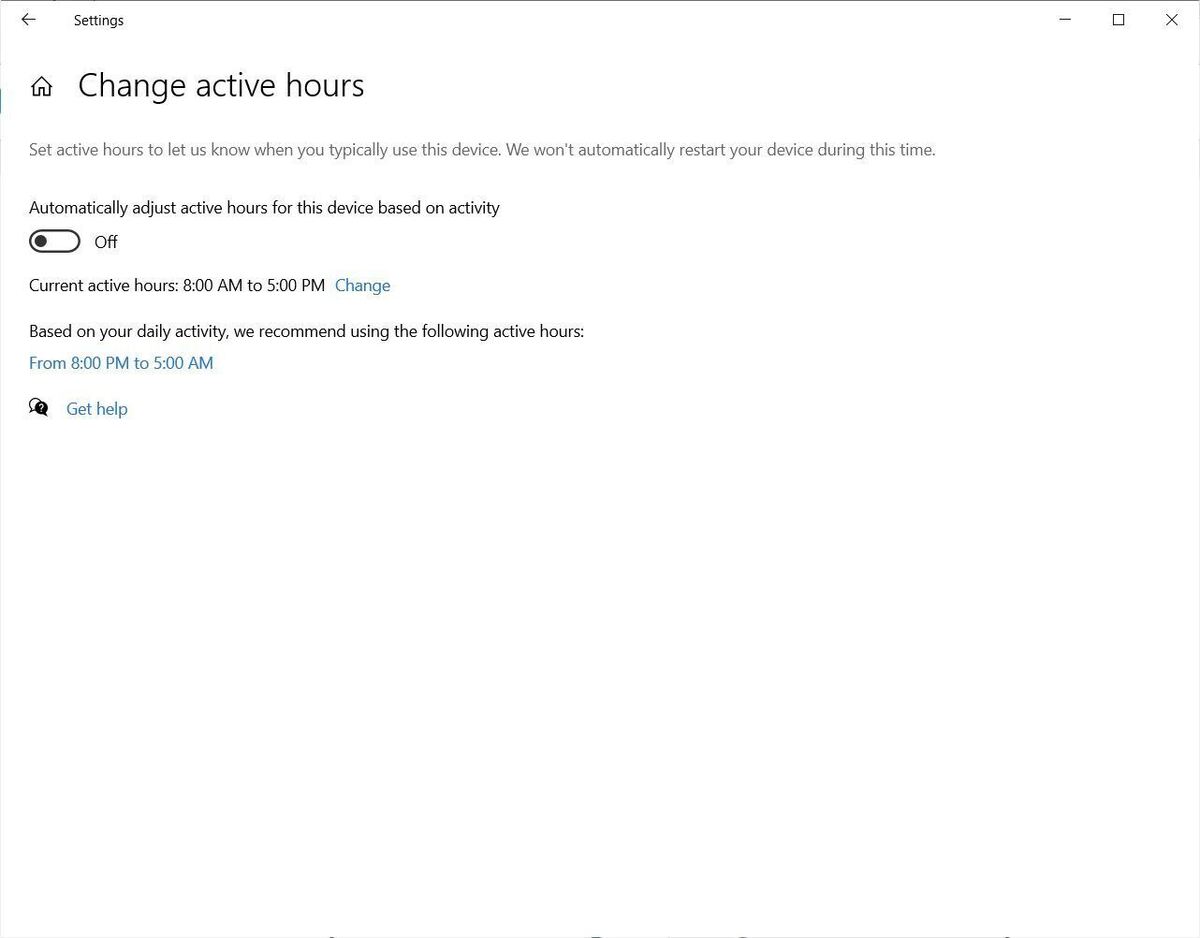
To control the update hours in Windows 10, on the Windows Update screen, click Change active hours. On the screen that appears, you can manually select the hours you’re active on your PC by clicking the Change link next to your current active hours. On the screen that appears, select the hours you typically use your computer. Updates won’t be installed during those hours. Note, though, that the total number of active hours can’t exceed 18.
 IDG
IDG
You can control when Windows installs updates by choosing “active hours,” during which installations shouldn’t take place.
You can alternatively trust Windows to decide which hours you’re most likely to be working (based on your past activity) and set your active hours for you. On the “Change active hours” screen, move the slider underneath the text “Automatically adjust active hours for this device based on activity” from Off to On.
Your system may or may not need to restart in order to install Windows updates. Typically, updates that add virus definitions for Microsoft Defender don’t need the system to restart, while other updates do. By default, your PC will restart to finish installing the updates only during non-active hours.
If you’d like Windows to alert you, via a system tray icon, when your PC needs to reboot in order to finish installing an update, go to the Windows Update screen and click Advanced options. In the “Update notifications” section on the screen that appears, move the “Show a notification when your PC requires a restart to finish updating” slider to On.
When an update has been downloaded but not yet installed, you’ll see it listed on the Windows Update screen. If you want the downloaded update to immediately install, on the Windows Update screen click Restart now. If you want to have your PC restart at a specific time, click Restart options and select the day and time you want your PC to restart. And if for some reason you want Windows to always install updates and restart your PC right away (essentially ignoring your active hours), click Advanced options from the Windows Update screen, and on the screen that appears, in the “Update options” section, move the “Restart this device as soon as possible when a restart is required to install an update” slider to On. (Your PC must be turned on and plugged in.)
One last update option, while we’re here: You can ask Windows Update to install not just updates for Windows, but also for other Microsoft products, such as Microsoft Office. To do that, on the Windows Update screen, click Advanced options, and in the “Update options” section of the screen that appears, move the slider from Off to On underneath “Receive updates for other Microsoft products when you update Windows.”
Control the update hours in Windows 11
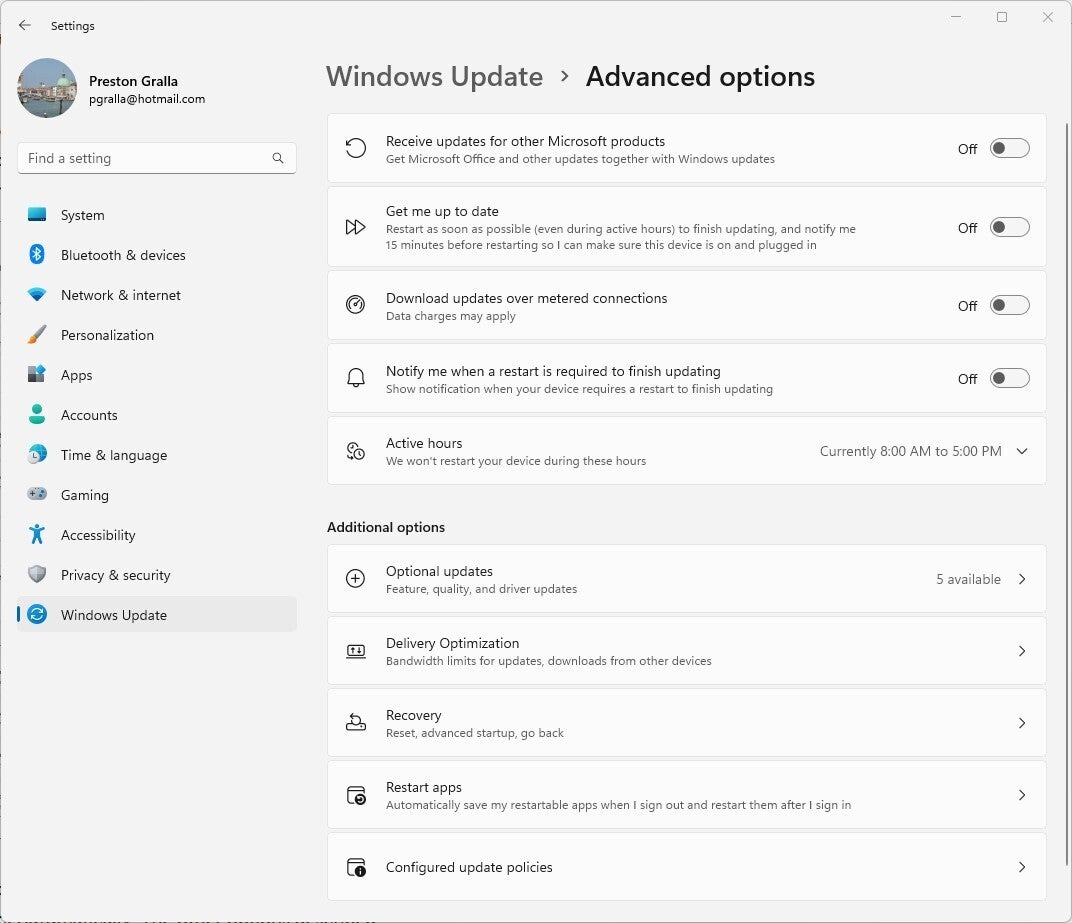
You control the update hours in Windows 11 in much the same way as you do in Windows 10, although the screens that let you do that differ somewhat. On the Windows Update screen in Windows 11, click Advanced options, then click the down arrow next to Active hours. In the area that appears, click Adjust active hours, and from the drop-down menu that appears, select Manually. Separate controls appear for “Start time” and “End time.” Select your new hours.
 IDG
IDG
Here’s how to change the update hours in Windows 11.
To tell Windows to automatically select your active hours for you, select Adjust active hours, and select Automatically. The other options described above are the same in Windows 11 as Windows 10, with only one difference: there’s no option for installing updates for other Microsoft products.
Next page: Stop updates, uninstall problematic updates, more →


