In some offices, computers are shared between two or more employees or temporary workers. That sounds like a recipe for disaster, but Windows 10 and 11 have great tools for allowing multiple people to share a PC without letting them read, edit, or delete each other’s files and folders; use or delete each other’s applications; or make system-wide customizations.
These tools can also be a big help for people who work from home and need to share their PC with a family member some of the time. They allow you to set up and log in with different user profiles so each user has access to only their own files and folders, apps, and preferences. In this piece, I’ll show you what to do.
This article has been updated for Windows 10 version 22H2 and Windows 11 version 22H2, both released in the fall of 2022. If you have an earlier release of Windows 10 or 11, some things may be slightly different.
Setting up accounts for sharing a Windows 10 or 11 PC
Windows 10 and 11 make it easy for multiple people to share the same PC. To do it, you create separate accounts for each person who will use the computer. Each person gets their own storage, applications, desktops, settings, and so on.
One person, the PC’s administrator, sets up and manages all the accounts, including a variety of system settings that only the administrator can access. The administrator account is established when Windows is first installed or used on the machine. (You can also upgrade other user accounts to administrator status, as I’ll cover later in the story.)
If you’re an administrator, setting up a user account is easy. First you’ll need the email address of the person for whom you want to set up an account. Ideally, this should be the sign-in information for their Microsoft account (such as an @outlook.com or @hotmail.com address or a corporate email address at an organization that uses Outlook) so they’ll be able to use all of their existing Windows settings, get access to their OneDrive storage, and download and install apps from the Microsoft Store. Anybody can sign up for a Microsoft account for free.
For now, we’ll assume that the person you want to add has a Microsoft account. Later on I’ll show you how to set up an account if they don’t have one and don’t want to register for one, but note that you can’t set up restrictions for family members unless they sign in with a Microsoft account. Accounts for children can only use an @outlook.com or @hotmail.com domain.
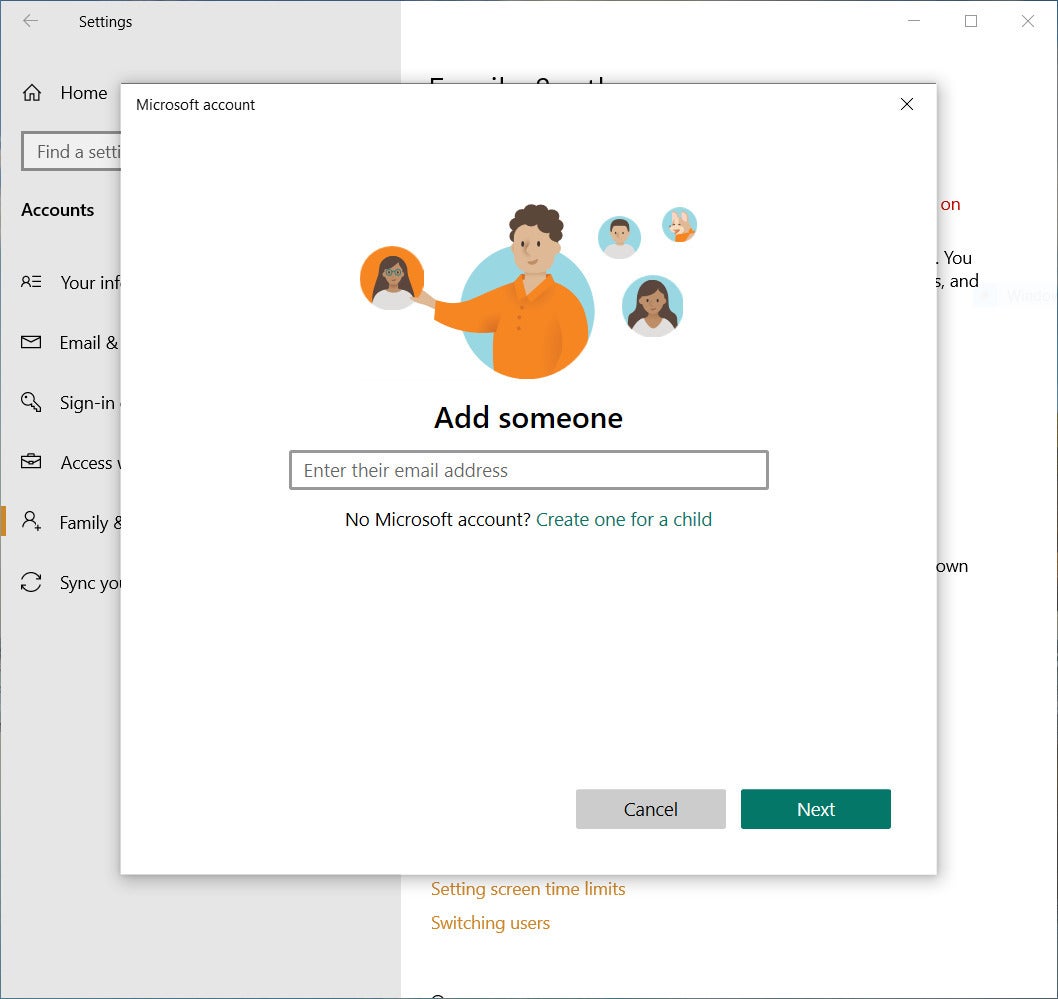
To add a user in Windows 10, click the Start button, select Settings and then choose Accounts. On the Accounts screen, choose Family & other users from the menu on the left. To set up an account for a co-worker, go to the “Other users” section and click Add someone else to this PC. To set up accounts for family members that let you set age limits, game and app restrictions, etc., instead choose Add a family member under the “Your family” section.
 IDG
IDG
Adding another user in Windows 10. (Click any image in this story to enlarge it.)
On the screen that appears, enter the email address of the person for whom you want to create a user account, and click OK. From the next screen, choose whether the person will be an “organizer,” who can edit family and safety settings, or a “member,” who can only edit their own settings, depending on their age. Then click Invite. The person gets sent an email. They’ll need to click Accept Invitation to be allowed to share the PC. They also become part of your family group.
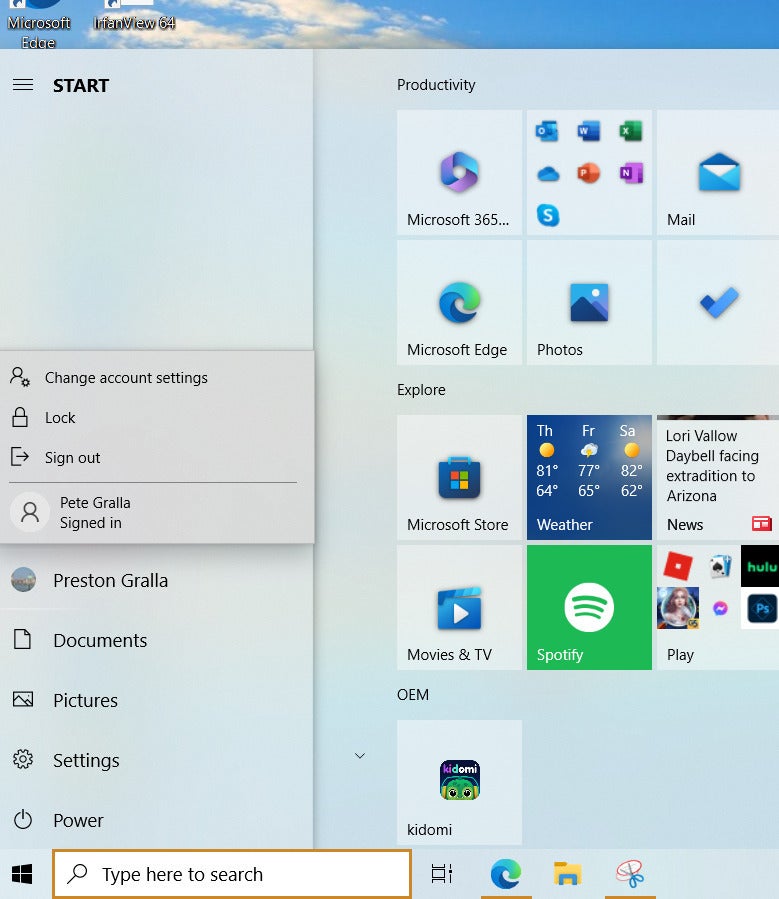
After they accept the invitation, the user’s name now appears on the “Family & other users” accounts page. (Before the person accepts the invitation, the name is there as well, although it’s shown as pending.) It also appears when you click the icon representing the current user of the PC, midway down on the left side of the Start menu when you click the Start button.
 IDG
IDG
When an account name is clicked in the Start menu, it will show all the accounts on the machine.
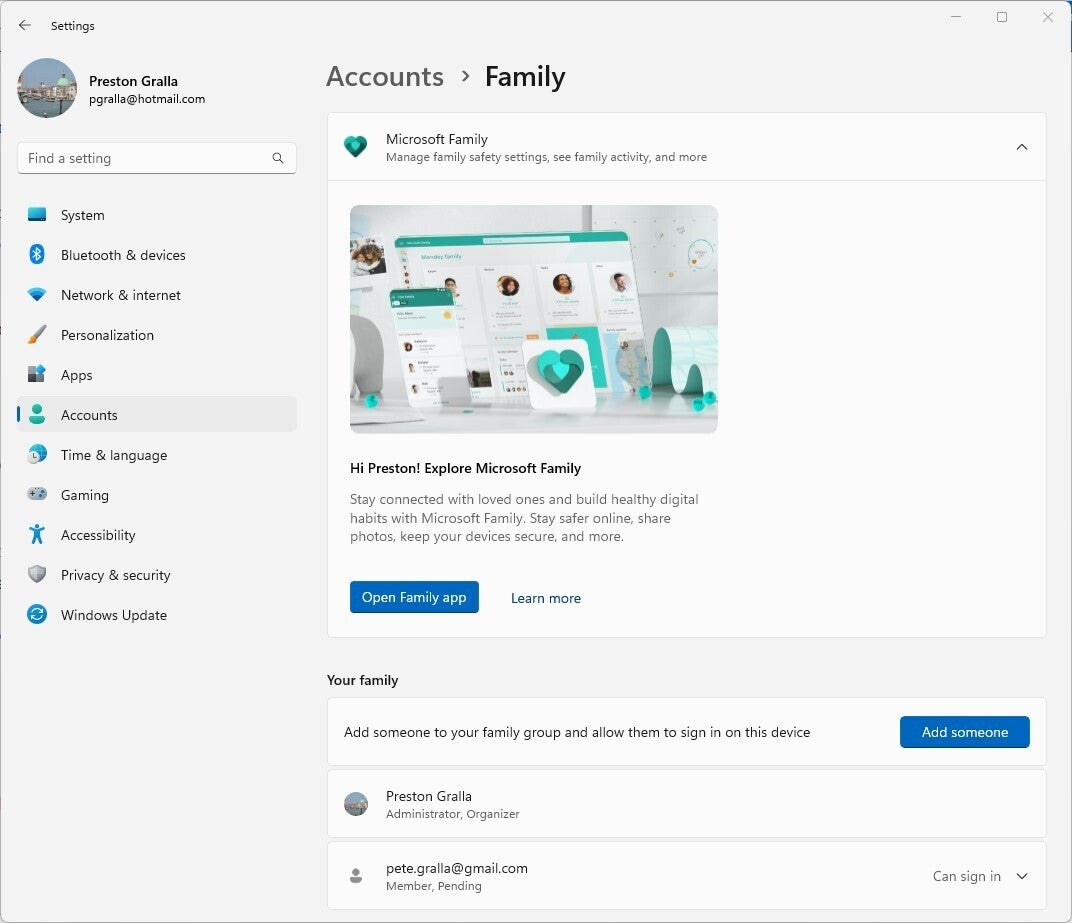
To add a user in Windows 11, go to Settings > Accounts > Family > Add someone, then follow the same directions as for Windows 10. The user’s name will appear on the Microsoft Family Settings page. You can also click the Start button, then click the icon representing the current user’s account on the lower left of the screen to see any family accounts on the machine.
 IDG
IDG
After you create an account for someone else in Windows 11, the name appears on the Microsoft Family Settings page.
If you’re the owner of the new account, there are two ways to start using it. You can click the icon representing the account of the current user of the PC, midway down on the left side of the Start menu. That displays all the accounts on the PC. Click your account name and log into your account with your Microsoft account password.
Or you can restart the PC. The Windows login screen will now have two accounts on it — yours and the administrator’s. You can click your account name and log in with your Microsoft account password.
The account will have its own separate OneDrive storage. Each user’s local files and folders won’t be accessible to the other. You will see the Windows apps you’ve installed, but not anyone else’s, and vice versa. Given that it’s a Microsoft account, files and settings will sync with all other devices connected to your account.
Creating a new user account without using a Microsoft account
Creating a shared PC if the other person doesn’t have or want a Microsoft account takes a little bit more work.
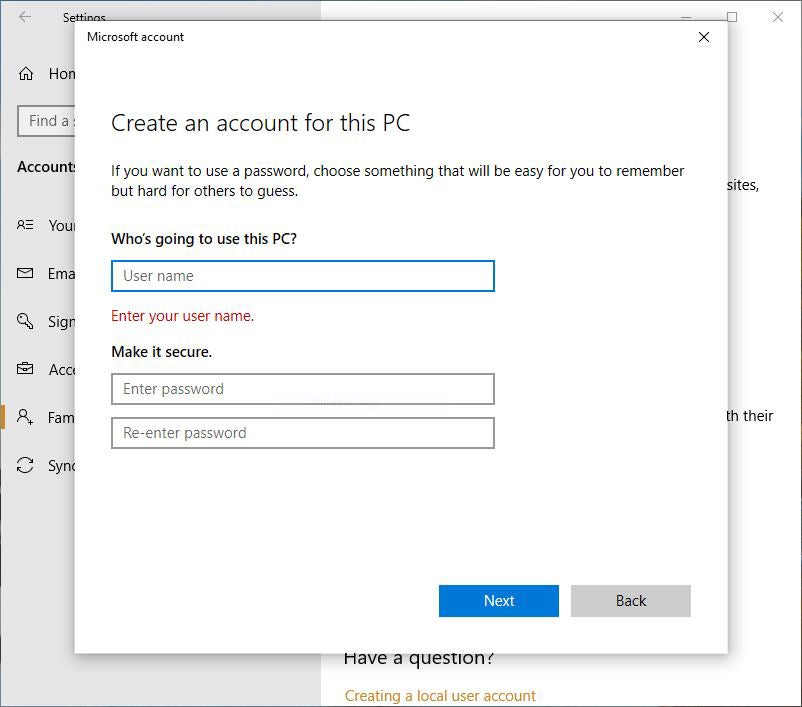
To do it in Windows 10, go to Settings > Accounts > Family & other users > Add someone else to this PC. (This is same selection you’ll make if you’re adding a family member without a Microsoft account, but remember that you won’t be able to use parental controls.) On the screen that appears, click I don’t have this person’s sign-in information. Then at the bottom of the next screen, click Add a user without a Microsoft account.
 IDG
IDG
You can add a user who doesn’t have a Microsoft account as a local account.
In Windows 11, go to Settings > Accounts > Other Users > Add account. On the screen that appears, click I don’t have this person’s sign-in information. Then at the bottom of the next screen, click Add a user without a Microsoft account.
Now you can add a user name and a password. The person’s account name will now show up the same way as if you had created one using a Microsoft account.
When you create an account for someone in this way, it’s called a local account. Unlike a Microsoft account, it won’t sync settings between devices, and it doesn’t give access to OneDrive. In addition, when someone has a local account, they won’t be able to download or install any apps from the Microsoft Store. They won’t be able to install desktop applications on their own, either — when they try to install them, they’re prompted for the password of the administrator’s account. So an administrator will have to be nearby to type in the password in order for them to install desktop applications.
Switching between accounts
Once your account has been set up, it’s easy to switch from the account currently running on the machine to your own. If someone else is currently using a Windows 10 machine and you want to use it, you can click the Start button, click the icon representing the current user’s account midway down on the left side of the Start menu, click the account to which you want to switch, and type in the password.
In Windows 11, click the Start button, click the icon representing the current user’s account on the lower left of the screen, click the account to which you want to switch, and type in the password.
You can, of course, also log in from the lock screen, which displays all of the user accounts on the machine.
One thing to keep in mind when several people use a PC with separate accounts: Even when someone is not using the PC, they still remain signed into the account unless they sign out or the PC is restarted. So several people might be signed into accounts, even though only one person is actively using the PC. (This does not mean that users have any access to the others’ accounts. There can be only one active account at a time; an individual user will still need to re-enter the password to see their account.)
To see which users are currently signed in in Windows 10, click the Start button, then click the icon representing the current user’s account midway down on the left side of the Start menu to see all of the machine’s accounts. Look underneath each account. The words “Signed in” will appear under the appropriate accounts.
In Windows 11, click the Start button, then click the icon representing the current user’s account on the lower left of the screen to see all of the machine’s accounts. Look underneath each account. As with Windows 10, the words “Signed in” will appear under the appropriate accounts.
What does it mean that someone is signed into their account, even if they’re not currently using it? When someone is signed in, Windows saves the state of that person’s user account — which applications the person was running, the files they were working on, and so on. That way, when they switch back to using their account, everything will be in place, and they won’t have to waste time launching apps, opening files, and so on.
This is useful, but it can be problematic as well, because it can lead to lost work. When a PC is restarted or shut down, all users on it are automatically logged off. Say someone is logged into their account and hasn’t yet saved work — if the computer is switched to another account, and the person using that second account restarts or shuts down the system, the first person will lose their unsaved work.
The upshot? It’s always a good idea to log out of your account before letting someone else use the same computer. It only takes a moment: Click your account name at the top of the Start menu and then click Sign out.
Managing accounts
If you want to let another user have administrator access, it’s simple to do. In Windows 10, select Settings > Accounts > Family & other users, click the account to which you want to give administrator rights, click Change account type, then click Account type. Choose Administrator and click OK. That’ll do it. You can always change it back to a standard user account later using this same method.
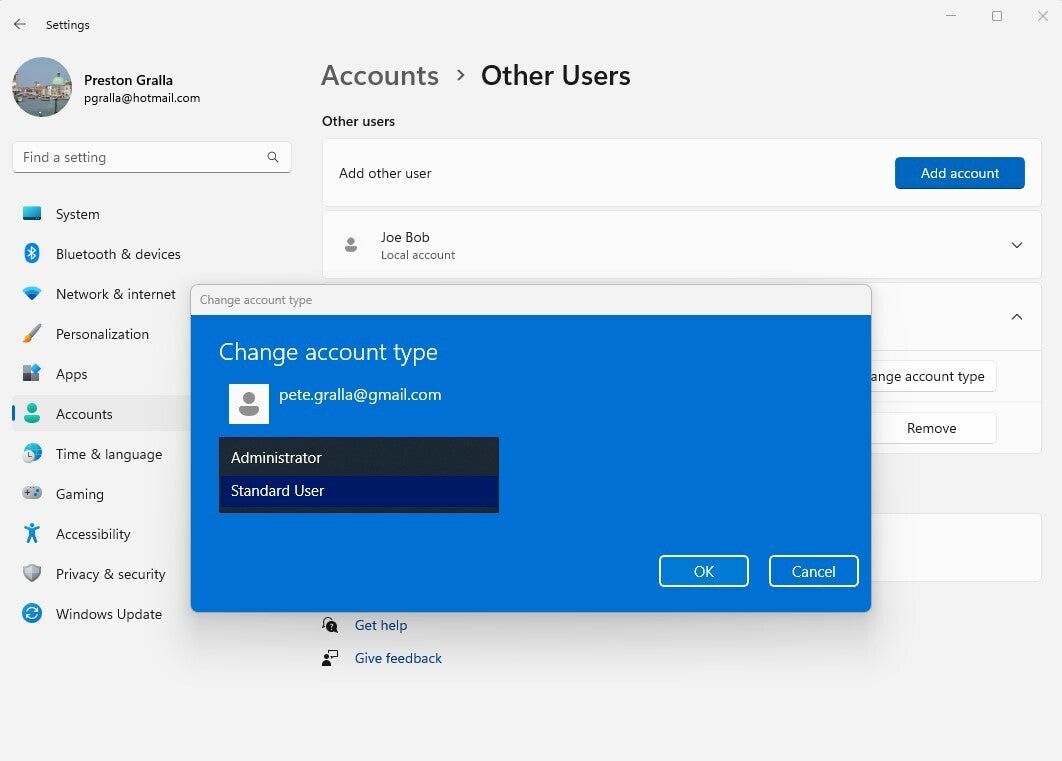
In Windows 11, select Settings > Accounts > Other users, click the down arrow next to the account you want to make an administrator, and then click Change account type. As with Windows 10, choose Administrator and click OK.
 IDG
IDG
You can change a standard user account to an Administrator account, as shown here in Windows 11.
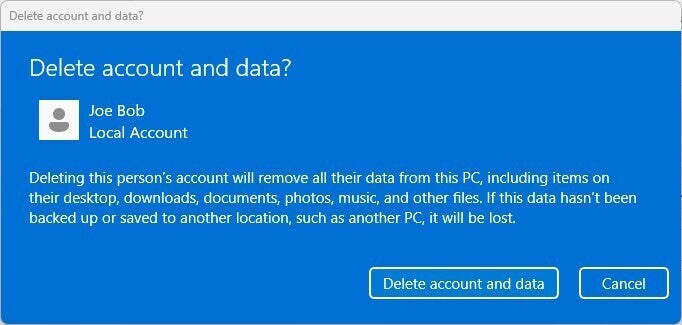
In Windows 10, select Settings > Accounts > Family & other users, click the account you want to remove, and then click Remove. A screen appears warning you that when you delete the account, you also delete all data associated with it, which includes files, desktop setup, apps, music, and so on.
In Windows 11, select Settings > Accounts > Other users, click the down arrow next to the account you want to remove, and then click Remove. Then follow the same directions as for Windows 10.
 IDG
IDG
When you delete an account, you also delete all data associated with it.
Once you’ve got it in hand, you’ll find that this is a simple and useful way for sharing a Windows 10 or 11 PC among multiple people.
Bonus tip: Turn on the hidden Windows 10 administrator account
I’ve got one more tip for you: how to turn on something that is sort of a super-administrator account hidden in Windows 10 and 11.
As I explained previously, the account you create when you install Windows is the PC’s administrator account — it gives you control over how Windows 10 or 11 works on the PC, what other accounts can be created and so on. But Windows 10 and 11 also set up a hidden administrator account during installation.
This hidden account has one advantage over a normal administrator account — when you use it, you won’t get any User Account Control (UAC) prompts. That makes it much easier to troubleshoot and customize Windows, because you won’t be constantly bothered by those pesky UAC notices.
Some people refer to this hidden administrator account as an elevated account, and a normal one as an un-elevated account.
It’s easy to turn on and use the hidden administrator account. Use the same directions for Windows 10 and 11:
- Make sure you’re using your normal Administrator account.
- In the Search box, type command prompt and from the pane that appears on the right, click Run as Administrator. Look at the prompt’s title bar. It will read “Administrator: Command Prompt.”
- At the command prompt, type net user administrator /active:yes and press Enter.
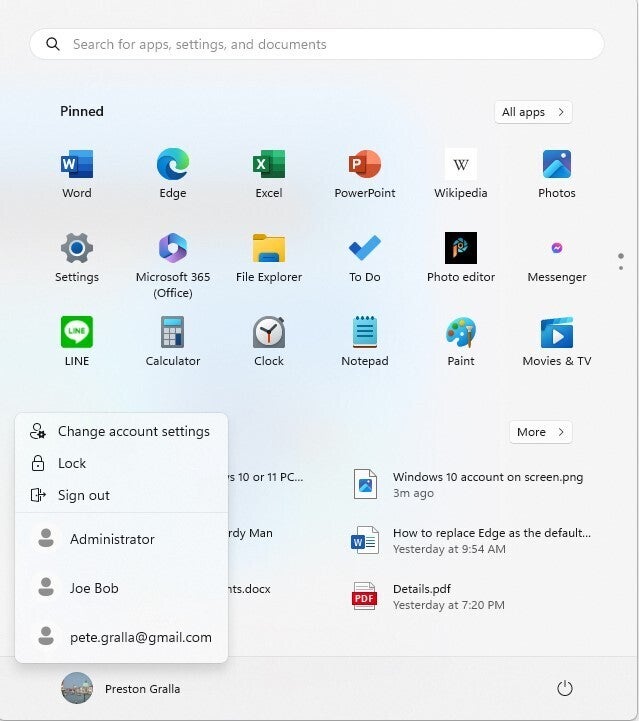
That turns on the hidden administrator account. In Windows 10 it will appear on the login screen and on the Start menu screen — just click it to use it as you would any other account. In Windows 11 it will appear on the login screen and when you click the Start menu and then click your account icon.
 IDG
IDG
When you turn on your PC’s hidden administrator account, it shows up just like any other account in Windows 10 or 11.
If you want to disable the hidden account, follow steps 1 through 3, and at the command prompt, type net user administrator /active:no and press Enter.
This article was originally published in March 2016 and most recently updated in September 2023.


