Task View and virtual desktops
In Windows 11, Microsoft redesigned its Task View feature for creating multiple virtual desktops, and it’s now more useful than ever.
To activate Task View, click its icon (two overlapping squares) in the taskbar just to the right of the Search button, or press the Windows key + Tab. When you do, Task View springs into action.
(Note that Task View no longer includes Windows 10’s Timeline feature that displayed snapshots of the files you worked on recently.)
Task View is divided into two sections. At the top of the screen you see your currently running apps and applications arrayed against a fuzzy version of the desktop so you can quickly see what you’ve got running. Click any thumbnail to switch to that app. If you hover your mouse over any thumbnail, an X appears in its upper-right corner. Click the X to close that app. For those used to using the old Alt + Tab key combination to cycle through open apps and applications, you can still do that as well. Press the Esc key to leave Task View and return to where you were.
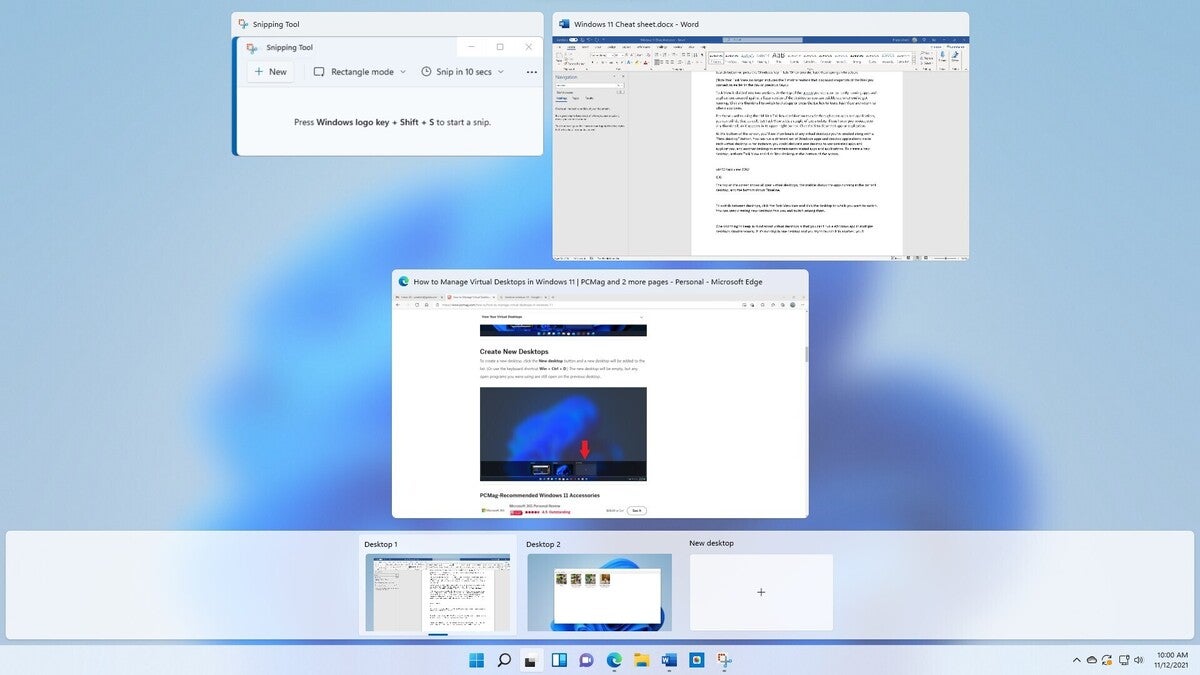
At the bottom of the screen, you’ll see thumbnails of any virtual desktops you’ve created, along with a “New desktop” button. You can run a different set of apps inside each virtual desktop — for instance, you could dedicate one desktop to work-related apps, and another desktop to entertainment-related apps. To create a new desktop, activate Task View and click New desktop at the bottom of the screen.
 IDG
IDG
The bottom of the screen shows all your virtual desktops, and the main area shows the apps running in the current desktop. (Click image to enlarge it.)
To switch between desktops, click the Task View icon and click the desktop to which you want to switch. You can keep creating new desktops this way and switch among them. To close a virtual desktop, hover your mouse over it in Task View and click the X on its upper right.
There’s also a quicker way to switch to switch to a virtual desktop (or create or close one) without activating Task View. Hover your mouse over the Task View icon in the taskbar and you’ll see thumbnails of all of your virtual desktops. Click the one you want to switch to. To close one, hover your mouse over its icon. To create a new one, click the New desktop button.
Snap Layouts
If you’re the kind of person who likes their apps arranged on the desktop just so, you’ll likely be interested in Snap Layouts. With it, you group your open windows into one of a half-dozen pre-built screen layouts, such as having two apps side by side, each taking up half the screen. Or you might have one app on the left and two stacked vertically on the right, or four apps in a grid. The hope is that you’ll be able to find the layout that fits the way you work.
To use Snap Layouts, open the applications you want to be in it, then hover your mouse over an application’s maximize icon on the upper right of the screen, located between the minimize and close icons. Choose the layout you want and which position you want the application to be in, and the app window snaps into that position. Then you can choose from your other open apps to fill in the rest of the spots in the layout.
 IDG
IDG
A Snap Layout in action. (Click image to enlarge it.)
Once all the places in a Snap Layout are filled, that app grouping is saved as a Snap Group that you can quickly return to later if you’ve opened other apps or minimized any of the app windows in the group. Hover your mouse over the taskbar icon of any of the applications in a Snap Group, and you’ll see two small popups — one that’s a thumbnail of what’s open in the application itself, and another that shows the Snap Group. Choose the Snap Group icon, and you’ll switch to the whole group in the layout you set up previously, rather than to the individual application.
Quick Settings and notifications
Windows 11 does away with the Windows 10 Action Center and instead gives you two separate taskbar flyouts, one for your notifications, and the other to make changes to your system via Quick Settings.
 IDG
IDG
Notifications have their own flyout and appear along with a calendar. (Click image to enlarge it.)
To check your notifications, click the date and time on the taskbar or press the Windows key + N. A flyout pops up with a calendar of the current month and with any notifications above it, for things such as your news feed, new emails, and security and maintenance messages. You’ll know when you have new notifications, because a small blue icon with the number of new notifications appears in the date and time area on the taskbar.
Security and system notifications are generally well worth heeding. For example, you may be told that you can speed up your PC by stopping unnecessary programs from launching at startup. Tap the notification and you’ll be sent to the Task Manager, which lets you stop them from running. The alerts also tell you when you’ve got printer woes, issues with Microsoft’s OneDrive cloud-based storage or similar problems. So overall, you’ll probably find it worth your time to regularly check your notifications.
As for email, you might find those notifications less than useful, because the Notifications feature doesn’t always play well with your mail provider. If you’ve set up the Windows 10 Mail app to hook into your Gmail account, you will see a notification when that account gets new email. When you click the notification, the Mail app launches and you can read the message there. But the system doesn’t take into account whether you’ve already checked your Gmail account in a browser, so you’ll continue to see notifications for messages you’ve received, even if you’ve already read them in Gmail and deleted them.
You can change which notifications show up or turn them off completely. Go to Settings > Notifications and turn the slider to Off in the Notifications section at the top of the screen. If you want have some appear and some not appear, first turn the slider to On. Then scroll down and next to the notifications you don’t want to see, turn the slider to Off.
You can also customize each type of notification you see. Click the right-facing arrow next to any notification, and you’ll be able to change options such as what priority it should be given when displayed along with other notifications (higher priority notifications show up at the top of the list), or whether to play a notification sound when it appears.
 IDG
IDG
The Quick Settings pane gives you instant access to some of your most commonly used settings. (Click image to enlarge it.)
To get to Quick Settings, click the network, volume, and battery set of icons on the taskbar or press Windows key + A. Six icons appear in two stacked rows, the top three for Wi-Fi, Bluetooth, and Airplane mode, and the bottom three for Night light (which changes your PC’s lighting to a warm yellowish), Focus assist (which stops notifications), and Accessibility (controls things such as the Magnifier and Narrator). Depending on your computer and setup, these icons might be different — for example, you might see a battery icon on a laptop.
You can use Quick Settings not just to turn settings on or off, but to customize how you use some of them. Those that allow for customization have a right arrow next to them. So, for example, click the Wi-Fi icon to show all available Wi-Fi networks and select which you want to use.
Below the icons is a volume control for your speakers. To the volume control’s right you’ll find a link to Settings, as well as an edit icon that when clicked lets you change which settings appear in Quick Settings. Click it and you can delete any icon by clicking its pushpin button on its upper right. You can also add new icon by clicking the New button and choosing which you want to add from the menu that appears.
Using Windows 11 on a tablet or 2-in-1
Windows 11 does away with the separate tablet interface of Windows 10. Gone is the Windows 10 feature called Continuum that automatically sensed the device you were using and switched Windows 10’s interface to match it. In Windows 11, tablet users see more or less the same interface as desktop and laptop users.
There is at least one very minor change in how Windows 11 looks on a tablet versus a desktop or laptop — the taskbar icons are slightly wider apart to accommodate tapping with a finger rather than clicking with a mouse. If you use a 2-in-1, you won’t have to do anything when you detach or attach your keyboard; Windows 11 automatically makes the switch.
Probably the biggest change in Windows 11 for users with touchscreens is that you can use three-finger and four-finger gestures on the screen itself, not just the touchpad:
Three-finger gestures
- Swipe left/right: Switch to the last used app window
- Swipe up: Show all open app windows
- Swipe down: Show the desktop
Four-finger gestures
- Swipe left/right: Switch to the previous/next virtual desktop
(See below for more touchscreen gestures, along with keyboard shortcuts and touchpad gestures.)
To turn on touch gestures, go to Settings > Bluetooth & devices > Touch > Three- and four-finger touch gestures and turn the switch on.
Minor changes and missing features
Some familiar features from Windows 10 have been tweaked slightly in Windows 11, usually for the better.
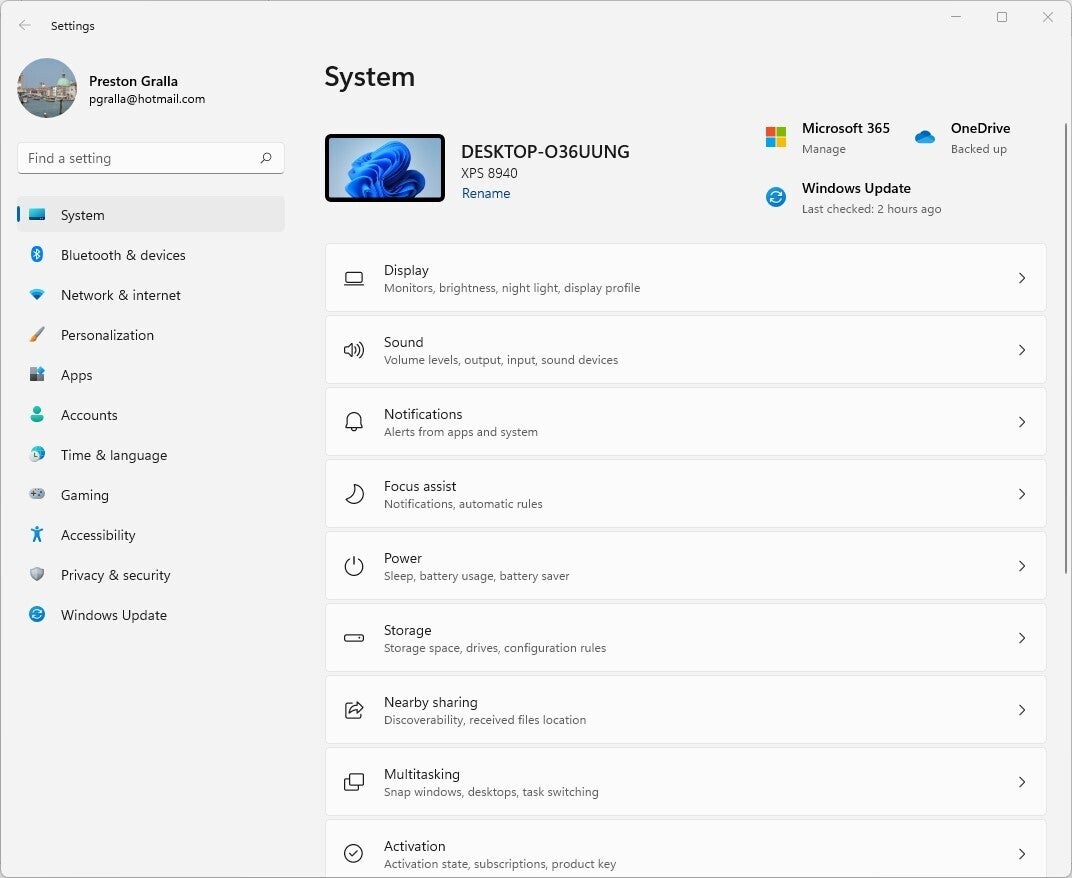
Settings: Windows 11 reorganizes and streamlines the Settings app somewhat, but in general it’s the same app as in Windows 10. Get to it by clicking the Start button, then clicking Settings. You can also get to it from various places throughout Windows by clicking on a gear icon, such as on the lower right of the screen in Quick Settings.
 IDG
IDG
The Settings app, the control center for all your system settings, sports a new streamlined look that makes it easier to get to the setting you want. (Click image to enlarge it.)
(See our Windows 10 cheat sheet for general information about using the Settings app.)
 IDG
IDG
The Windows Clipboard has a new toolbar for pasting emojis, Kaomojis, symbols, and GIFs from pre-selected libraries. (Click image to enlarge it.)
Clipboard: In Windows 11, the Clipboard gets a particularly useful new feature – the ability to paste emojis, Kaomojis, symbols, and GIFs from pre-selected libraries. A row of symbols at the top of the Clipboard lets you access any of the libraries. Scroll or search through any and click what you want to paste.
Cortana: Microsoft’s digital assistant, which has struggled to gain traction, is turned off by default. There’s good reason for that — with each succeeding year, Microsoft takes away more of its features. These days, there’s not a whole lot it can do.
If you do find Cortana useful and want to enable it in Windows 11, go to Settings > Apps > Apps & Features, then scroll to the Cortana entry. Click its three-dot icon, then select Advanced options. On the screen that appears, in the “Runs at log-in” setting, move the slider from Off to On. The next time you log into Windows, Cortana will start. To run it, do a search for Cortana and then click its icon.
One problem with running Cortana this way is that even though it runs at startup, its icon won’t show up on the taskbar until you run it manually. The icon disappears when you close it. When you go to the taskbar settings that let you control what icons should appear on it, Cortana doesn’t show up as an option, even if it’s enabled to run at startup. You can, however, pin it to the taskbar by running it, then clicking its icon on the taskbar and choosing Pin to taskbar.
In addition to those changes, Microsoft streamlined Windows 11 by cutting out several features from Windows 10. Here are the most obvious ones:
People: In Windows 10 this let you pin contacts to the Windows taskbar, and then communicate with them without having to open a separate app. It’s no surprise People is gone — Microsoft said some time ago that it would kill the feature. It’s been replaced with a stripped-down version of Teams, the collaboration app Microsoft is pushing heavily in a remote-first world.
Skype: Microsoft’s legacy chat and videconferencing tool Skype doesn’t ship with Windows 11. As with People, it’s likely because Microsoft is trying to move as many people as possible to Teams. However, you can still download Skype and use it in Windows 11.
Timeline: Timeline, a Windows 10 feature that let you review and resume activities as well as open files you’ve started on any of your Windows PCs, has been axed.
Handy keyboard shortcuts, touchpad gestures, and touchscreen gestures
Windows 11 supports a variety of keyboard shortcuts as well as gestures for touch-based devices. Try them out a few times, and before long they’ll become second nature.
First let’s look at the most useful keyboard shortcuts — get to know these and you’ll save oodles of time as you zip around Windows 11 without taking your hands off the keys.
Next up are touchpad gestures. Touchpads are standard equipment on laptops these days, and for everyday computing, a modern touchpad can do everything a mouse can, and more. (Note, however, that if you have an older machine, some or all of these gestures might not work.)
Finally, if you’re working on a tablet or a touchscreen PC, here’s how to get around.


