7. Disable shadows, animations, and visual effects
Those who like eye candy are probably big fans of Windows 11’s shadows, animations, and visual effects. They typically don’t affect performance on fast, newer PCs. But they can exact a performance hit on older, slower machines.
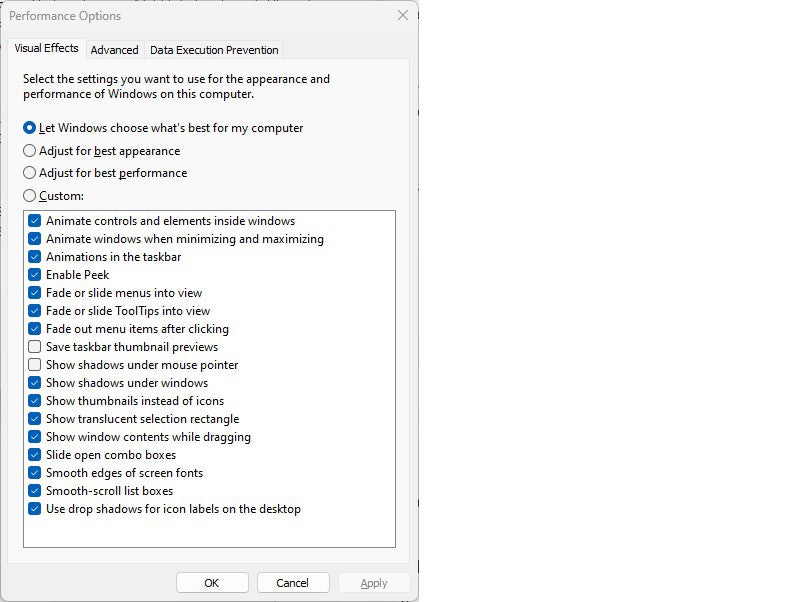
If you’ve got a slower PC, turn them off. To do it, in the Windows 11 search box, type sysdm.cpl, press Enter, and then click the sysdm.cpl icon. That launches the Control Panel’s System Properties dialog box. Click the Advanced tab and click Settings in the Performance section. That brings you to the Performance Options dialog box. (Make sure you’re on the Visual Effects tab of the dialog box.) You'll see a varied list of animations and special effects.
 IDG
IDG
The Performance Options dialog box lets you turn off visual effects that might be slowing down Windows 11. (Click image to enlarge it.)
If you love to tweak, you can turn individual options on and off. These are the animations and special effects you’ll probably want to turn off, because they have the greatest effect on system performance:
- Animate controls and elements inside windows
- Animate windows when minimizing and maximizing
- Animations in the taskbar
- Fade or slide menus into view
- Fade or slide ToolTips into view
- Fade out menu items after clicking
- Show shadows under windows
However, it's a lot easier to just select the Adjust for best performance option at the top of the screen and click OK. Windows 11 will then turn off the effects that slow down your system.
8. Disable transparency
To get an even bigger speed boost, go beyond turning off shadows, animations, and visual effects. Also disable the transparency effects in the taskbar and other Windows 11 locations. Windows does a surprising amount of heavy lifting to create transparency effects, and turning them off can make a difference in system performance.
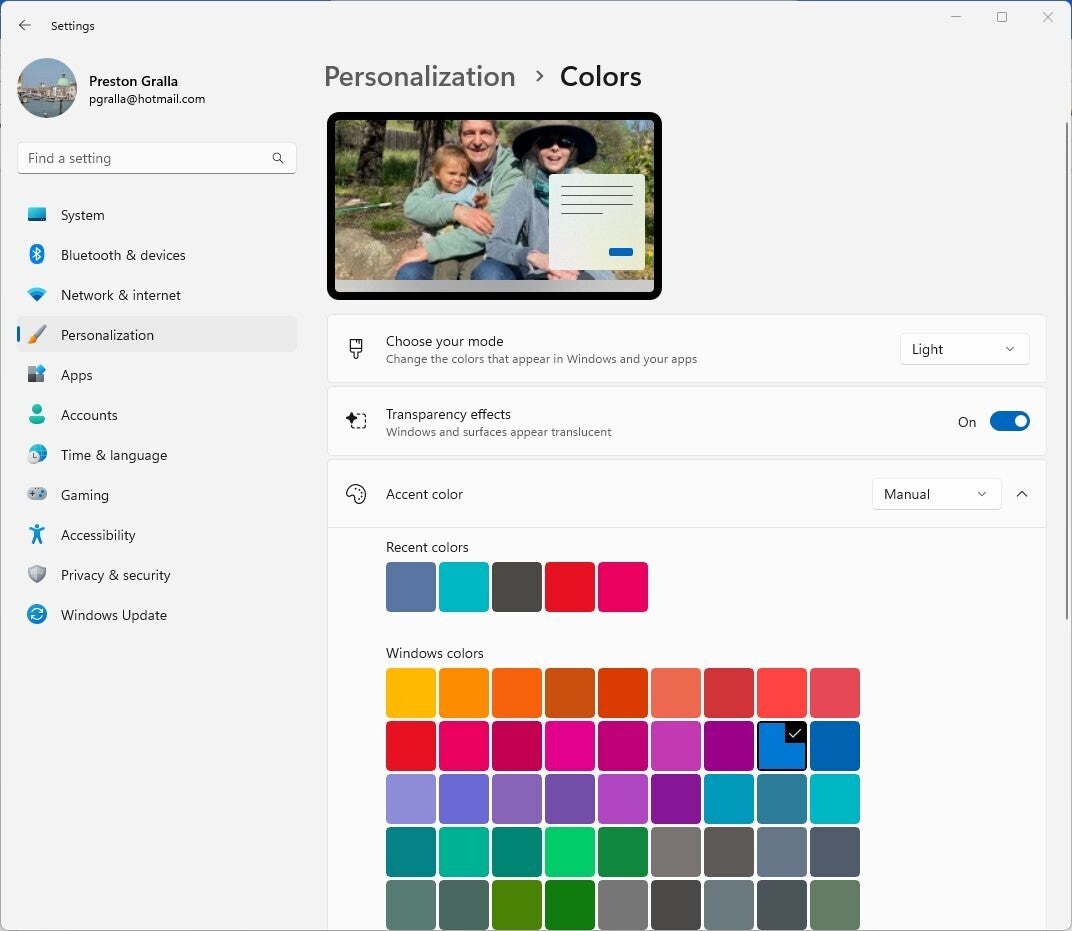
To do it, click the Start button, select Settings > Personalization > Colors, and move the Transparency effects slider to Off.
 IDG
IDG
Turning off Windows 11’s transparency effects can help speed up performance. (Click image to enlarge it.)
9. Change your power settings
Your Windows 11 PC’s power settings let you balance its energy use with its performance. So keep in mind that if you’re using Windows 11’s “Power saver” plan, you’re slowing down your PC. That plan reduces your PC’s performance to save energy. (Even desktop PCs typically have a “Power saver” plan.) Changing your power plan from “Power saver” to “High performance” or “Balanced” will give you an instant performance boost.
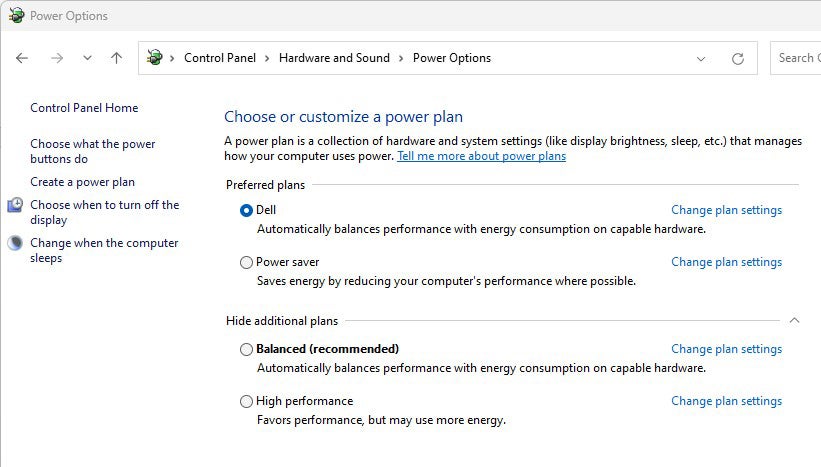
To do it, first launch the Control Panel app by typing control in the search box and clicking the Control Panel icon. Then select Hardware and Sound > Power Options. You’ll typically see two options: “Balanced (recommended)” and “Power saver.” Depending on your make and model, you might see other plans here as well, including some branded by the manufacturer. To see the “High performance” setting, click the down arrow by “Show additional plans.”
 IDG
IDG
Change your power settings in Control Panel to give your PC a performance boost. (Click image to enlarge it.)
Choose the setting you want, then exit Control Panel. “High performance” gives you the most oomph but uses the most power. “Balanced” finds a happy medium between power use and better performance, and “Power saver” does everything it can to give you as much battery life as possible. Desktop users have no reason to choose “Power saver,” and even laptop users should consider the “Balanced” option when unplugged.
10. Turn off Windows tips and tricks
Windows 11 constantly watches what you’re doing on your PC and gives you tips about things you might want to do with the operating system. I’ve never found these “tips” helpful. And I don’t like the privacy implications of Windows constantly taking a virtual look over my shoulder.
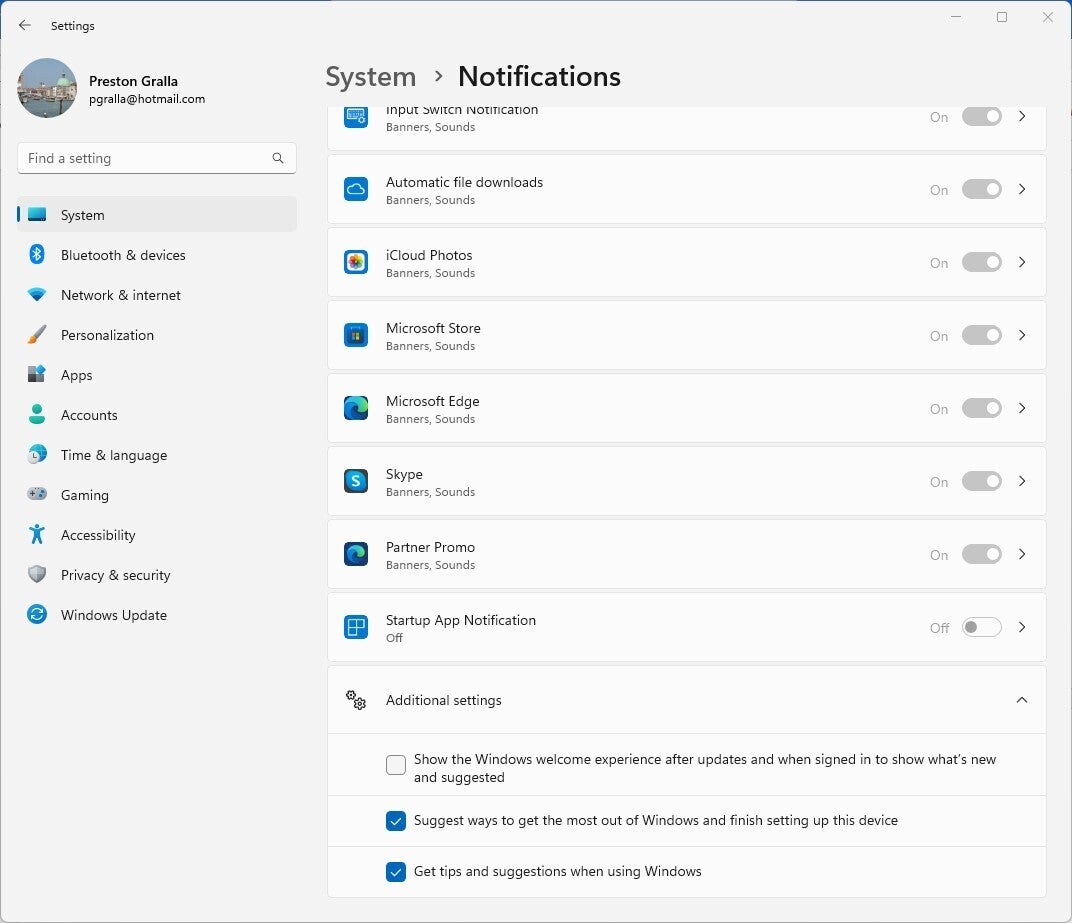
Beyond that, this monitoring can also make your PC run more sluggishly. So to speed things up, tell Windows to stop being so nosy and giving you advice. To do it, click the Start button and select Settings > System > Notifications. Scroll down to Additional settings and click the down arrow. From the options that appear, uncheck the box marked Get tips and suggestions when using Windows.
 IDG
IDG
Turning off Windows’ suggestions for you should help things run more smoothly (and give you back a measure of privacy). (Click image to enlarge it.)
11. Disable Game Mode
Windows 11’s Game Mode optimizes your PC for playing games. When it detects that you’re playing a game, it prioritizes system resources for gaming, taking them away from other apps and background processes. That’s great for serious gamers, but when you’re not playing games, it can slow down your system because it keeps some system resources in reserve in case you start playing a game. It occasionally causes stability issues as well. So turning off Game Mode may be able to give your PC a quick boost. (You can always turn it back on again when you want to play a game.)
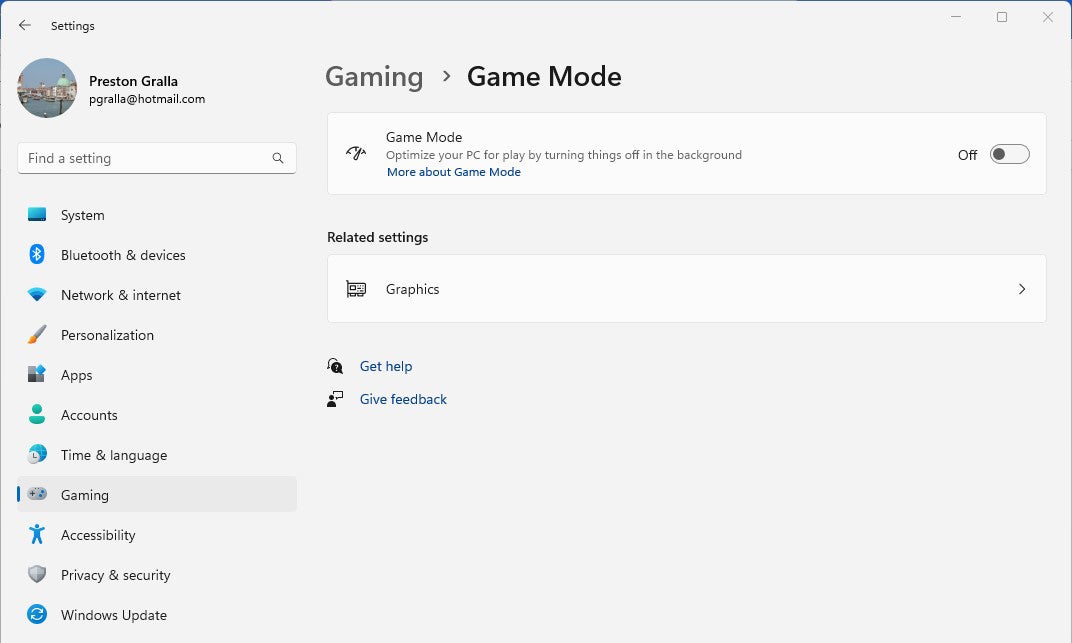
Game Mode is turned on by default, so even if you’ve never played a game on your PC, it’s probably enabled. To turn it off, go to Settings > Gaming > Game Mode and move the Game Mode slider to Off.
 IDG
IDG
Game Mode can sometimes cause stability and performance issues, so turning it off may give your PC a boost. (Click image to enlarge it.)
12. Update device drivers
Your Windows 11 PC can become a slowpoke if its drivers are old and in the way. Outdated drivers can exact a big performance hit. Graphics drivers are often the biggest culprit in driver-related slowdowns. To check whether yours is outdated, and to update to the latest one:
- Left-click the Start icon to the left of the Search box and select Run.
- Type msc in the Run box that appears and click OK or press Enter.
- Scroll to the Display Adapters entry and click the side-facing arrow to expand it.
- Right-click the driver, and from the context menu that appears, select Update.
- You’ll be asked whether to have Windows search for an updated driver, or whether you want to find one and install it manually. Your best bet is to let Windows do the work. Follow the on-screen instructions to get the driver installed.
You can use the Device Manager to update all your drivers this way. That’s time-consuming, so consider asking Windows to do the work the work for you. Here’s how:
- Launch the Settings app (pressing the Windows key + I is a good shortcut for doing it) and select Windows Update from the left pane.
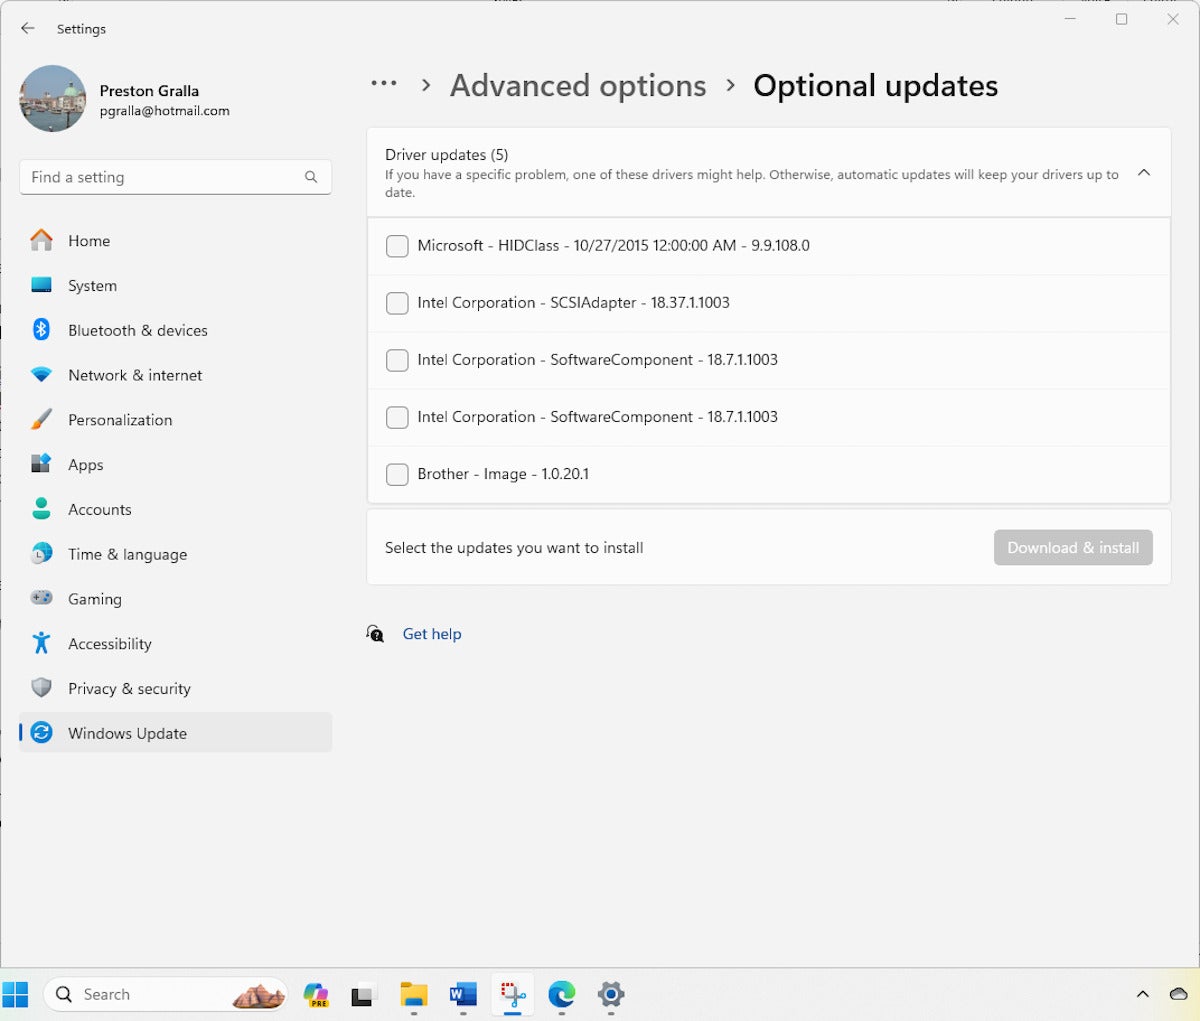
- Select Advanced Options > Additional Updates. You’ll see a list of all the updates Windows has found but hasn’t installed.
- Select any of the drivers you want to install, then click Download & Install.
 Microsoft
Tell Windows Update to update your drivers.
13. Restart Windows
Here’s one of IT’s not-quite-secret weapons for troubleshooting and speeding up a PC: shut it down and restart it. Doing that clears out any excess use of RAM that otherwise can’t be cleared. It also kills processes that you might have set in motion and are no longer needed, but that continue running and slow your system.
If your Windows 11 PC has turned sluggish over time for no apparent reason, you may be surprised at how much more quickly it will run when you do this. I can vouch for it, and I restart my Windows 11 PCs regularly even if they’re not sluggish, just as a precautionary measure.
This article was originally published in February 2023 and most recently updated in November 2023.


