Windows’ built-in Deployment Image Servicing and Management command-line tool, a.k.a. DISM, has been around since Windows Vista, when it was first introduced as a method for creating and managing Windows images based on the Windows image (.wim) file format. It also works with the encrypted and compressed Electronic Software Download (.esd) file format introduced in Windows 8.1. DISM hasn’t changed much since it emerged in 2014, and (mostly) works the same for both Windows 10 and 11.
In the context of the DISM utility's name, “servicing” is a broad term covering a wide range of functions, from capturing a disk partition and creating a disk image from its contents to mounting and modifying a disk image. My own recent use of DISM with Windows 10 and 11 has centered around day-to-day system upkeep and maintenance. I’ll discuss the following DISM tasks in this article:
- Installing Windows updates from the Microsoft Update Catalog or other package file sources
- Repairing a Windows 10 or 11 image
- Cleaning up the Windows component store to reclaim disk space
- Identifying Windows images, installers, and ISO files
- Identifying and changing international settings in Windows images
To use DISM for any of these tasks, you’ll need to open an administrative command prompt or an administrative PowerShell session. (Type either cmd or powershell in the Windows search box, right-click Command Prompt or Windows PowerShell in the list of results, select Run as administrator, and enter a password if prompted.)
Using DISM to install Windows updates
My article about installing Windows updates with DISM explains how to use the dism /Add-Package option to install Catalog or other updates in .cab or .msu formats into a targeted Windows image. This procedure comes in handy when Windows Update isn’t working properly or for managing large-scale or remote deployments. Essentially, it’s a way to add updates to a Windows image, a technique sometimes called “slipstreaming.” Please consult that story for all the details.
Repairing a Windows 10 or 11 image using DISM
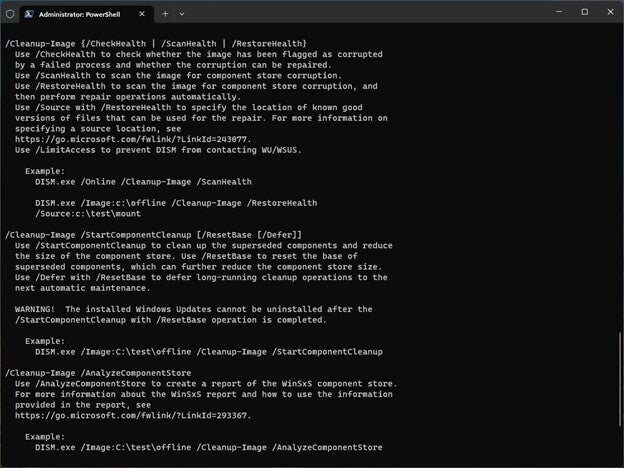
In my article entitled “How to repair Windows 10 (and 11) in 4 steps,” I detail my go-to set of steps for fixing misbehaving Windows systems. Step 1 deals with using DISM to check and scan the health of a Windows image and restore it to health using the /checkhealth, /scanhealth, and /restorehealth switches for DISM’s /cleanup-image option.
Figure 1 shows some information about those commands; please read my Windows repair story for step-by-step instructions and explanations.
 Ed Tittel / IDG
Figure 1: Selected DISM /online /cleanup-image help options in Windows 11. (Click image to enlarge it.)
Cleaning up the Windows component store with DISM
The WinSxS folder stores Windows component store files, which support Windows updates and customizations. As updates get added to Windows over time, an entry gets stored in the Windows component store for each such update in addition to the components already present. This means that a certain amount of clutter is inevitable, where new components reside alongside older ones they may have made obsolete.
DISM provides a couple of ways to remove such clutter. The first identifies and deletes previous versions of update components from the Windows component store with two commands:
dism /online /cleanup-image /analyzecomponentstore
dism /online /cleanup-image /startcomponentcleanup
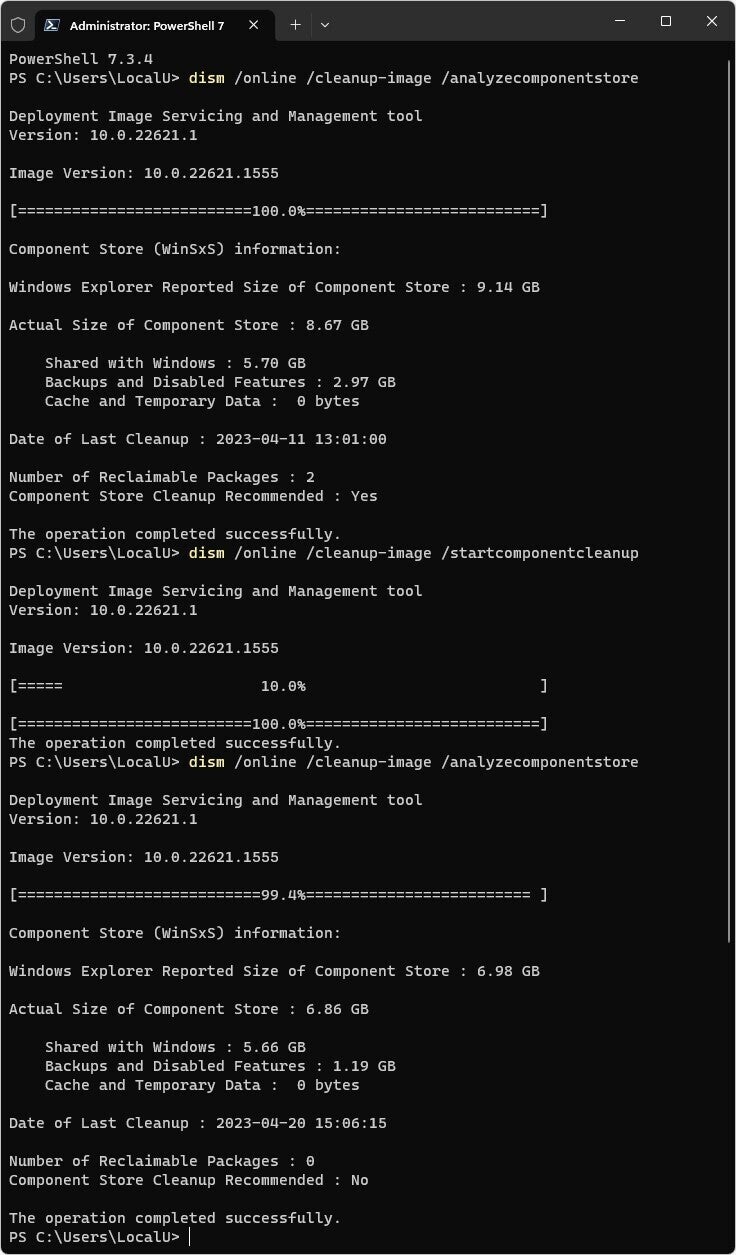
Figure 2 shows the complete operation. Note that I run /analyzecomponentstore once at the beginning to show a reclaimable package, then run /startcomponentcleanup to do the cleanup, then /analyzecomponentstore again to show no remaining reclaimable packages and the resulting footprint changes.
 Ed Tittel / IDG
Figure 2: Before and after analysis shows reported size savings of 2.16GB and on-disk savings of 1.81GB after reclaiming two packages from the component store. (Click image to enlarge it.)
The example in Figure 2 only cleans out two reclaimable packages, but after a Patch Tuesday that includes multiple update elements, I’ve seen as many as five or six reclaimable packages show up when analyzing the component store. After running the corresponding clean-up operation, I’ve seen reductions of up to 6GB of disk space.
I’ve gotten in the habit of running this operation once a month on my Windows PCs to keep the component store slimmed down. Savings of approximately 2 to 4GB are typical.
There’s another variation on the same syntax as shown in the preceding example with an added option:
dism /online /cleanup-image /startcomponentcleanup /resetbase
This removes all superseded versions of every component in the component store. Admins or power users in search of a “deep clean” can use this syntax instead of the preceding, simpler cleanup so long as they understand a resulting potential complication: Existing update packages can no longer be uninstalled after this command is executed (though new update installs can proceed as always).
In other words, don’t elect this option unless you’re willing to freeze the package lineup in your Windows image going forward. FWIW, this has never caused me any problems on over 100 PCs I’ve worked with since DISM came along in the Windows 8 era.
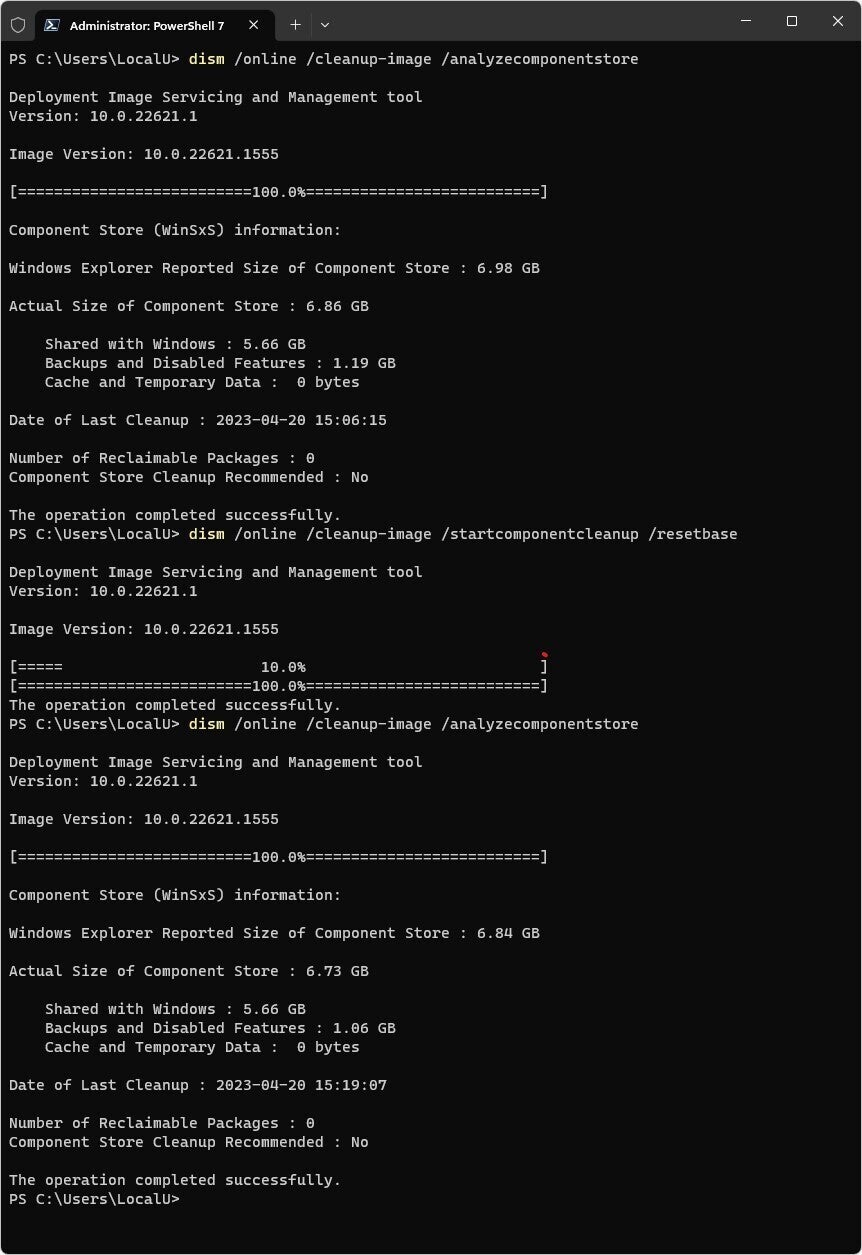
Figure 3 shows the decidedly modest results that /resetbase delivers on an already clean test machine (0.14GB reported size, 0.13GB actual size). On a PC with reclaimable packages, it will boost space reclamation by about 10% to 20%.
 Ed Tittel / IDG
Figure 3: Running /resetbase on an already-clean PC makes little difference. (Click image to enlarge it.)
On standalone PCs, there’s little reason to use DISM’s /resetbase option. It probably makes the most sense for curated images destined for deployment.
Microsoft Learn has more information about the WinSxS folder and Windows component store.
Identifying Windows images, installers, and ISO files with DISM
If you work with multiple versions of Windows, you may find yourself looking at an installer or OS image without being able to tell what’s what. Though it won’t work on running Windows images, DISM can tell you a fair amount about WIM and ESD files you might have lying around.
If you run:
dism /get-wiminfo /wimfile "target"
where you use a valid path specification for a target file, it will show you all the various elements indexed in that file by number. For example, I used:
dism /get-wiminfo /wimfile:"D:\sources\install.esd" /index:6
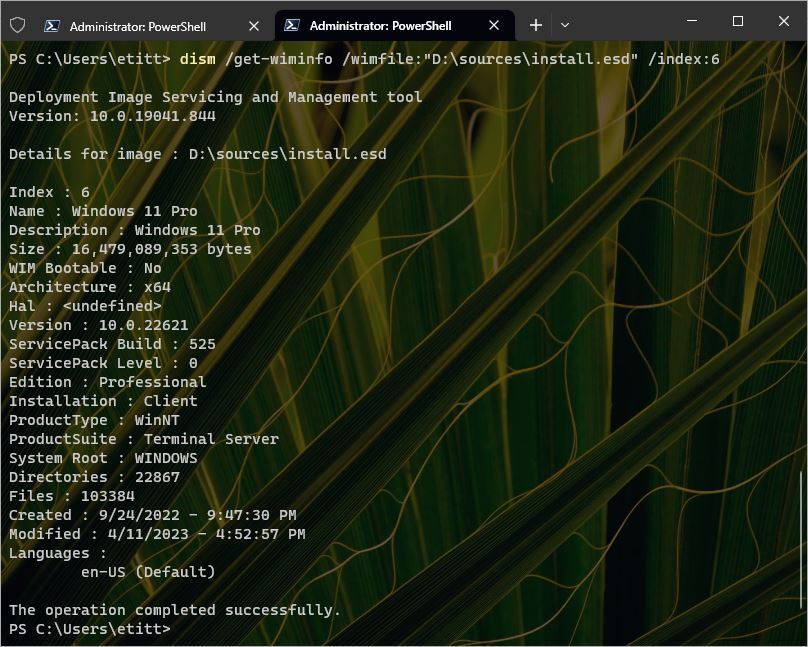
on a USB flash drive upon which I’d deposited a Windows 11 installer without labeling it clearly enough. The /index:6 switch specifies the Windows 11 Pro stuff inside the install.esd image file. Figure 4 shows the result.
 Ed Tittel / IDG
Figure 4: Here’s the info about the Windows 11 Pro subset within the target install.esd image file: version 22621 (22H2) last updated on 4/11/2023. (Click image to enlarge it.)
You can use DISM’s /get-wiminfo capabilities to determine what version of Windows the installer is for, and what editions (Home, Pro, and so forth) it includes. This can be quite helpful for the installer UFDs that the Microsoft Media Creation Tool creates. Because they’re all named ESD-USB, the added info makes all the difference.
Identifying and changing international settings in Windows images with DISM
Looking at the bottom of Figure 4, you can see the Windows Pro image elements use American English (ISO language code en-US). If you want to repair a Windows image using DISM, the source material for both repair and the target images must be identical — same OS, same bittedness (x86 or x64), same default language.
At some point in my checkered career with Windows 10 or 11 I apparently downloaded and installed the UK language version (en-GB) on one of my PCs, probably through an ill-chosen MSDN download. As I encountered mysterious problems in getting /restorehealth to work on that machine (which drove me bonkers for a while), it gradually dawned on me that my problem wasn't a lack of understanding of the DISM command. Rather, the issue was that I was trying to use an American English (en-US) image to repair a British English (en-GB) installation. Doesn’t work, so don’t bother trying. Instead, make sure repair and target images are the same OS version, bittedness, and language.
Had I known then what I know now about DISM, I could've gotten to the bottom of things much sooner. To check the international settings for a Windows image, one uses the /Get-Intl attribute. For an online (running) image, the syntax is:
dism /online /Get-Intl
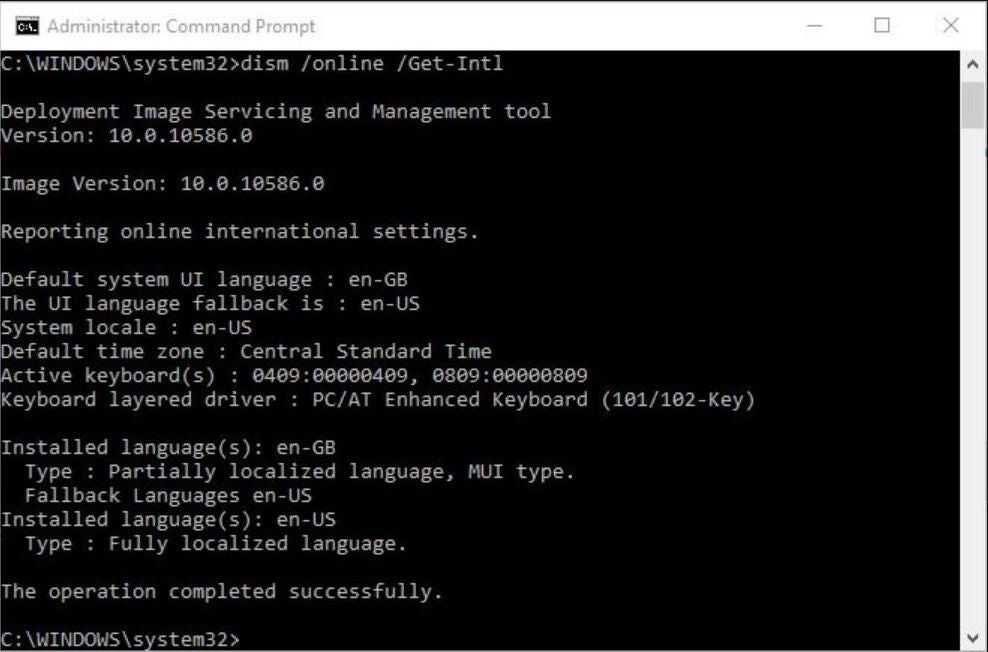
Specifying an offline image requires using the /Image attribute, with a path specification to the image file you wish to examine. Figure 5 shows the /Get-Intl results for an online image with en-GB as the default language.
 Ed Tittel / IDG
Figure 5: The /Get-Intl attribute shows language settings (helpful when using languages other than en-US). (Click image to enlarge it.)
I discovered this discrepancy when installing an update to Windows and observing that the keyboard behaved like a UK model instead of a US model. This led me to change the fallback language to American English (en-US) and to change my locale to the USA, after which those problems vanished.
This DISM command supports changing the installed language, but it only works on an offline image. To make that change, I'd have to boot to a recovery image, then navigate to the installed image file on this machine and perform a series of commands involving /Set-UILang, /Set-UILangFallback, /Set-UserLocale, and /SetInputLocale. See Microsoft Learn for all those details.
Dig deeper into DISM
Although these examples encompass a fair number of capabilities in DISM, it's just the beginning of what you can do with this powerful and capable tool. For instance, Microsoft Learn has tutorials for using DISM to:
- Capture and apply images of hard disk partitions (also requires using the Diskpart utility)
- Mount and modify a Windows image (includes a description of how to customize images by adding and deleting files)
- Capture and apply a Windows image using a single .WIM file
- Create a data image using DISM (contains only files and applications to be copied into a Windows installation using an unattended answer file)
The more you dig into DISM, the more you'll find to like about it. That's why the DISM Reference at Microsoft Learn should be on your favorites list or in your browser bookmarks. You can also find lots of great, step-by-step tutorials on working with DISM at ElevenForum.com, especially “Repair Windows Image Component Store in Windows 11.” (Here’s the Windows 10 equivalent.) Enjoy!
This article was originally published in February 2016 and updated in June 2023.


