Find attachments more easily — and share ‘cloud attachments’
We’ve all been there: We want to attach a file we were recently working on, but don’t remember its precise location — or sometimes even its name — and spend far too much time navigating and searching for it.
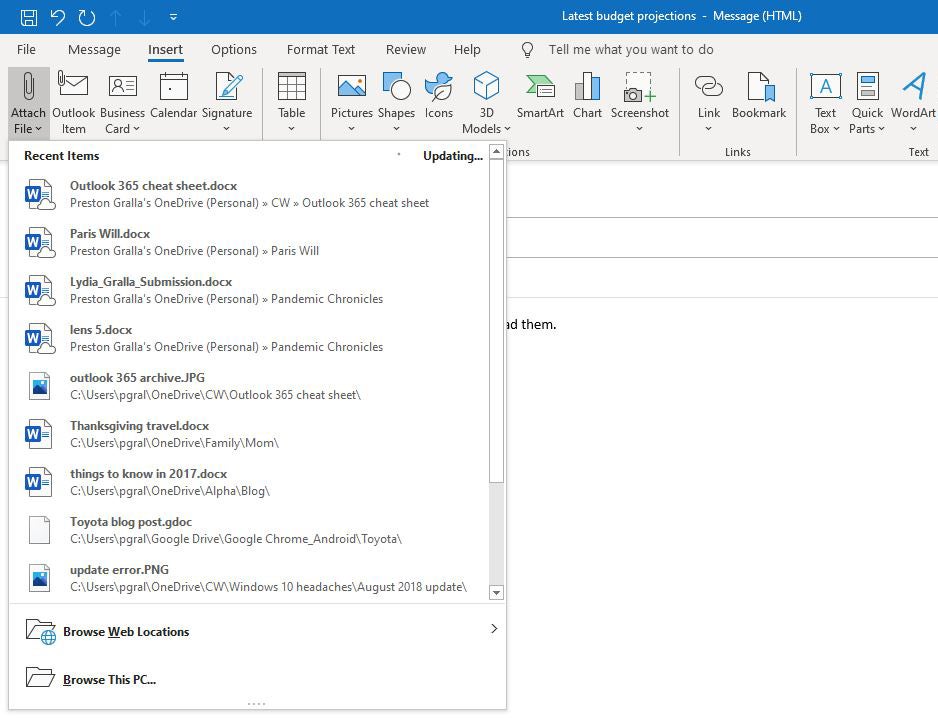
Outlook solves the problem neatly. When you click the Attach File icon, a list of the 12 most recent files you’ve been using pops up. The list includes all the files you’ve been using on any device, as long as you’re signed in to your Office 365 or Microsoft account. So if you were working on a file on your desktop, then later in the day took your laptop to work outside your office, Outlook would show you the files you had opened on both devices. If a file is stored in OneDrive, OneDrive for Business, or SharePoint, you’ll see a cloud on its icon.
If the file you want isn’t in the list, click Browse this PC to browse your local hard disk, or Browse Web Locations to browse OneDrive, OneDrive for Business, or SharePoint.
 IDG
IDG
Outlook shows you a list of Office files you’ve recently used, making it easier to find and attach them to an outgoing email.(Click image to enlarge it.)
Click the file you want to attach. What happens next depends on where the file is stored. If you choose a file that’s stored on your local hard drive, a copy of it will be attached to the email in the usual way.
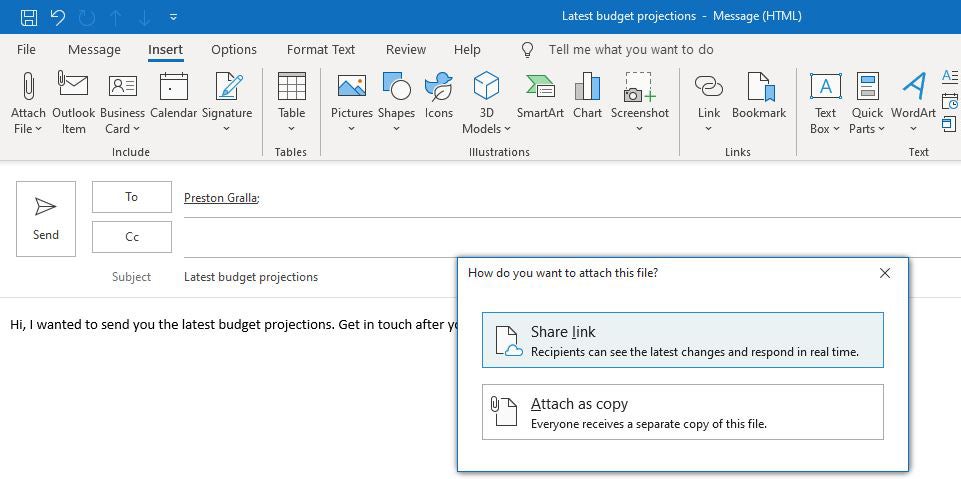
If you click on a file that’s stored in OneDrive, OneDrive for Business, or SharePoint, you’ll be given a choice: You can choose Attach as copy to send the file as a normal attachment or Share link to send a link to the file in its cloud location, something Microsoft informally calls a “cloud attachment.”
The latter option ensures that people will see the most recent version of the file and lets them collaborate on it. For example, if you send a link to a Word file to multiple people, when they click the link, they’ll open the file and be able to collaborate on it with each other live using Word’s collaboration features.
 IDG
IDG
Sharing a link to a file stored in OneDrive, OneDrive for Business, or SharePoint lets you collaborate on the file with others. (Click image to enlarge it.)
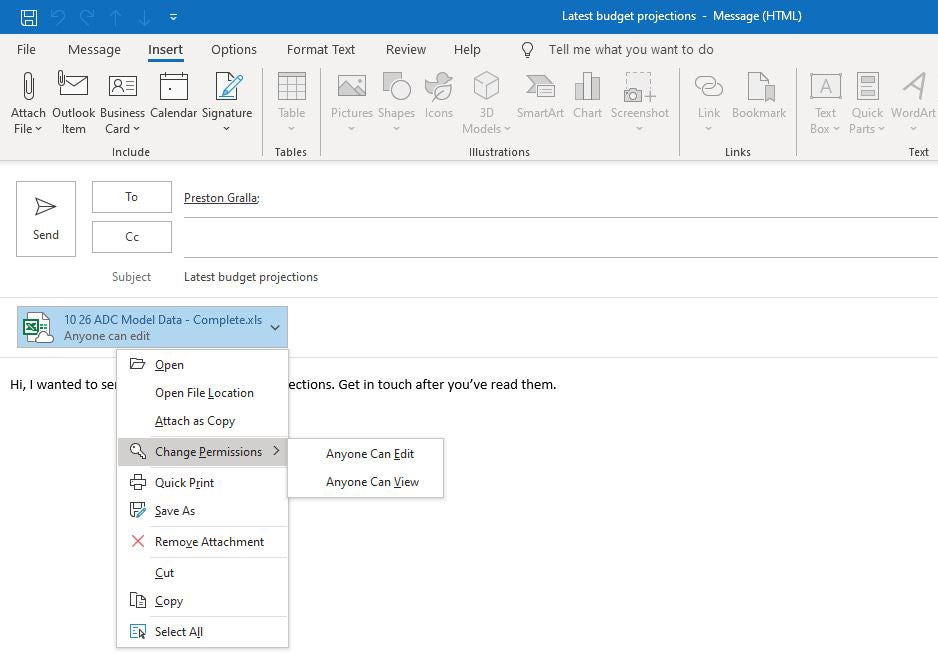
If you’re in a business environment, by default anyone within your organization can edit the file, and for individuals, the default is that anyone can edit the file. But you can change the collaboration permissions. After you’ve attached the link to the email message, click the down arrow next to the attachment icon and select Change Permissions from the drop-down menu. Individual users will have a choice of Anyone Can Edit or Anyone Can View. Business users have a few more options: Anyone Can Edit, Anyone Can View, Organization Can Edit, Organization Can View, Recipients Can Edit, and Recipients Can View. Make your selection and then send the file on its way.
 IDG
IDG
Choosing collaboration permissions for a shared file link. (Click image to enlarge it.)
Work in Microsoft 365 Groups
If you work in an office that uses Microsoft 365 Groups, you can now join groups, create new groups, schedule meetings on a group calendar and more, all from within Outlook.
Microsoft 365 Groups, available for most Microsoft 365 and Office 365 business and enterprise plans, make it easy to collaborate with others by designating a set of people with whom to share resources, such as a document library, shared calendar, and/or shared email account. Groups can be for departments, project teams, and so on, and when a group is created, all the appropriate permissions are automatically granted for everybody in the group.
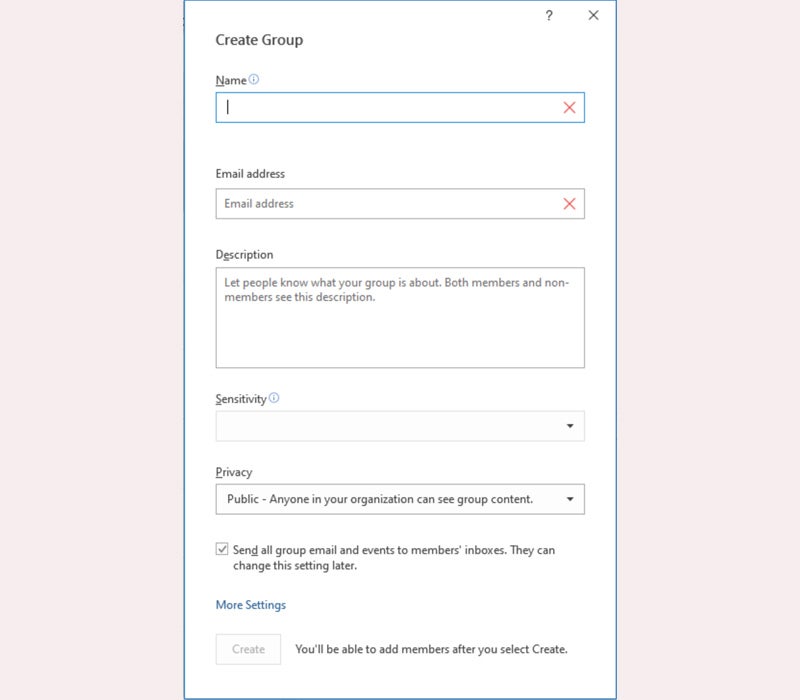
Creating a new group from inside Outlook is simple. Select the Home tab in the Ribbon, and over to the right in the Groups section, select New Group. Then fill in information for the group, including its name, description, whether it’s private or public within your organization, and so on.
 IDG
IDG
Creating a Microsoft 365 group from inside Outlook. (Click image to enlarge it.)
Note that your IT department needs to set up provisioning for Microsoft 365 Groups, so check with IT for more details about creating and using groups. Also, in order to use Microsoft 365 Groups in Outlook, you need to use Outlook in Cached Exchange Mode. See this Microsoft support page for details.
Other new features to check out
Outlook for Microsoft 365/Office 365 has several more useful features. Although they’re not as significant as the other features we’ve covered here, they’re worth knowing about.
Message encryption: In older versions of Outlook, there’s a Permissions button that lets you set permission levels for an email — for example, “Confidential,” “Internal,” and “Do Not Forward.” In Outlook for Microsoft 365/Office 365, that button has been replaced with an Encrypt button that lets you encrypt the message with S/MIME or Microsoft 365 Message Encryption.
For details, see Microsoft’s “Encrypt email messages” help page.
Quick Actions: If you hover your cursor over any email in your message list, tiny Quick Action icons appear. These let you perform tasks such as deleting or archiving the message with a single click. By default, the two icons that appear are Follow Up and Delete, but you can customize that by right-clicking on any message in the list and selecting Set Quick Actions from the pop-up menu. You can designate only two Quick Action icons — your options are Archive, Delete, Move, Flag/Clear Flag, and Mark as Read/Unread — but Delete appears even if you don’t select it.
Note that Quick Actions does not replace Outlook’s more complex Quick Steps feature, which lets you apply multiple actions to a message at the same time. Quick Actions simply provides a quick way to do a few frequently performed actions.
Built-in translation: You no longer have to use a translation add-in for other languages — it’s now built directly into Outlook for Microsoft 365/Office 365. Right-click words, phrases, or the entire message and select Translate from the menu that pops up.
Turn grammar suggestions on and off: Outlook offers grammar suggestions — you’ll know they’re there when you see underlined text, which marks the text as having an error. If you’d prefer not to see them, you can turn them off. To do it, create a new email, and with it open, go to File > Options > Mail, and in the “Compose messages” section, click Editor Options. On the screen that appears, select Proofing, and under “When correcting spelling in Outlook,” uncheck the Mark grammar errors as you type box. You can still check grammar at any time by pressing F7.
Dictate messages: Look, ma, no hands! With Microsoft 365/Office 365, you can dictate messages. Once you’ve created an email, select Message > Dictate from the Ribbon and start talking.
Use the same Outlook settings on all your devices: If you use Outlook on more than one machine, you can store your settings for features such as Automatic Replies, Focused Inbox, and Privacy in the cloud, and they’ll automatically be applied to all your Windows PCs. To turn it on, go to File > Options > General. Under “Cloud storage options,” check the box next to Store my Outlook settings in the cloud.
Regardless of whether you do that, any signatures you create in Outlook will be automatically stored in the cloud so that they’ll be available on all your devices.
Handy keyboard shortcuts
If you’re a fan of keyboard shortcuts, you’ll be pleased to find out that Outlook for Microsoft 365 has them. The table below highlights the most useful ones, and more are listed on Microsoft’s Office site.
And if you really want to go whole-hog with keyboard shortcuts, download our Outlook for Microsoft 365 Ribbon quick reference guide, which explores the most useful commands on each Ribbon tab and provides keyboard shortcuts for each.
Useful Outlook keyboard shortcuts
Don’t forget to download our Outlook for Microsoft 365 Ribbon quick reference!


![Computerworld Cheat Sheet > Microsoft > Word [Office 365]](https://images.idgesg.net/images/article/2019/02/cw_microsoft_office_365_word_cheat_sheet-100787161-small.3x2.jpg?auto=webp&quality=85,70)
![Computerworld Cheat Sheet > Microsoft > Excel [Office 365]](https://images.idgesg.net/images/article/2019/02/cw_microsoft_office_365_excel_cheat_sheet-100787152-small.3x2.jpg?auto=webp&quality=85,70)
![Computerworld Cheat Sheet > Microsoft > PowerPoint [Office 365]](https://images.idgesg.net/images/article/2019/02/cw_microsoft_office_365_powerpoint_cheat_sheet-100787158-small.3x2.jpg?auto=webp&quality=85,70)
![Computerworld Cheat Sheet > Microsoft > Outlook [Office 365]](https://images.idgesg.net/images/article/2019/02/cw_microsoft_office_365_outlook_cheat_sheet-100787153-small.3x2.jpg?auto=webp&quality=85,70)


![Microsoft > OneDrive [Office 365]](https://images.idgesg.net/images/article/2019/02/cw_microsoft_office_365_onedrive-100787148-small.3x2.jpg?auto=webp&quality=85,70)
![Microsoft > OneNote [Office 365]](https://images.idgesg.net/images/article/2019/02/cw_microsoft_office_365_onenote-100787150-small.3x2.jpg?auto=webp&quality=85,70)
![Microsoft > Planner [LOGO]](https://images.idgesg.net/images/article/2020/10/cw_microsoft_365_planner-100863840-small.3x2.jpg?auto=webp&quality=85,70)
![Computerworld Cheat Sheet > Microsoft > SharePoint [Office 365]](https://images.idgesg.net/images/article/2019/02/cw_microsoft_office_365_sharepoint_cheat_sheet-100787155-small.3x2.jpg?auto=webp&quality=85,70)