Down at the bottom of the screen when you display the App bar in IE is an Address bar; forward, back and refresh buttons; a pin button that lets you pin the current site to the Start screen or add it to Favorites (which you will be able to use only in the Desktop version of IE); and a wrench button that, when clicked, lets you search for text on the current Web page, view the page in the Desktop version of Internet Explorer, or download a Windows 8 Store app associated with the site you're visiting, if it has one.
The Address bar does double duty as a way to go to websites and to perform searches: Just type a Web address or a search term into the bar. When you type in a search term, you'll see several kinds of results -- those from sites you've visited often, those from sites you've pinned, those from your Favorites, and those from the Web, via Bing.
Note that you don't have to make all the controls appear to use the back and forward buttons. When you're on a Web page, move your mouse cursor to the left edge of the screen and a back arrow appears; move it to the right edge and a forward arrow appears.
The bottom set of controls -- the Address Bar and various buttons -- also pops up from time to time without you having to display the App bar. For example, they appear when you click a link or when you use the back and forward arrows as described in the previous paragraph.
To make the controls go away, right-click, press the Windows key + Z or swipe down from the top on a touch screen.
Using the Desktop version of IE10
The changes to the Desktop version of IE are generally under the hood: notably, improved performance and an overhauled rendering engine. So just use the Desktop version of IE in the same way you've always used it.
Other new features
There have been plenty of other changes in Windows 8, too numerous to list in this article. Here are some of the more important ones.
File Explorer
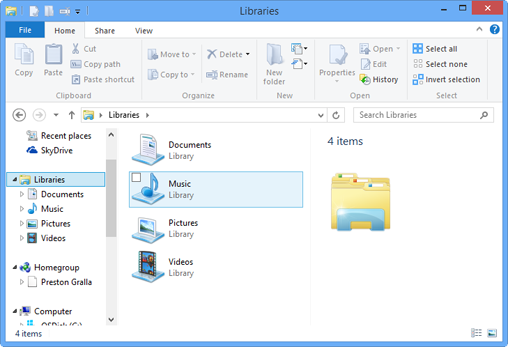
The file management app once called Windows Explorer has been renamed File Explorer. The change is not just in name only. It has also been redesigned and now has a Ribbon interface. (New to the Ribbon interface? Check out our to get acquainted.)
Note that the first time you use File Explorer the Ribbon might be hidden. To expand the Ribbon (or collapse it if it's already expanded), either press Ctrl-F1 or click the small down arrow in the top right corner of the window. You can also leave the Ribbon collapsed and simply click on any tab to see its available commands.

File Explorer, with the Ribbon turned on.
The Ribbon's Home tab contains a grab bag of file-management commands, such as copy, paste, copy a path, move, rename and open. You can also create a new folder, select multiple files or folders, and more. The Share tab lets you share files and folders via email, by burning to disc, by printing and so on. The View tab lets you customize the overall File Explorer interface (by, for example, turning the left-side navigation pane on or off) or the display of files and folders (by showing hidden items or not, changing the icon size and configuration, and so on).
Clicking the File tab on the left pops up a small box that lets you open new File Explorer windows, shows you a list of your frequently visited places so you can navigate to them quickly, and includes several other features.
File History
This new feature, turned off by default, backs up files stored in your Libraries, Favorites, Contacts and Desktop. Keep in mind that your Libraries include many folders, including public and private Documents, Music, Pictures and Videos folders, so you can use this feature to back up plenty of files. And you can add other locations you want backed up as well. It's a vast improvement over the less-than-useful Windows 7 feature called Previous Versions.
Of course, you'll need storage media such as a USB drive to back up your files to, or you can back up to local network storage. File History uses compression to reduce the amount of disk space you'll need.
And File History does more than just back up files. It also keeps interim versions of them, so that you can see previous versions of a file.
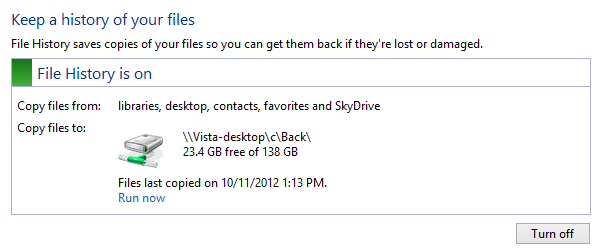
To turn on File History, first run Control Panel by typing "Control Panel" at the Start screen and clicking the Control Panel icon that appears. Then, in the Control Panel search box, search for "file history" and click the File History link that appears. Click the "Turn on" button and make any selections necessary, such as which drive you want to back up your data to.

Turning on Windows 8's new File History feature.
Three tips for getting more out of Windows 8
It may take you a little while to become comfortable with Windows 8, so I've put together three tips to help you get up to speed. The first two will help you make the most of the new interface, and the third will bring back an old friend: the Start button.
1. Customize the Start screen
The Start screen that appears by default is not necessarily the Start screen that's best for you. There are many ways to customize it, though. Here I'll show you how to add, remove, rearrange and otherwise tweak the tiles on your screen.
To remove a tile from the Start screen, right-click it and select "Unpin from Start" from the bar that appears at the bottom of the screen. You can select multiple apps by holding down the Ctrl key as you right-click them, and then unpin them in one fell swoop.
If you don't want a live tile such as the Weather app to display changing information, right-click it and select "Turn live tile off." To make a large tile smaller or a small tile larger, right-click it and select "Smaller" or "Larger."
Adding tiles to the Start screen takes a little more work than unpinning them, but not a lot. If you're on the Start screen and you know the name of the app you want to add, type its name. You'll be sent to the Search charm, and the app will show up on the left. Right-click it, and from the bar that appears at the bottom of the screen, select "Pin to Start." If you search for a Desktop app and right-click it, you'll also be able to pin it to the Desktop taskbar. If it's already pinned to the taskbar, you can unpin it.


