Sadly, there are many reasons why data stored on disk drives in Windows 10 can — and sometimes does — go missing.
As someone who’s used Windows 10 since the day after the first Technical Preview appeared on October 14, 2014, I’ve been through at least half a dozen different data recovery incidents over the past 6-plus years. Some of these have resulted from failing storage media, others from issues with cables or connectors between the media and the PC or its motherboard, and one or two have been self-inflicted arising from mistakes when using disk partitioning or repair utilities.
In each of these incidents I’ve been able to claw back my missing data, and in most cases you can too. In this story I’ll go over several techniques you can use to try to recover lost files. But first, let’s take a look at the main culprits when it comes to lost data.
Three main reasons for data loss
In most cases, three primary causes stand behind situations that call for data recovery. These are:
1. File or file structure damage or corruption. Basically, files are just long sequences of bits (1s and 0s) chained together through a master file table (or its equivalent) on the storage media. For various reasons, those patterns can become damaged or disrupted. Consequently, they may go missing or become unreadable. In this case, your repair efforts attempt to restore the bits to their original form and order.
2. Partition or disk structure changes or damage. In Windows, storage devices use specific disk layouts to create logical volumes (which usually have names and associated drive letters) wherein file systems reside. Each volume (and certain other disk structures related to boot-up and recovery on Windows system/boot disks) has at least one associated on-disk partition. The drive maintains one or more copies of a partition table to keep track of disk extents, called sectors, where partitions (volumes and other special disk regions) reside.
When errors or unwanted changes affect a partition table, it must be repaired before the files and folders in any of the volumes it describes may be accessed. In this case, the repair process attempts to restore the partition table’s original structure and contents.
3. Disk drive hardware problems. For spinning disks, this might involve damage to a disk platter’s read/write heads or its recording surface, and usually manifests as loss of drive sectors. In severe cases, a storage device may fail completely so that its contents become completely unreadable. For SSDs, something similar can happen when the drive’s controller suffers from hardware errors, or when the flash memory locations under its control become damaged and unreadable.
For both kinds of drives, failure is often a progressive cascade. That is, it starts slowly, with the failure of one or two sectors or memory locations, and gets progressively worse over time. Eventually the device fails completely. At that point, end-user recovery is impossible, and one must turn to a data recovery company for expensive professional recovery services.
That’s why it’s better to act at the first sign of disk trouble while there’s still time to head problems off at the pass. In this case, the repair process is attempting to capture valid data from good sectors or locations before they have a chance to go bad.
When recovery is needed, backup’s the thing
Nothing beats access to a fresh, current backup of a drive from which items are missing or lost. I keep project work on two separate SATA SSDs and back them up every morning, along with the all-important C: boot/system drive where Windows 10 itself lives. Thus, I’m reasonably sure that no matter what happens to one or more of those drives, I won’t lose more than a day’s work or data, worst case.
Before attempting any kind of file or data recovery on Windows 10, the first thing you should do (let’s call it step 0) is back up the problem drive on which those files or data once resided. This means you can always get back to where you started, should your own data recovery efforts prove fruitless. You will then be able to turn the media over to a data recovery company that has tools and capabilities that ordinary users like you, dear reader, and I do not have at our disposal.
That’s the worst-case scenario, though. There are several steps you can take first to try to recover your lost files yourself.
The first step to data recovery: Recycle Bin
A typical situation that calls for data recovery is one where a user or some program has intentionally deleted a file from a Windows volume. Afterward, the user wishes to regain access to that file.
It seems obvious, but checking Recycle Bin to see if the missing file is present can often save a lot of unnecessary hassle when recovering lost items. Double-click the Recycle Bin icon on the desktop, then browse or use the search box to see if the missing file is there. If it turns up, a right-click on the item, then selecting Restore is all that’s needed to put the file back where it came from (see Figure 1).
 IDG
IDG
Figure 1: A simple right-click, then selecting Restore is all it takes to recover files from the Recycle Bin. (Click image to enlarge it.)
If the file is not accessible through the Recycle Bin, additional actions may help.
The second step to data recovery: File History
This step comes with a couple of ifs attached. The first if is “Is File History turned on?” If so, the second if is “Is the damaged or missing file actually available through File History?”
To explain: in Windows 10 and 11, File History is turned off by default and has to be enabled — and even then, it backs up files only in specific folders — namely, Documents, Downloads, Music, Pictures, and other primary folders that show up beneath your user account holding (e.g., for user account name EdTittel that would be C:\Users\EdTittel).
If File History is turned on and the item you want is stored in one of the folders that File History backs up, click Start > Settings, then type file history into the Settings search box. From the options that appear, select Restore your files with File History. You’ll see a File Explorer-like view of your backed-up folders. Click any folder to drill down to the item you want. If you navigate into the Documents folder, for example, you’ll see its contents show up. By highlighting one or more files, you select them for a “copy back” operation. Then, when you click the green arrow at bottom center, it will restore the files you’ve selected to their original location.
For in-depth details about File History, including its limitations, how to turn it on, and the best way to configure it, see “How to use File History in Windows 10 and 11.”
If a file or folder is not available for restoration through File History, then a more robust recovery effort is needed. Move on to the third step.
The third step to data recovery: chkdsk
If the affected drive remains readable and visible in Windows 10 — that is, the drive letter still appears in File Explorer and some (or most) of its files and folders remain visible therein — the next step to recovery is to use the command line check disk utility, a.k.a. chkdsk.exe. You’ll need to run it at an administrative command prompt or in an administrative PowerShell session. (Type either cmd or powershell in the Windows search box, right-click Command Prompt or Windows PowerShell in the list of results, select Run as administrator, and enter the password if prompted.)
You can use either of two key parameters to effect disk repairs, as outlined on the MS Docs Windows Commands reference for chkdsk):
/f: Fixes errors on the disk. The disk must be locked. If chkdsk cannot lock the drive, a message appears that asks you if you want to check the drive the next time you start the computer.
/r: Locates bad sectors and recovers readable information. The disk must be locked. /r includes the functionality of /f, with the additional analysis of physical disk errors.
The only way to repair the Windows boot/system disk (usually drive letter C:) is to elect the option to repair after the next restart, followed by a restart of the affected PC.
For minor disk corruption or damage, this second step is often as far as you’ll need to go. If it works, count yourself lucky — and make another backup right away!
The fourth step to data recovery: Windows File Recovery
Microsoft offers a good, basic file recovery utility called Windows File Recovery (winfr.exe) for Windows 10 version 2004 and higher. It’s available in the Microsoft Store.
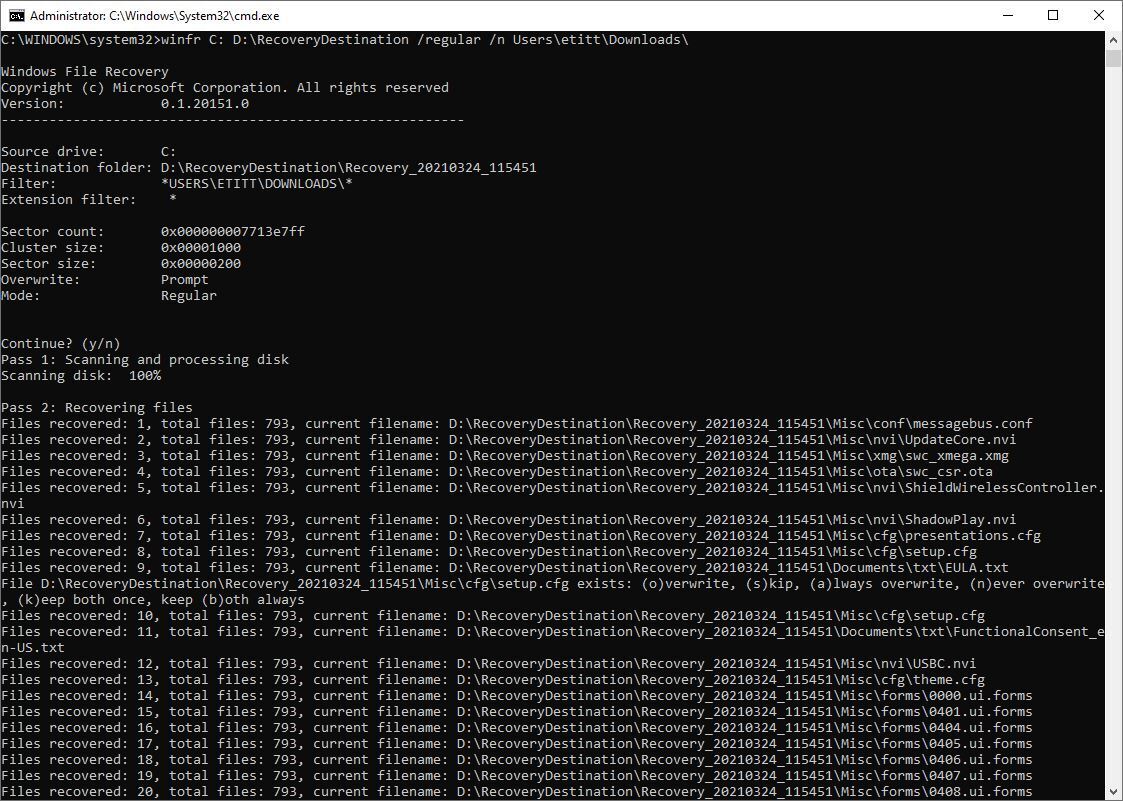
This utility launches in an administrative command prompt session and runs at the command line. I tried the command to recover download files, as shown in Figure 2. There is a learning curve involved in using this tool, but the user manual is available online and very much worth reading and exploring for those willing to tackle file and folder recovery at the command line. If you know what’s missing and where it resided, you can use it to recover files quickly and easily using specific filters (the more specific, the better, as I learned when recovering my old download files).
 IDG
IDG
Figure 2: Windows File Recovery is a basic, bare-bones command-line recovery toolset. Even so, it’s surprisingly capable. (Click image to enlarge it.)
The winfr tool also supports what’s called “extensive mode,” which offers more comprehensive and far-reaching repair capabilities. Regular mode is turned on by default; you must use the /extensive parameter to access extensive mode’s capabilities. It’s good at handling non-NTFS file sytems (e.g., FAT and exFAT), and can find more files deleted longer ago. Extensive mode can also attempt repairs after formatting a disk — which takes us into territory for the next topic, partition repairs — and it is better able to cope with disk corruption than regular mode.
Those who prefer to undelete files using a graphical interface instead of working at the command line should try the free but good Piriform tool Recuva.
The fifth step to data recovery: partition recovery
There are plenty of good third-party data recovery tools available for Windows 10. That said, those that can recover entire drives — especially big ones — or that offer partition and formatting recovery are usually not available at low or no cost.
For example, upgrading from the free version of Recuva to the Professional version means gaining more advanced file recovery, including partition recovery, recovery from damaged or reformatted disks, and more extensive recovery for long-deleted files and folders. The same is true for MiniTool Partition Wizard, which offers excellent partition handling and modest partition recovery in its free version, but adds extensive file, folder, and partition recovery capabilities to its Pro version.
Once partition recovery is effected, you can then tackle file and folder recovery from the newly restored partitions (if needed). In cases where accidental reformatting or partitioning mistakes have been self-inflicted — I’ve done this to myself on at least two occasions when I targeted the wrong drive — successfully restoring the old partitioning scheme usually brings all the old files and folders back, too.
If you successfully recover data yourself: perform a disk health check
Something had to cause the issues that led you down the recovery road. If you’ve managed to recover data through chkdsk, Windows File Recovery, or another data recovery tool, it’s a good idea to give the problem disk a thorough checkup.
Hard drive and SSD makers often offer such tools as downloads for the drives they sell, and there are plenty of free and for-a-fee tools available for disk health checks. I’m partial to CrystalDiskInfo because it provides a good overview of a disk’s SMART data (self-monitoring, analysis and reporting technology, which includes error counts that often signal impending disk failures).
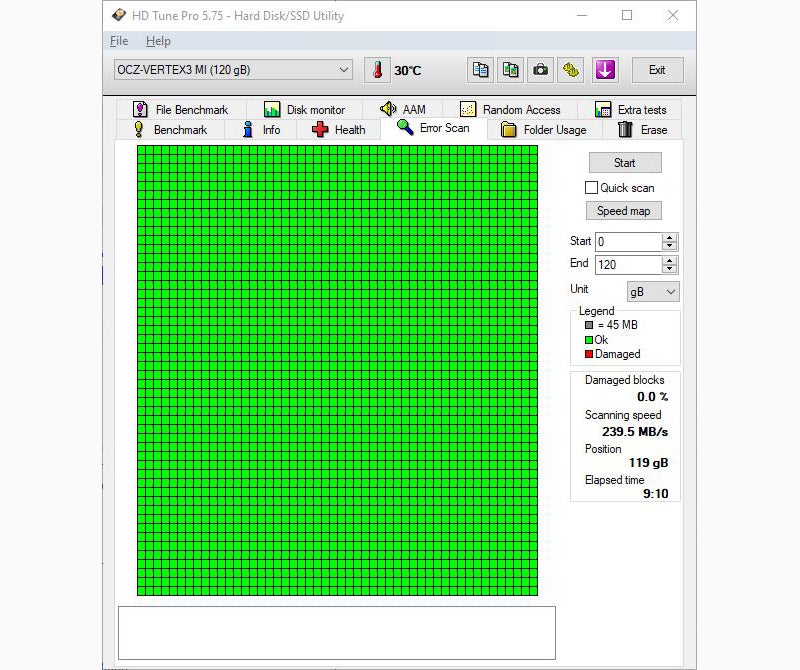
Other tools such as HD Tune Pro ($35, occasionally available for free) and Hard Disk Sentinel (free trial available, $20 for the standard version, $30 for the pro version) offer more detailed disk diagnosis and surface/media scans to provide better information on disk health and condition. The former took 10 minutes to scan my 9-year-old OCZ Vertex 3 SSD (nominal 120GB, actual 119GB) before giving it a clean bill of health despite advanced age and heavy usage, as shown in Figure 3.
 IDG
IDG
Figure 3: HD Tune Pro analyzes disk health and condition, including SMART data and a sector-by-sector media scan. The error scan shows all sectors green here; any damaged sectors would show in red. (Click image to enlarge it.)
If a disk shows questionable health or more than 10% of its sectors are damaged, it’s time to replace it. Make a backup while you still can, order a new device, and you’ll be able to restore the backup when the replacement arrives.
The sixth and final step to data recovery: call in the professionals
If steps 1 through 5 fail, you’ll need to seek outside help. Here’s Software Testing Help’s list of the top dozen data recovery services for those who must travel this road.
Hopefully, you’ll never need to send a drive to a professional data recovery service. If you do, be prepared to pay handsomely for their work. Charges of $300 and up are typical. (Bigger drives cost more, as you might expect.) And it can take weeks or months to get through their service queue.
Some companies will let you send them a replacement drive on which to restore what they find. Others will insist on selling you such a drive, sometimes at above-market prices. But sometimes, there is no alternative, and you’ll pay what you must to get precious or irreplaceable files and data back.
Be sure to work out as much of the cost picture as you can before sending a drive off for recovery. You don’t want the bill, however big it turns out to be, to come as a surprise.
In my 30-plus years of working with personal computers, I’ve never had to send a drive off for professional recovery. Even so, it’s good to know such services exist should I ever need them.
I learned the value of backups in 1989, when a 300MB SCSI drive attached to a Macintosh cratered and I lost a book manuscript as a result. I’ve never been caught unprotected again, nor should you be. Happy computing!







![laptop keyboard with a life preserver or personal floatation device [PFD]](https://images.idgesg.net/images/article/2018/02/rescue_diagnose_fix_patch_update_laptop_thinkstock_185931513-100749650-small.3x2.jpg?auto=webp&quality=85,70)

![A hand activates the software update button in a virtual interface. [ update / patch / fix ]](https://images.idgesg.net/images/article/2020/08/hand_activates_software_update_button_in_virtual_interface_development_update_patch_fix_by_ra2studio_gettyimages-1220938772_2400x1600-100854508-small.3x2.jpg?auto=webp&quality=85,70)


