4. Speed up Windows bootup
From the moment that Windows 10 was released, people started complaining that their bootup times were more sluggish than with previous versions of Windows. If you’re being annoyed by a lethargic Windows 10 startup, here are two ways to speed it up:
Enable Fast Startup
Windows 10 has a feature called Fast Startup, which combines a normal shutdown with the Windows hibernate feature.
With Fast Startup, when you shut down your PC, it closes your applications and logs off all users, but loads the Windows kernel and drivers to a hibernation file on your hard disk. Then, when you restart your PC, Windows loads the kernel and drivers from the hibernation file, speeding up startup.
Fast Startup may already be enabled on your PC. Here’s how to check whether it is and what to do about it if it’s not:
- Right-click the Start button and select Power Options from the menu that appears.
- Click Additional power settings.
- Click Choose what the Power buttons do.
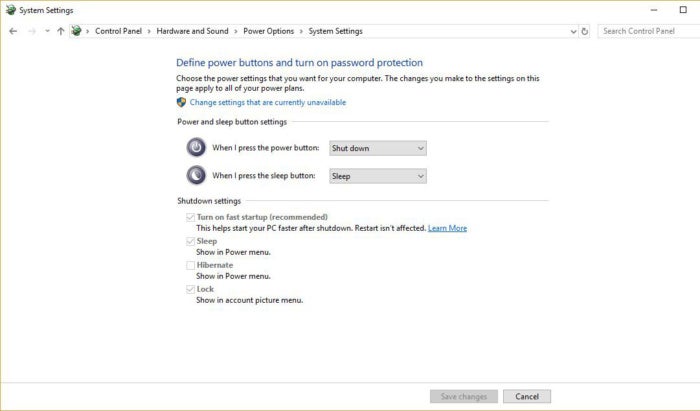
- Look in the “Shutdown settings” section of the screen that appears. If there’s a check next to “Turn on fast startup (recommended),” you don’t need to do anything else.
- If there’s not a check next to it, click Change Settings that are currently unavailable.
- Check the box next to “Turn on fast startup (recommended)” and click Save changes.
That’s all it takes. Note that on some machines Fast Startup isn’t available. If that’s the case with yours, you won’t see the “Turn on fast startup (recommended)” entry.
 IDG
IDG
It's easy to turn on Fast Startup in order to speed up your bootup time.
Use the Task Manager to speed up startup
The Windows 10 Task Manager is a great tool for managing your PC’s startup. With it, you can disable programs that run on startup:
- Right-click the taskbar and select Task Manager.
- If the Task Manager runs as a small window and only shows the applications that are currently running on your system, click the More details link at the bottom of the screen. This opens up an expanded view, with multiple tabs across the top of the screen.
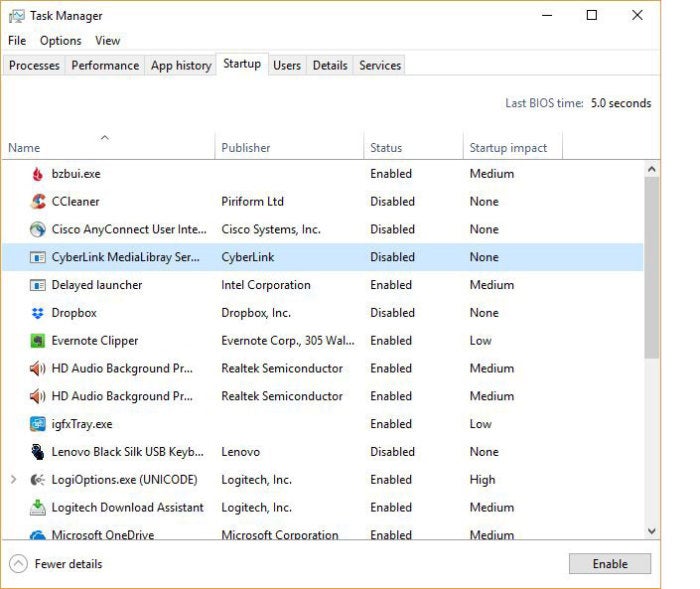
- Click the Startup It lists all the applications that run on startup.
- Right-click each application you don’t want to run on startup and select Disable. You’ll still be able to run the program by launching it in the usual way — it just won’t run on startup.
 IDG
IDG
You can use the Task Manager to disable applications in the startup listing.
Some additional tips: To help decide which programs to disable, look at the “Startup impact” column. That shows whether the program has no impact on startup time, a low impact, a medium impact or a high impact.
Many of the programs on the list may be unfamiliar, and you won’t be sure whether to disable them or not. Right-click any you don’t recognize and select Search online. That will launch an online search of the filename. Go through the results; they’ll usually tell you exactly what the program does and help you decide whether to have it run on startup.
You can also right-click any program on the list and select Open file location. That will open Windows Explorer to the folder where the program’s .exe file is found. That’s another clue to a program’s purpose, and whether to disable a program to run on startup.
5. Turn off annoying notifications
The Windows 10 Action Center sends you notifications about your email, social media, software updates, system messages and much more. That can be useful or intensely annoying, depending on your personality and how many notifications you get.
There’s an easy way, though, to turn off the notifications on an app-by-app basis, or to stop them all in one fell swoop:
- Go to Settings > System > Notifications & actions.
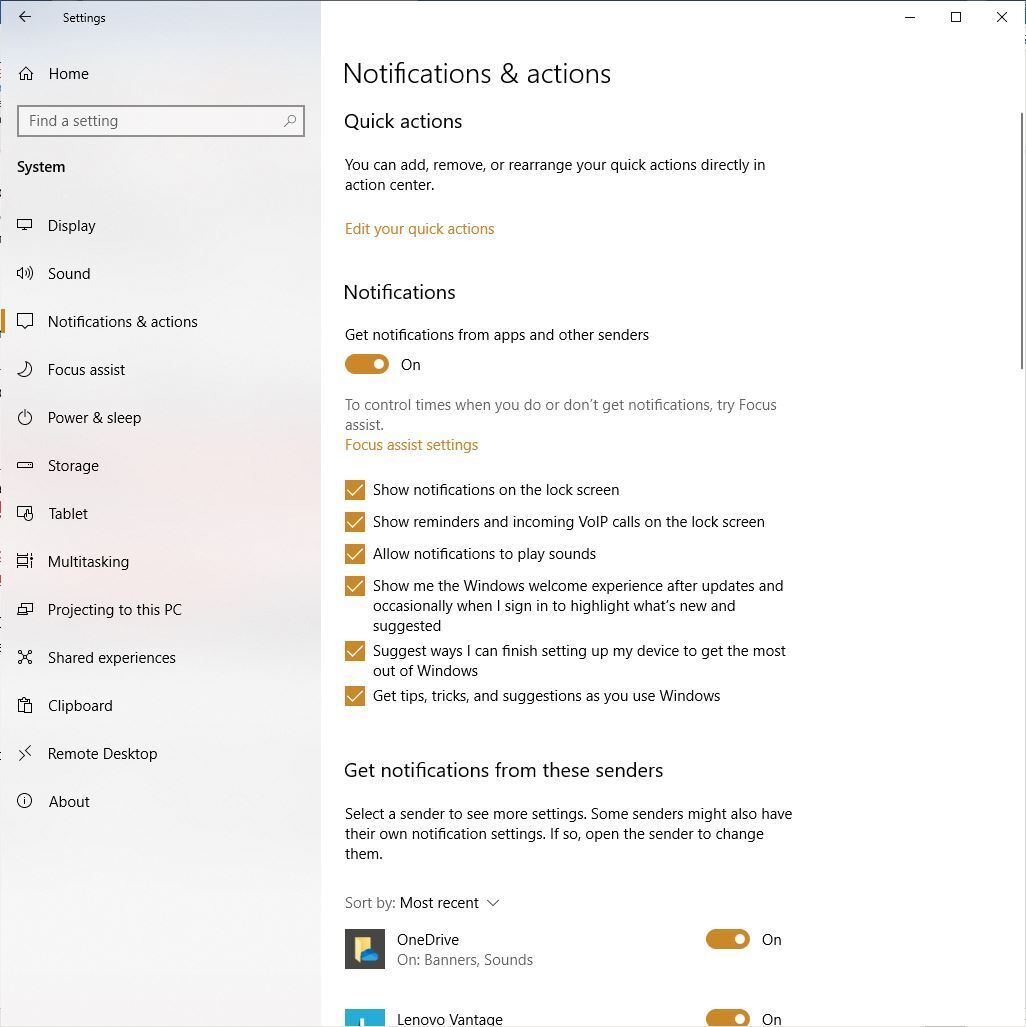
- You’ll see six types of notifications you can turn off: notifications that appear on the lock screen, reminders and incoming VoIP calls that appear on the lock screen, “Windows welcome experience” tips that appear after updates and occasionally when you sign in, tips and tricks that appear as you use Windows, and notifications from apps and other senders. You also have the option on this screen to allow notifications to play sounds or to ban the sounds.
- Turn off any types of notifications by unchecking the boxes next to them. The two most persistent types are those from apps and other senders and the Windows tips and tricks, so consider turning them off. Note that you’ll turn off notifications from apps and other senders differently than the others: Move the slider beneath “Get notifications from apps and other senders” to Off.
- If you want to keep some notifications from apps and other senders but not others, don’t turn that slider to Off. Instead, go to the “Get Notifications from these senders” section below and move the slider to Off for any apps and services from which you don’t want to get notifications.
 IDG
IDG
Here’s where to turn off notifications on an app-by-app basis.
This story was originally published in March 2017 and most recently updated in February 2021.


