You'd think a service designed to improve your efficiency would be delightfully easy to embrace.
That is absolutely not the case with Notion. Notion, which bills itself as an "all-in-one workspace," is about as overwhelming as can be at first glance. The app just does so many things that it's damn-near impossible to know where to begin. And that makes it all too tempting to simply give up and walk away.
I should know: I've done that myself — a few times, in fact. I danced around the, erm, notion of using Notion for months before I ever actually dove in. Every time, I'd poke around a little, find myself nodding and making thoughtful "hm!" sounds with every intriguing new possibility I encountered (as one does), and then realizing I had no earthly idea what to do next.
Eventually, I figured something out: The key to getting started with Notion is forcing yourself to ignore all the different ways the service can be used — at least at first — and instead allowing yourself to focus on just one or two specific feats the app might be able to help you accomplish. If you do that, you're bound to discover a spectacular new system for organizing info and keeping your team (or even just yourself!) on track. I know I did, and Notion has now evolved into an indispensable part of my professional toolbox.
So consider this your guide — not to the infinite-seeming intricacies Notion possesses but to a handful of worthwhile ways to wrap your head around the service and start putting it to good use.
(Notion is available on the web as well as in a native app form for both Windows and MacOS on the desktop and Android and iOS on mobile. The service is free for personal use, with an optional $4-a-month Pro plan upgrade, and $8 per user per month for teams.)
1. Organize projects and agendas
All right — confession time: I've tried out pretty much every task management program and tactic known to humankind. (I may or may not be obsessed with organization to an unhealthy degree. I know this mostly because I track my obsession obsessively.) And for my metaphorical money, nothing even comes close to matching Notion's capabilities when it comes to keeping your bigger-picture priorities in order.
You could think about setting Notion up in any number of ways, depending on how exactly you like to organize your days and/or projects and what specific types of elements are involved. Some specific possibilities to ponder:
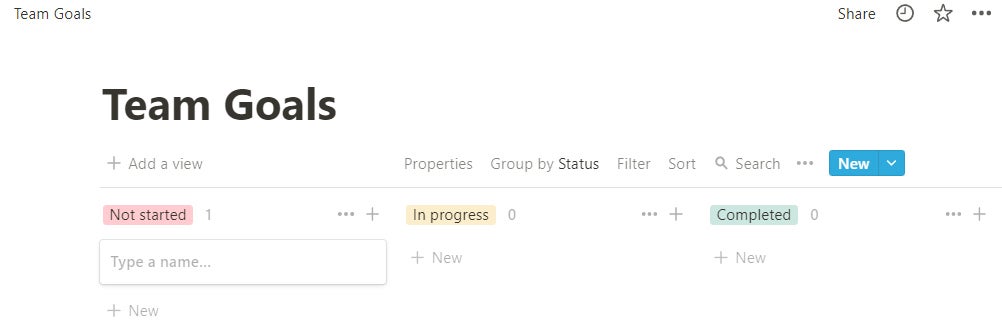
A Trello-style Kanban board is a great way to visualize a roadmap or series of responsibilities and then shuffle items around between columns as needed. If you click the "New page" option in the Trello website's lower-left corner and then click "Board" on the screen that comes up, you'll find yourself facing a new blank Notion board. And from there, all that's left is to create your columns and start adding in tasks or lists as cards.
 JR Raphael/IDG
Notion's Kanban board view is perfect for organizing tasks, roadmaps, and other databases where you have lots of individual items to track and move around. (Click image to enlarge it.)
Your columns could represent days, weeks, or quarters; they could be categories of tasks for a sprawling project; or they could even be status-oriented — "Not started," "In progress," and "Completed," for instance, as shown above.
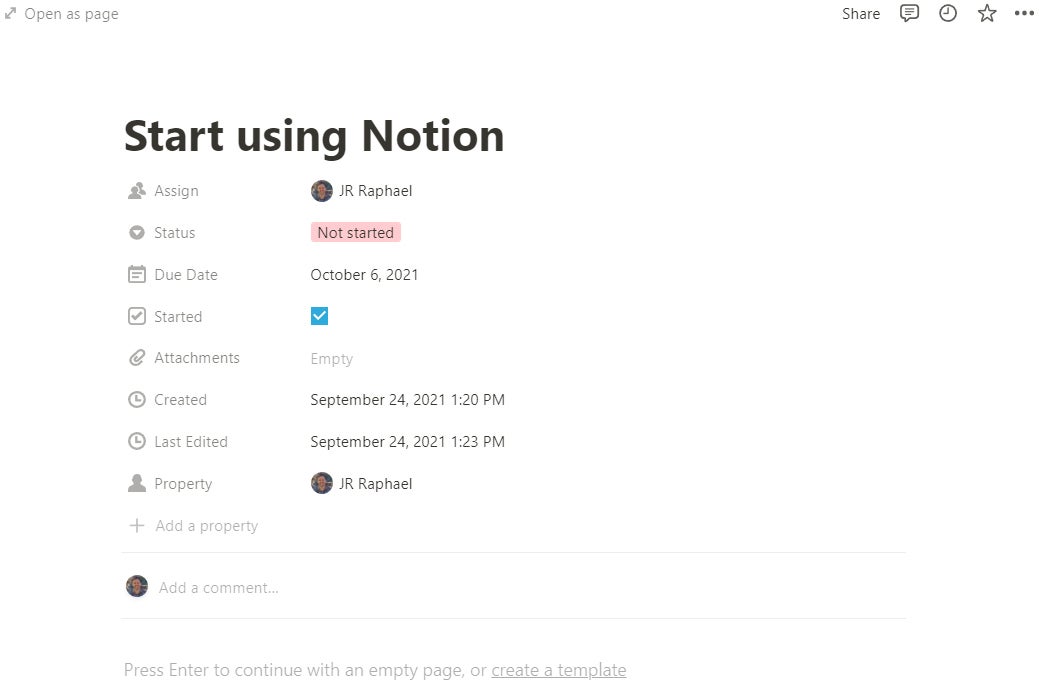
Whatever the case may be, you can then set up any number of standard properties that'll live within the cards — text fields, team-linked assignment dropdowns, purpose-specific checkboxes, spaces for file attachments, and anything else your beautiful brain can come up with. Once you create those properties within one card, they'll appear within every subsequent card you make inside that board as well. And all you'll have to do is fill in the blanks as you go.
 JR Raphael/IDG
Every card in a Notion board holds customizable fields for easy data input. (Click image to enlarge it.)
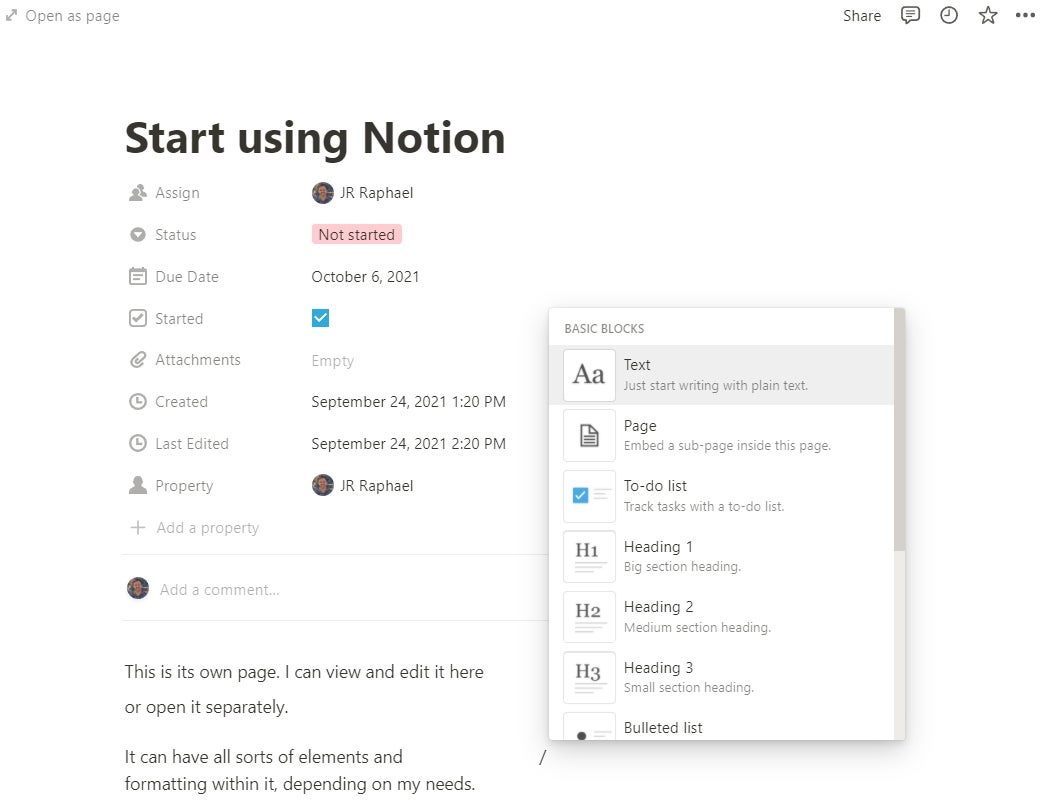
What makes Notion especially interesting is the fact that each card also has its own individual page within it — so you can create a perfectly formatted list or even a full-fledged document and then work on it right there within the card. And you can easily link from any piece of content within Notion to another so everything is always readily accessible.
 JR Raphael/IDG
Each Notion card contains its own customizable page, which can also be viewed inside that card or opened as a standalone document. (Click image to enlarge it.)
If a board is too complex for your current purposes, a multicolumned page can be another excellent way to organize projects and tasks in Notion. Once again, click the "New page" command in the lower-left corner of the Notion website, and this time, select "Empty" from the list of options that comes up.
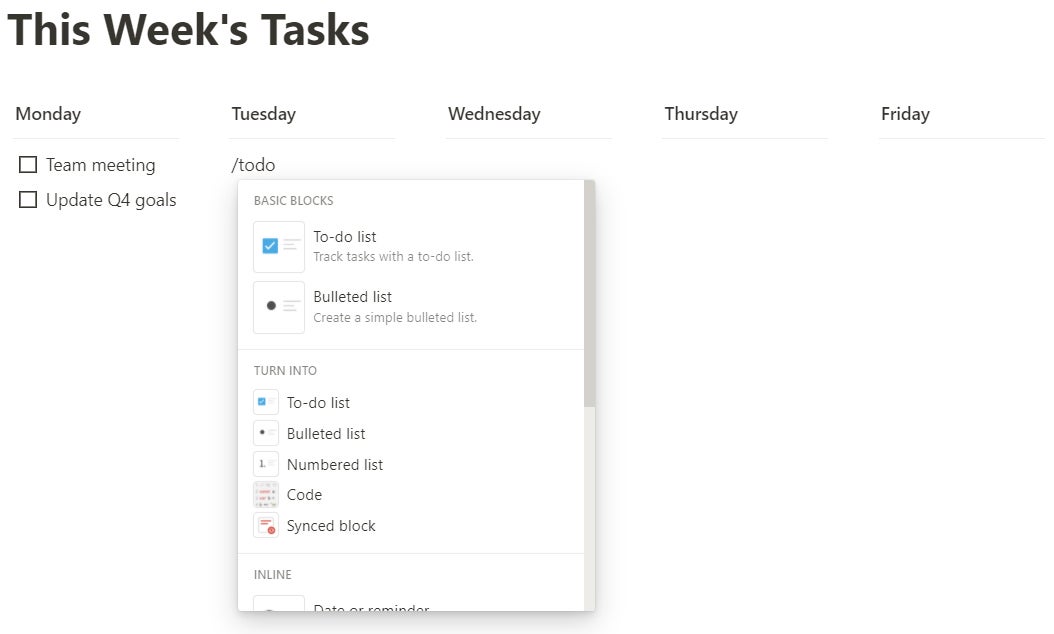
For this example, let's say we want to organize a list of project-related tasks that need to be completed this week. So we'll start by typing in the days of the week on subsequent lines on the page.
Next, we'll move those lines into columns. Notion makes this pleasingly easy to do: Simply hover your mouse over the line you want to move, then click on the six-dot icon that appears alongside it and drag the line all the way to the right side of the page until a vertical blue line appears between it and the original area. Keep repeating that same process, and before you know it, you'll be staring at a fancy little grid arranged exactly the way you want it.
Add in a teensy bit of basic formatting — using commands like /divider for a dividing line and /todo for a to-do list — and bam! You've got yourself a lovely little structure for mapping out each week's goals.
 JR Raphael/IDG
Notion's flexibility allows you to create any kind of canvas imaginable for whatever style of organization you need. (Click image to enlarge it.)
And from there, if you're working in a team context, all you've gotta do is type the @ symbol followed by a teammate's name (assuming you're either in a team-oriented Notion environment or on a page you've already shared with other people) to mention them alongside a task so they'll be sure to see it.
Creating subtasks within any list is as easy as hitting the Tab key for each indent you require. And remember, too: You can always link a task to any other Notion page for more elaborate info. Just highlight a word and click the "Link" button (or hit Ctrl-K or ⌘-K) and then start typing to search through the available options.
 JR Raphael/IDG
Everything in Notion is interconnected, with a powerful system for linking different pages and blocks of content together.
Finally, if you want to scale back to something even simpler, you can command Notion to create a single-column list of your daily doings that you can then fill in every evening. That's what I've been doing myself as of late, with separate Notion pages in which I map out my work-related tasks for every week and then more broadly for every month and quarter. Sometimes, the most frills-free, back-to-basics approach can be an incredibly effective way to keep track of what's important and then maintain your focus.
 JR Raphael/IDG
Even something as simple as a single-column daily planner is delightfully easy to organize within Notion.
These same setups can work just as well for almost any purpose imaginable, of course — whether it's tracking ideas, tracking goals, or even tracking all the different ways you could use Notion to track stuff (whoaaaa....).
And they're still only scratching the surface of our initial Notion ideas.
2. Create an on-demand link library
One of my favorite efficiency-enhancing Notion purposes is allowing the service to serve as a home for all the links you love to save. It's much better-suited for that job than most dedicated read-it-later-style services, if you ask me, thanks to some awfully attractive advantages.
To start, create another new Notion page, and set this one up as a board. Then create a series of columns to represent either the types of links you anticipate saving or maybe the purposes those links might serve.
Now go install the Notion Web Clipper extension into your desktop browser of choice and grab the Notion mobile app for your preferred smartphone platform. With those programs in place, all it'll take to save something from the web into Notion will be clicking on the extension's icon on the desktop front or sharing a page into the app on your phone. Select the page you just created as the destination, and that'll then remain the default sharing location from that point forward (at least, until you change it).
So what makes Notion so much more optimal than other services that were actually designed for article collecting? Well, a few things: First and foremost, it pulls any web page you save directly into the service in its entirety. If you were to save one of my Computerworld articles, for instance, it'd look like this:
 JR Raphael/IDG
A saved web page within Notion — not bad, right? (Click image to enlarge it.)
That means it's your own personal copy that you can then mark up and modify in any way you want — highlighting text, adding in notes, even cutting out parts that aren't relevant — and it means it'll always be there and available for reading both online and off, even if the original page ends up being changed or taken down for any reason.
Beyond that, it also means the material is always in a consistently pleasant and easy-to-read presentation, without any extraneous elements or the need to navigate through a site's clutter. It's basically like copying an article into your own personal notebook instead of just saving a glorified link to it.
The board-style setup opens up some interesting organizational options, too, and it eliminates all of the ads and discovery-oriented nonsense many traditional article-saving services insist on including alongside your saved materials. Plus, it only takes a quick drag of the mouse or a couple fast clicks to move a saved link into any other area of your Notion notes as reference — or to even assign it to a teammate for further consideration.
Factor in a fast and effective search function, and there's really not much more you could ask for from a link-saving system — whether it's for your own personal purposes or for organizing pages that are relevant to your company or current team project.
3. Assemble your own custom wiki guides
Last but not least, whether you're creating onboarding-style documents for incoming co-workers or putting together your own references for complicated workday procedures, having a finely organized set of wiki-style guides can do wonders for your efficiency. And Notion is a spectacular place to start assembling.
The key with this really resides in the dead-simple page-linking system we've been talking about: Just fire up a new blank Notion page and then start typing out a table of contents to all the subsections of info you can think of for your current reference purpose. You can create columns using the same trick we went over a minute ago, if you want, or keep things simple and in a single column with header text and dividers to make it visually appealing.
Then hover over the name of your page in the Notion sidebar and click the plus icon that appears alongside it. That'll create a new subpage within your main page. All you've gotta do is create a subpage for each part of your guide, then link to that page within your main table of contents, and wouldya look at that? You've got yourself a lovely and exceptionally user-friendly foundation for any sort of shared info.
 JR Raphael/IDG
Behold: your all-purpose custom wiki, neatly presented and ready for sharing. (Click image to enlarge it.)
Now all that's left is to write it — and that part, I'm afraid, falls squarely on your shoulders.


